Mounting a chain on a mountain bike can feel tricky, especially if you’re not used to working with bike parts. But understanding how a chain goes on a mountain bike is one of the most useful skills for any rider. A well-installed chain means smooth shifting, safe riding, and less chance of getting stranded on the trail. In this guide, you’ll learn how a chain is placed on a mountain bike, what tools and steps are needed, how to avoid common mistakes, and what to check for after installation. You’ll also find answers to the most common questions about bike chains.
Why The Chain Is So Important On A Mountain Bike
The chain is the link between your pedaling and the bike’s movement. When you push the pedals, the chain transfers that energy to the rear wheel. If your chain is too loose, too tight, or installed incorrectly, your bike won’t work well. On a mountain bike, a reliable chain is even more important because rough trails and steep hills put extra stress on your drivetrain.
A poorly installed or worn-out chain can cause:
- Skipping gears
- Chain drops
- Accelerated wear on gears and cogs
- Unexpected stops or even accidents
That’s why knowing how to put a chain on your mountain bike is a key part of basic bike maintenance.
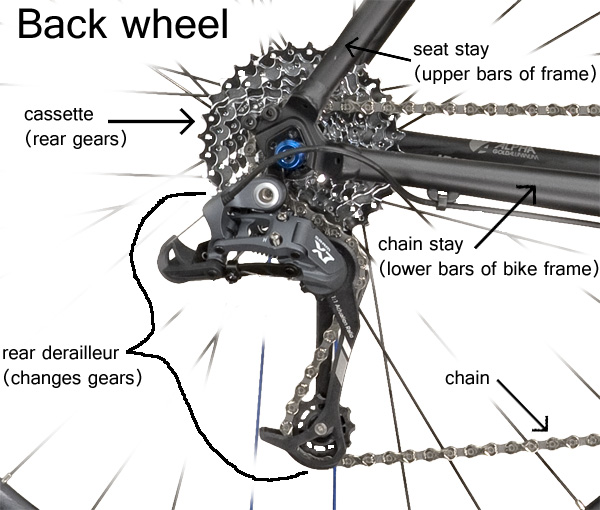
How A Mountain Bike Chain Works
A mountain bike chain is made of small metal links connected by pins. These links fit closely with the teeth of your bike’s front chainring(s) and rear cassette. As you pedal, the chain moves over these gears, allowing you to shift and adjust for hills or flat terrain.
Most modern mountain bikes use derailleur gears, which move the chain sideways between sprockets. The chain needs to be flexible, strong, and exactly the right length. Even small mistakes in installation can lead to poor shifting or chain drops.
Types Of Mountain Bike Chains And Compatibility
Before putting a chain on, it’s important to know the type your bike needs. Chains are not universal; they match the number of gears on your rear cassette.
Common Types Of Mountain Bike Chains
- 8-speed chains: For bikes with 8 cogs at the back
- 9-speed chains: For 9-cog setups
- 10-speed, 11-speed, 12-speed chains: For newer bikes with more gears
The higher the number, the narrower the chain. Always match the chain to your cassette and shifters.
Compatibility Table
Here’s a simple comparison:
| Number of Rear Gears | Chain Type | Width (Approx.) | Common Brands |
|---|---|---|---|
| 8-speed | 8-speed chain | 7.1 mm | Shimano, KMC |
| 9-speed | 9-speed chain | 6.7 mm | SRAM, KMC |
| 10-speed | 10-speed chain | 6.2 mm | Shimano, SRAM |
| 11-speed | 11-speed chain | 5.6 mm | KMC, SRAM, Shimano |
| 12-speed | 12-speed chain | 5.3 mm | SRAM, Shimano, KMC |
Important Insight: Using the wrong width chain can cause shifting problems or even damage your drivetrain. Always check your bike’s specs before buying a new chain.
Tools And Supplies You’ll Need
Before you begin, gather these basic tools:
- Chain tool (for breaking or shortening the chain)
- Quick link pliers (if your chain uses a master or quick link)
- Bike stand (optional, but makes the job easier)
- Gloves (to keep your hands clean)
- Degreaser and rag (for cleaning)
- New chain (correct speed and length)
Some chains use a master link (quick link) for easy joining; others use a special connecting pin.
Step-by-step: How To Put A Chain On A Mountain Bike
Let’s walk through the process, step by step. Take your time, and don’t rush—precision matters.
1. Shift To The Smallest Gears
Start by shifting your bike so the front derailleur is on the smallest chainring and the rear derailleur is on the smallest cog. This reduces chain tension and makes installation easier.
2. Remove The Old Chain (if Present)
If you’re replacing a chain, first remove the old one. Find the master link (if there is one), and use quick link pliers to disconnect it. If your chain does not have a master link, use the chain tool to push out one of the pins and separate the chain.
3. Clean The Drivetrain
Take a moment to clean the chainrings, cassette, and derailleur pulleys. Dirt or old lube can make new chains wear out faster.
4. Thread The Chain
Lay the new chain out flat to untwist it. Starting from the front chainring, feed the chain over the smallest ring. Next, run it through the front derailleur cage. Then, carefully thread it through the top jockey wheel (upper pulley) of the rear derailleur, down around the lower pulley, and finally toward the cassette.
Beginner Tip: Many people accidentally miss a derailleur tab or route the chain outside the pulley cage. Always check the path matches your old chain or look at a diagram in your bike’s manual.
5. Set The Chain Length
A chain that’s too short can damage your bike; too long, and shifting will be slow or sloppy. The most common way to find the right length:
- Place the chain on the largest front chainring and the largest rear cog (but not through the derailleur).
- Pull the chain tight so both ends meet.
- Add two full links (one inner and one outer plate) to allow for derailleur movement.
Use the chain tool to remove extra links.
6. Join The Chain
Now connect the two ends. If your chain has a master link, slot the ends together and use your hands or pliers to snap them into place. If it uses a connecting pin, insert the special pin and use the chain tool to push it through, then break off the excess.
7. Check The Connection
Rotate the pedals backward and watch the chain move through the gears. Make sure the master link or pin is properly seated and the chain runs smoothly.
Pro Tip: Sometimes, a new connecting pin or master link can feel stiff. Flex the chain sideways at the joint to loosen it up.
8. Test Shifting And Tension
Shift through all gears. Watch the chain as it moves up and down the cassette. Listen for any clicks, skips, or jumps. If everything feels smooth, your installation was a success.
Key Mistakes To Avoid When Installing A Chain
Even experienced riders sometimes make errors. Here are mistakes that cause the most trouble:
- Routing the chain incorrectly through the derailleur. Double-check each pulley and cage before joining the chain.
- Using the wrong length. Too short and your derailleur can break; too long and the chain can fall off.
- Forgetting to lubricate. A dry chain wears quickly and makes noise.
- Mixing brands or speeds. Not all chains and cassettes work well together—especially at 11- and 12-speed.
- Skipping the test ride. Always ride briefly and shift through all gears before heading out on a longer trip.
How To Know When To Replace A Chain
Chains don’t last forever. Riding with a worn chain can damage your cassette and chainrings, which are much more expensive to replace.
Signs Your Chain Needs Replacement
- Chain “stretch”: Over time, the links wear and the chain becomes longer.
- Skipping gears, especially under load.
- Visible rust or stiff links.
- Measuring tool: Use a chain checker. If it fits easily at 0.5% or 0.75% (for 11-12 speeds), it’s time for a new chain.
Chain Wear Table
Compare how often you should check your chain:
| Riding Style | Check Chain Every | Average Chain Life |
|---|---|---|
| Casual (dry conditions) | 300 miles | 1,500-2,000 miles |
| Mountain biking (mud/sand) | 150 miles | 700-1,200 miles |
| Commuting (mixed weather) | 200 miles | 1,000-1,500 miles |
Insight: Mountain biking in mud or grit wears chains much faster than road riding.
Lubrication And Chain Care After Installation
A new chain should be lubricated after installation. Dry or dirty chains can cause poor shifting and extra wear.
How To Lubricate Your Chain
- Use a bike-specific chain lube (not motor oil or WD-40).
- Apply a small drop to each link while slowly rotating the pedals backward.
- Wipe off excess lube with a rag—extra oil attracts dirt.
Tip: Re-lubricate after wet or muddy rides.
Single-speed And 1x Drivetrains: What’s Different?
Some mountain bikes use a single front chainring (1x system) or are true single-speed bikes.
- Single-speed bikes have no derailleurs. Chain length is set by moving the rear wheel.
- 1x drivetrains still use a derailleur but with only one front ring. The installation is nearly the same, but the chain is often slightly narrower and may have a special “narrow-wide” tooth profile for better retention.
Beginner Mistake: Forgetting to check for “narrow-wide” chainring compatibility. Using a standard chain on a narrow-wide ring can cause chain drops.
How Chains Differ By Brand
Major brands like Shimano, SRAM, and KMC each have their own features.
- Shimano: Often use special connecting pins.
- SRAM: Use PowerLock (master link) systems for quick joining.
- KMC: Universal, often work with both systems.
Some chains are directional—they work best if installed a certain way. Look for an arrow or label on the chain.
Credit: www.shoptrekbikes.com
What If The Chain Keeps Falling Off?
If your chain drops after installation, check these issues:
- Chain too long: Remove extra links.
- Worn chainring or cassette: Teeth look “shark fin” shaped.
- Derailleur adjustment: Check the limit screws and “B-tension”.
- Bent derailleur hanger: Even a small bend can cause problems.
If you’re not sure, have a bike mechanic check your setup.
Example: Real-world Chain Installation
Let’s look at a practical example.
Sarah rides a 10-speed mountain bike. She notices her chain skips gears and measures it—0. 75% worn. She buys a new 10-speed chain and uses a bike stand for easy access.
- She shifts to the smallest front and rear gears.
- Removes the old chain with a chain tool.
- Cleans all gears and the derailleur pulleys.
- Feeds the new chain through the drivetrain, matching the old routing.
- Measures length using the large-to-large method, adds two links, and cuts off the extra.
- Joins the ends with the included master link.
- Runs the chain through all gears, making sure it’s quiet and smooth.
- Applies chain lube and wipes off the excess.
After a short test ride, the bike shifts perfectly. Sarah is ready for the next trail.

Credit: www.wikihow.com
Advanced Tips: Troubleshooting And Upgrades
- If you ride in muddy conditions, check your chain more often.
- Upgrading to a higher-quality chain can improve shifting and last longer.
- For extreme riding (downhill or enduro), consider a chain guide for extra security.
- Always carry a small chain tool and a spare master link for trailside repairs.
Environmental Impact And Recycling
Old chains should not go in the trash. Many bike shops collect used chains for recycling. Metal can be melted down and reused, reducing waste.
Insight: Some organizations use old chains to make art or even jewelry, giving them a second life.

Credit: www.liv-cycling.com
Visual Chain Comparison
Here’s a quick comparison of chain types for common mountain bike setups:
| Bike Setup | Chain Type | Master Link | Common Use |
|---|---|---|---|
| 2×10 Drivetrain | 10-speed chain | Optional | Cross-country |
| 1×12 Drivetrain | 12-speed chain | Yes | Trail/Enduro |
| Single-Speed | Single-speed chain | Optional | Urban/Commuting |
Frequently Asked Questions
How Often Should I Replace My Mountain Bike Chain?
Most chains last between 1,000 and 2,000 miles. In muddy or sandy conditions, check more often—every 500 miles is smart. Use a chain checker tool and replace when it reaches 0.5% to 0.75% wear for best results.
Can I Use Any Chain On My Mountain Bike?
No. Chains must match your cassette’s speed (number of gears). For example, a 10-speed chain won’t work well on an 11-speed bike. Always check for brand compatibility and the correct width.
What If My Chain Is Making Noise After Installation?
Noisy chains may be dry (needs lube), too long, or not routed correctly. Check for stiff links, proper routing, and that you’ve used the right connecting method. If unsure, compare your setup to a guide or ask a bike mechanic.
Do I Need Special Tools To Install A Chain?
Yes, you’ll need a chain tool to break or shorten chains and possibly quick link pliers for master links. These are easy to use and small enough to carry on rides.
Where Can I Find Reliable Information About Bike Chains?
Trusted sources include your bike’s official manual, bike shop mechanics, and resources like Sheldon Brown’s chain guide for in-depth advice.
A mountain bike chain may seem like a small part, but it’s central to performance and safety. With the right tools, clear steps, and a bit of patience, you can install and care for your chain like a pro. Whether you’re on rocky trails or city paths, knowing how your chain goes on keeps your ride smooth and reliable.

Hello Guys! I am John Reese, a professional biker and my hobby is biking! I have been biking for last 12 years and I love using bikes while outing as well. Based on my experiences with the different type of bikes (mountain bikes, road bikes and hybrid bikes); I am sharing my opinion about various bikes so that a beginner can get started right away. Happy reading!