Riding a mountain bike should feel smooth and safe, especially when you need to stop quickly. But if your cable brakes are not adjusted correctly, you may feel unsafe, lose control, or damage your bike. Learning how to adjust cable brakes on a mountain bike is a skill every rider should know. It helps you ride confidently, avoid accidents, and save money by doing simple repairs yourself. Many beginners think brake adjustment is difficult or only for experts, but with some guidance, anyone can do it. This guide will walk you through every step, from the tools you need to common mistakes, so you can master brake adjustment and make your mountain bike safer.
Understanding Cable Brakes On Mountain Bikes
Cable brakes are the most common type on mountain bikes. They use a steel cable to pull the brake arms and create friction between the pads and the rim or rotor. There are two main types:
- V-brakes (linear pull): Found on many mountain bikes, especially older or entry-level models.
- Mechanical disc brakes: Use a cable to move a caliper, pressing brake pads against a metal disc.
Hydraulic disc brakes are different and not covered here. Cable brakes are popular because they are simple, affordable, and easy to maintain.
How Cable Brakes Work
When you squeeze the brake lever, the cable pulls the brake arms. This moves the pads against the rim (for V-brakes) or the rotor (for mechanical disc brakes), creating friction and stopping the bike. If the cable is loose or the pads are misaligned, braking will be weak or noisy.
Why Adjustment Matters
Proper brake adjustment ensures:
- Smooth stopping
- Shorter stopping distance
- Less wear on pads and rims
- Safer rides in all conditions
A well-adjusted brake can stop a bike in 2–3 meters at low speed, compared to 5–7 meters for poorly adjusted brakes. This difference can prevent accidents, especially on rough trails.
Tools And Parts You Need
Before adjusting your cable brakes, gather the right tools and parts. Having everything ready saves time and prevents frustration.
Essential Tools
- Allen wrenches (hex keys): Most mountain bike brakes use 4mm or 5mm sizes.
- Phillips or flat-head screwdriver: For fine-tuning the brake arms.
- Needle-nose pliers: Helpful for gripping cables.
- Cable cutters: For trimming excess cable.
- Lubricant: Use a bike-specific lubricant for cables.
- Clean rag: To wipe parts and keep things tidy.
Replacement Parts (if Needed)
- Brake pads: Should be replaced if worn below 3mm.
- Brake cable: Replace if frayed or rusty.
- Cable housing: Replace if cracked or stiff.
Having spares is smart, especially if you ride often or in muddy conditions.
Credit: www.montaguebikes.com
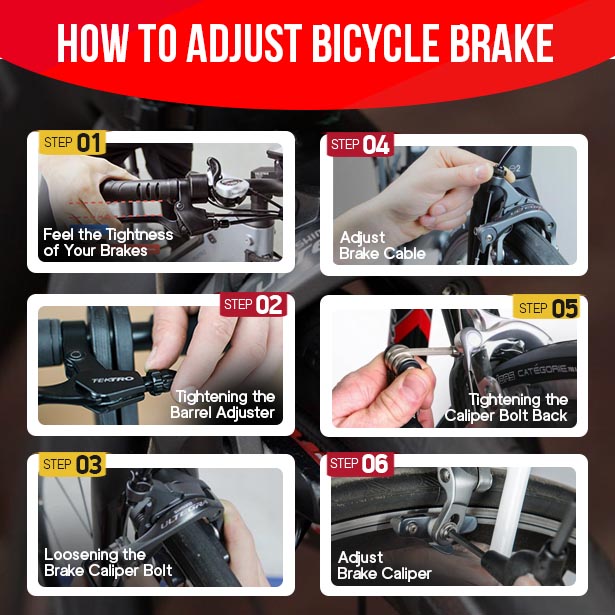
Step-by-step Guide: Adjusting V-brakes
V-brakes are simple, reliable, and easy to adjust. Follow these steps to get your brakes working perfectly.
1. Inspect Brake Pads
Check the brake pads first. They should have at least 3mm of material left. Look for uneven wear, cracks, or contamination (oil, dirt).
- If pads are worn or damaged, replace them before adjusting.
2. Check Cable Condition
Inspect the brake cable. It should move smoothly and have no rust or fraying. If the cable is sticky or damaged, replace it.
- Lubricate the cable with bike-specific oil to keep it moving freely.
3. Align Brake Pads
Pads should contact the rim evenly. Misaligned pads can reduce stopping power and wear out quickly.
- Loosen the pad fixing bolt (usually 5mm Allen).
- Position the pad so it touches the rim flatly, not the tire or below the rim.
- Tighten the bolt. Check both sides.
A common mistake is aligning pads too low, causing them to hit the tire and damage it.
4. Adjust Cable Tension
This is the main step for adjusting V-brakes.
- Squeeze the brake arms together so pads touch the rim.
- Loosen the cable anchor bolt (usually 5mm Allen).
- Pull the cable tight, then re-tighten the bolt.
- Release the brake arms. The pads should sit 2–4mm from the rim.
If pads are too far from the rim, braking will be weak. Too close, and the wheel may rub.
5. Fine-tune With Barrel Adjuster
Most brake levers have a barrel adjuster. This lets you tweak cable tension without tools.
- Turn the barrel adjuster outward to tighten the cable (pads move closer to rim).
- Turn inward to loosen the cable (pads move away).
This is useful for small adjustments as pads wear down.
6. Center The Brake Arms
Both arms should move evenly. If one arm moves more, the pads may drag or feel weak.
- Find the small screws on each brake arm near the frame.
- Use a screwdriver to turn the screw clockwise to tighten the spring (moves pad away from rim).
- Turn counterclockwise to loosen (pad moves closer).
Alternate adjustments until both arms move evenly.
7. Test Braking
Spin the wheel and squeeze the lever. The wheel should stop quickly and smoothly. Pads should not rub when released.
- If braking feels weak, repeat steps 4–6.
8. Trim Excess Cable
Use cable cutters to trim extra cable, leaving about 2–3cm. Install a cable end cap to prevent fraying.
Example: Adjusting V-brakes
Let’s say your right pad is rubbing the rim, and the lever feels loose. You would:
- Loosen the pad bolt and realign.
- Adjust the cable anchor for tighter tension.
- Fine-tune with the barrel adjuster.
- Center the arms using the screws.
This sequence solves most common V-brake problems.
Step-by-step Guide: Adjusting Mechanical Disc Brakes
Mechanical disc brakes use a cable to move pads against a metal rotor. Adjustment is a bit different than V-brakes.
1. Check Pad Condition
Inspect the disc brake pads. Replace if worn below 1mm or contaminated with oil.
2. Inspect Rotor
Look for warping or deep grooves. Rotors should be clean and straight.
3. Adjust Cable Tension
- Loosen the cable anchor bolt on the caliper.
- Pull the cable so the pads sit close (about 1mm) to the rotor, but do not rub.
- Tighten the anchor bolt.
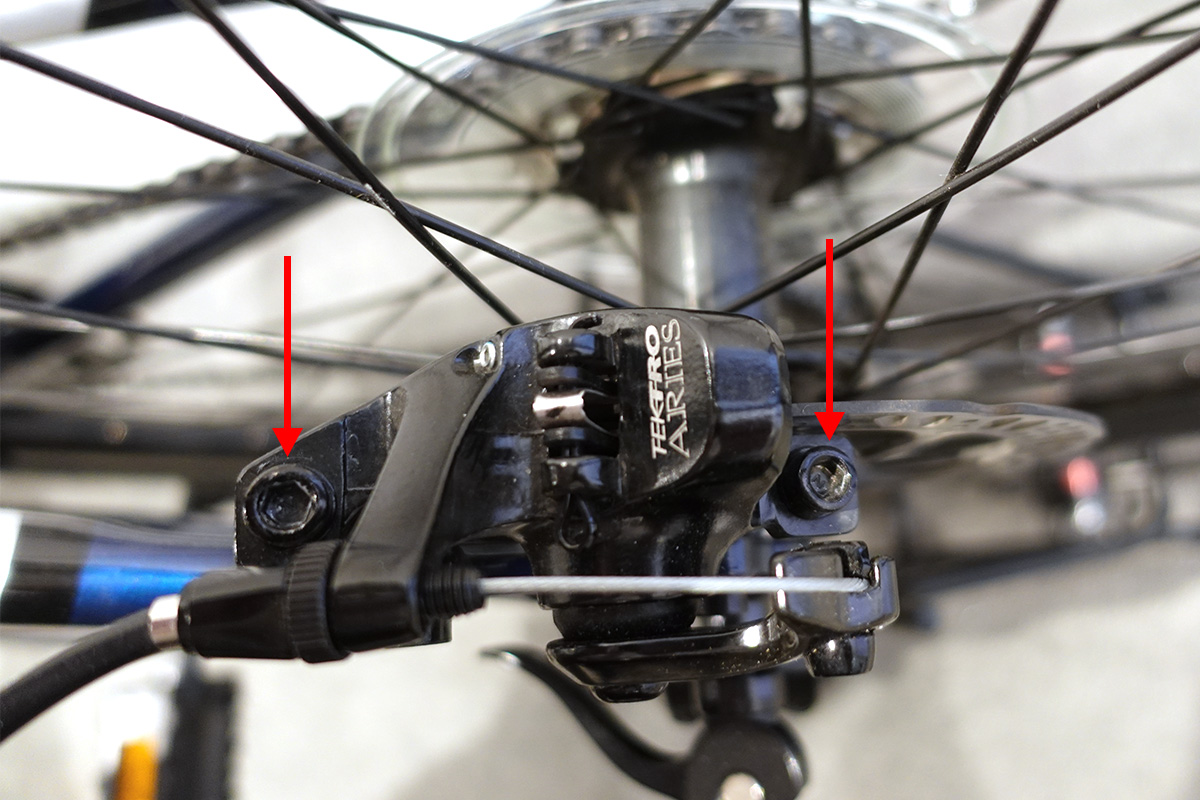
4. Align Caliper
The caliper must be centered on the rotor.
- Loosen the mounting bolts (usually 5mm Allen).
- Squeeze the brake lever and hold.
- Tighten the bolts while holding the lever. This centers the caliper.
5. Fine-tune With Barrel Adjuster
As with V-brakes, use the barrel adjuster on the lever or caliper to tweak cable tension.
6. Adjust Pad Clearance
Some calipers have a pad adjustment knob or screw.
- Turn to move the inner pad closer or farther from the rotor.
7. Test Braking
Spin the wheel, squeeze the lever. Pads should grip the rotor without rubbing.
Example: Adjusting Mechanical Disc Brakes
Your lever is soft and the bike takes too long to stop. You would:
- Tighten the cable anchor.
- Center the caliper.
- Use the barrel adjuster for small tweaks.
This improves stopping power and prevents rotor rubbing.
Common Problems And Solutions
Adjusting cable brakes is simple, but some problems are confusing for beginners. Here are frequent issues and how to fix them.
Brake Lever Feels Loose
- Cable tension is too low. Tighten at the anchor or barrel adjuster.
Pads Rub The Rim Or Rotor
- Pads are too close. Loosen the cable or adjust the arm springs/caliper position.
Uneven Pad Movement
- Springs need balancing. Adjust the arm screws for V-brakes or caliper bolts for discs.
Brake Squeal
- Pads are dirty or misaligned. Clean pads and rims/rotors, realign pads.
Weak Braking
- Pads are worn, cable is loose, or contaminated. Replace pads, tighten cable, clean components.
Cable Fraying
- Cut and cap the cable end. Replace cable if badly frayed.
Example Data: Brake Adjustment Frequency
How often should you adjust cable brakes? It depends on riding style and conditions.
| Riding Style | Adjustment Interval | Pad Replacement |
|---|---|---|
| Casual (paved trails) | Every 2 months | Every 12 months |
| Mountain (mud/dirt) | Monthly | Every 6–8 months |
| Intense (downhill) | Every 2–4 weeks | Every 3–4 months |
Many riders forget to adjust brakes regularly. Doing it on schedule prevents bigger problems.
Tips For Effective Brake Adjustment
Not all advice is obvious. Here are two insights many beginners miss:
- Lubricate the cable after every adjustment. Dry cables can cause slow, sticky braking.
- Watch for pad contamination. Pads can pick up oil or dirt from the trail, making brakes noisy and weak. Clean pads and rims/rotors with rubbing alcohol after muddy rides.
Other practical tips:
- Always check both brakes, not just the front or rear.
- Replace cables and housing every 1–2 years for smooth operation.
- Use quality pads; cheap pads wear fast and reduce stopping power.
Credit: asergaliciaformacion.com
Safety Checks After Adjustment
After adjusting, always test your brakes before riding.
- Squeeze levers hard while stationary. The bike should not move.
- Ride slowly in a safe area and test stopping power.
- Check for pad rubbing or strange noises.
If brakes fail these tests, repeat the adjustment steps.
Comparison: V-brakes Vs Mechanical Disc Brakes
Choosing between V-brakes and mechanical disc brakes depends on your riding needs. Here’s a quick comparison:
| Type | Stopping Power | Weather Performance | Maintenance |
|---|---|---|---|
| V-Brakes | Good (dry) | Poor (wet/muddy) | Easy, low cost |
| Mechanical Disc | Very good | Consistent (all weather) | Medium, more parts |
Disc brakes are better for wet or muddy trails. V-brakes are simpler to adjust and cheaper to maintain.
When To Seek Professional Help
Most brake adjustments can be done at home. But sometimes, you need a bike shop.
- If the cable is badly frayed or the housing is damaged, professional replacement is safer.
- If the caliper is bent or pads wear unevenly, a shop can diagnose hidden problems.
- After a crash, always check brakes or have them inspected.
A professional tune-up costs about $20–$40 and can prevent accidents.

Credit: www.youtube.com
Upgrading Your Mountain Bike Brakes
If you ride often or in tough conditions, consider upgrading.
- Mechanical disc brakes offer better performance than V-brakes, especially in wet weather.
- Hydraulic disc brakes are even stronger, but require more complex maintenance.
Upgrading is a smart investment for safety and confidence. For more details, check this guide from BikeRadar.
Frequently Asked Questions
How Do I Know If My Brake Pads Need Replacement?
Check the pad thickness. For V-brakes, replace if below 3mm; for disc brakes, replace at 1mm. Look for cracks, uneven wear, or contamination. Old pads can cause weak braking and noise.
Can I Adjust Cable Brakes Without Special Tools?
Yes, you only need basic tools like Allen wrenches and a screwdriver. But cable cutters and pliers make the job easier. Avoid using household pliers on cables, as they can cause fraying.
Why Do My Brakes Squeal After Adjustment?
Squealing is usually caused by dirty or misaligned pads. Clean pads and rims or rotors with rubbing alcohol. Realign pads so they touch the rim or rotor flatly. If squealing continues, replace pads.
How Often Should I Adjust Cable Brakes?
Adjust brakes every 2 months for casual riding, monthly for mountain trails, and every 2–4 weeks for intense riding. Always check brakes before long rides or after wet, muddy conditions.
Are Disc Brakes Better Than V-brakes For Mountain Biking?
Disc brakes offer stronger, more reliable stopping in all weather, but V-brakes are easier to adjust and maintain. Choose disc brakes if you ride in wet or muddy conditions often.
Adjusting cable brakes on your mountain bike is not just about maintenance; it’s about riding safely and confidently. With these steps, tips, and checks, you can solve most brake problems yourself and enjoy better control on the trail. Remember, regular brake adjustment is key to preventing accidents and keeping your bike in top shape.
If you run into problems you can’t fix, don’t hesitate to get help from a bike shop. By mastering brake adjustment, you become a more skilled, independent rider—ready for any adventure.

Hello Guys! I am John Reese, a professional biker and my hobby is biking! I have been biking for last 12 years and I love using bikes while outing as well. Based on my experiences with the different type of bikes (mountain bikes, road bikes and hybrid bikes); I am sharing my opinion about various bikes so that a beginner can get started right away. Happy reading!