Adjusting sag on a mountain bike is one of the most important steps to make your ride comfortable and controlled. Whether you are a beginner or a long-time rider, learning how to set sag correctly can change how your bike feels, climbs, and handles rough trails.
Sag adjustment is not just for professionals—it’s for anyone who wants a smoother and safer ride.
Many people think they only need to set sag once, but conditions change. Your weight, gear, and trail type all affect how much sag you need. If you ride with a backpack or water, your suspension needs to adapt. If you switch between fast, rocky trails and smooth paths, sag helps your bike perform well.
In this article, you’ll learn exactly what sag is, why it matters, how to measure it, and step-by-step guidance to set it right. Along the way, you’ll find tips, common mistakes, and practical advice that most beginners miss.
What Is Sag In Mountain Biking?
Sag is the amount your bike’s suspension compresses when you sit on it. In simple words, sag lets your suspension start from a partially compressed position, so it can move both up and down when you ride over bumps or drops.
Most mountain bikes have two main suspension parts: the front fork and the rear shock. Both need sag to work properly. If there is too little sag, the bike feels stiff and bounces off obstacles. If there is too much sag, it can bottom out easily and lose efficiency.
Sag is measured as a percentage of the total suspension travel:
- For most bikes, front fork sag is set between 15-25%
- Rear shock sag is usually 25-30%
For example, if your bike’s rear shock has 100mm of travel and you want 25% sag, you should aim for 25mm of sag when you sit on the bike.
Why Sag Matters
Sag is not just a technical term. It is the starting point for your suspension to absorb impacts, keep your wheels on the ground, and give you control. Without proper sag, your bike can feel harsh or too soft, and you may lose grip or handling on tricky trails.
Correct sag:
- Helps you stay balanced
- Improves traction
- Reduces fatigue
- Makes your ride safer
Many beginners overlook sag, thinking it’s complicated. But setting sag is straightforward once you know the steps.
How Suspension Works
Understanding your bike’s suspension makes adjusting sag easier. Mountain bikes usually have:
- Air suspension (most modern bikes): You adjust sag by changing air pressure with a pump.
- Coil suspension: You adjust sag by tightening or loosening a spring preload collar.
Both systems aim to keep your wheels in contact with the ground while absorbing bumps.
Suspension Travel
Suspension travel is the maximum distance your fork or shock can compress. Travel numbers are printed on your fork or shock, or found in your bike’s manual. Typical values:
- Cross-country bikes: 80–120mm front fork
- Trail bikes: 120–150mm front fork
- Enduro/Downhill bikes: 150–200mm front fork
The amount of sag you set depends on this travel.
| Bike Type | Front Travel (mm) | Recommended Sag (%) | Rear Travel (mm) | Recommended Sag (%) |
|---|---|---|---|---|
| Cross-country | 80–120 | 15–20% | 80–100 | 20–25% |
| Trail | 120–150 | 20–25% | 120–140 | 25–30% |
| Enduro/Downhill | 150–200 | 25% | 150–200 | 30% |
Tools Needed To Adjust Sag
Before adjusting sag, gather the right tools:
- Shock pump (for air suspension)
- Tape measure or ruler (millimeters)
- O-ring or zip tie (to mark the stanchion)
- Bike stand or wall (optional, for stability)
- Helper (optional, helps with measuring)
If you don’t have a shock pump, most bike shops sell them. Do not use a regular tire pump—it does not fit or measure pressure accurately.
Step-by-step Guide To Adjust Sag
Setting sag is easy if you follow these clear steps. Here’s how to do it for both the front fork and rear shock.
Step 1: Prepare Your Bike
- Put on your riding gear (helmet, shoes, backpack, etc.). Sag depends on your full riding weight.
- Place your bike on a flat surface. Lean it against a wall or use a bike stand.
- Make sure tires are inflated to normal riding pressure.
Step 2: Reset Suspension
- For air suspension, make sure any lockout lever is open.
- For coil suspension, loosen the spring preload if needed.
- Move the O-ring or zip tie to the base of the fork and shock stanchion (next to the seal).
Step 3: Sit On Your Bike
- Carefully get on the bike, sitting in your normal riding position.
- Keep your feet on the pedals and hands on the handlebars.
- If possible, have a friend help steady the bike while you sit naturally.
Step 4: Compress Suspension
- Bounce gently to settle the suspension.
- Stay still for a few seconds to let the suspension compress under your weight.
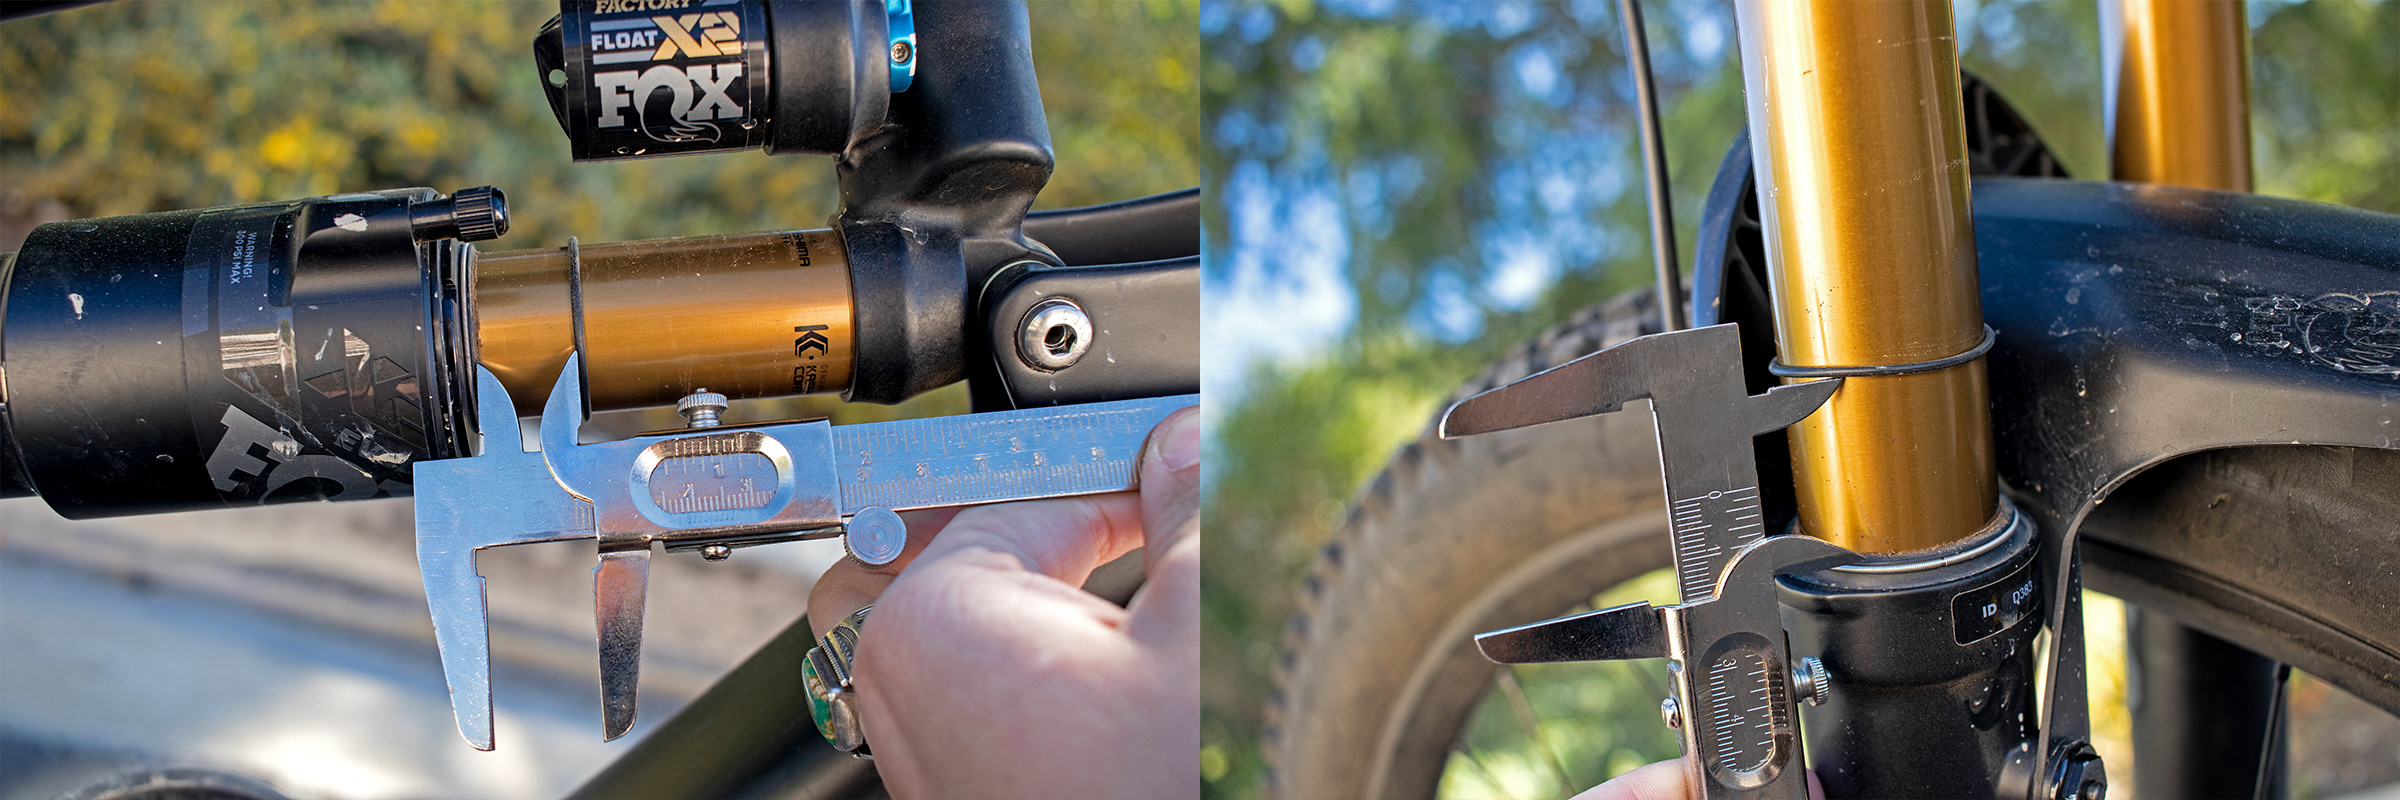
Step 5: Measure Sag
- Carefully get off the bike.
- Look at the O-ring or zip tie position. Measure the distance from the base to the O-ring.
- This is your actual sag in millimeters.
Step 6: Calculate Sag Percentage
- Find the total suspension travel for your fork or shock.
- Use this formula:
Sag % = (measured Sag / Total Travel) X 100
For example, if you measured 20mm sag and your fork has 100mm travel:
Sag % = (20 / 100) X 100 = 20%
Step 7: Adjust Sag
- If sag is too low (less than recommended), reduce air pressure (for air suspension) or loosen the coil spring collar.
- If sag is too high (more than recommended), add air pressure (for air suspension) or tighten the coil spring collar.
- Repeat Steps 3–6 until sag is within recommended range.
Step 8: Double-check Both Fork And Shock
- Set sag for the front fork first, then the rear shock.
- Both should be adjusted for your weight and gear.
Many beginners forget to measure both—the bike feels unbalanced if only one is set.
Common Mistakes When Adjusting Sag
Setting sag is simple, but a few mistakes can ruin your setup.
- Ignoring riding gear weight: Always wear your normal gear. Extra weight changes sag.
- Not resetting O-ring: If you forget to move the O-ring each time, measurements will be wrong.
- Measuring sag with lockout engaged: Lockout stops suspension movement—make sure it’s open.
- Not checking tire pressure: Soft tires can affect sag. Set tire pressure before adjusting suspension.
- Rushing adjustments: Sag can change with small pressure changes. Go slowly, especially with air suspension.
- Forgetting to re-check after a few rides: Suspension settles over time. Re-check sag after your first few rides.
How Sag Affects Riding Performance
Sag is not just a setup step—it changes how your bike behaves on trails.
- Too little sag: The bike feels stiff, and wheels can lose contact with the ground. You may bounce off rocks and roots.
- Too much sag: The suspension bottoms out easily, reducing control and efficiency. Climbing becomes harder.
Correct sag helps:
- Cornering: More grip and control in turns.
- Climbing: Efficient power transfer and comfort.
- Descending: Smooth absorption of bumps and drops.
Many riders notice their bike feels “planted” after setting sag correctly. It becomes easier to predict how the bike will respond.
Credit: www.fondation-enovos.lu
Advanced Tips For Sag Adjustment
1. Fine-tune For Terrain
If you ride mostly smooth trails, you might want less sag for efficiency. For rocky or downhill trails, add more sag for comfort.
2. Adjust For Extra Weight
If you carry a heavy backpack or water, set sag with everything you plan to carry. Even small changes in weight affect suspension.
3. Record Your Settings
Keep a log of your air pressures, sag values, and how the bike feels. Over time, you’ll see patterns and can adjust quickly.
4. Use Manufacturer Recommendations
Many bike brands provide recommended sag percentages and air pressures. These are good starting points, but your preference may differ.
5. Check Sag Regularly
Suspension can lose air or coil tension over time. Check sag every few weeks, or after big rides.
| Suspension Type | Adjustment Method | Typical Sag Range | Maintenance Frequency |
|---|---|---|---|
| Air Fork | Shock pump | 15–25% | Monthly |
| Air Shock | Shock pump | 25–30% | Monthly |
| Coil Fork | Preload collar | 15–25% | Seasonally |
| Coil Shock | Preload collar | 25–30% | Seasonally |
Comparing Air Vs. Coil Suspension
Both air and coil suspensions need sag, but the way you adjust them is different.
| Feature | Air Suspension | Coil Suspension |
|---|---|---|
| Adjustment | Shock pump (air pressure) | Preload collar (spring tension) |
| Weight | Lighter | Heavier |
| Fine-tuning | Easy and precise | Less precise |
| Maintenance | Needs regular air check | Check spring tension |
| Feel | Progressive | Linear |
Air suspension is more common on modern bikes. It’s easy to adjust and lighter. Coil suspension is popular for downhill bikes—some riders prefer its feel, but it’s harder to fine-tune.

Credit: www.youtube.com
Practical Examples
Let’s see sag adjustment in real-world scenarios:
Example 1: Trail Rider
Sarah rides a trail bike with 140mm fork travel and 130mm rear shock travel. She weighs 70kg (154 lbs) and carries a 2kg backpack.
- She sets fork sag to 28mm (20% of 140mm).
- She sets rear shock sag to 34mm (26% of 130mm).
- After riding, she feels the bike is too soft. She adds 10 psi to the fork and 15 psi to the shock and re-measures sag.
- Now, fork sag is 22mm, rear shock sag is 30mm. The bike feels balanced.
Example 2: Downhill Rider
Mark has a downhill bike with 200mm fork and rear travel. He weighs 85kg (187 lbs) with full gear.
- He sets sag to 50mm (25% of 200mm) for both fork and shock.
- He uses a coil shock, so he tightens the preload collar to reach 50mm sag.
- After a few rides, he checks sag again. The coil has settled, so he re-adjusts.
Example 3: Cross-country Rider
Linda rides a cross-country bike with 100mm fork and 90mm rear shock travel. She weighs 60kg (132 lbs).
- She sets fork sag to 15mm (15% of 100mm).
- She sets rear shock sag to 22mm (24% of 90mm).
- She notes the air pressures for future reference and checks sag monthly.
How Often Should You Adjust Sag?
Sag should be checked:
- After buying a new bike
- When changing gear or weight
- After suspension service
- Every 1–2 months
Many riders set sag once and forget. But regular checks keep your bike feeling fresh and responsive.

Credit: www.youtube.com
What If You Can’t Achieve Recommended Sag?
Sometimes, the spring or shock may not allow the right sag. For example, if you are heavier or lighter than average, or if your suspension is worn.
Possible solutions:
- Change spring rate (for coil suspension)
- Add/remove volume spacers (for air suspension)
- Upgrade shock or fork
It’s always best to follow manufacturer advice. If unsure, visit a trusted bike shop.
Real-world Data And Trends
Studies show that proper sag adjustment can improve control and reduce crash risk. For example, a report from Pinkbike found that riders with correct sag had 15% fewer falls on technical trails. Surveys from mountain bike forums reveal that 70% of riders notice improved comfort after adjusting sag.
Many pros adjust sag before every race. For regular riders, monthly checks are enough.
Extra Tips Most Beginners Miss
- Always check sag with your normal riding shoes and backpack.
- Write down your air pressures and sag measurements—it saves time next ride.
- Don’t forget to check sag after suspension service—settings often change.
- If your suspension feels harsh or bottoms out, check sag first before changing other settings.
- Practice riding after each adjustment—feel how changes affect control.
Frequently Asked Questions
How Do I Know If My Sag Is Set Correctly?
If your bike feels balanced, absorbs bumps well, and doesn’t bottom out easily, your sag is likely correct. Measure sag using the steps above and compare to recommended values. If unsure, ask a bike shop to check.
Can Sag Be Adjusted Without A Shock Pump?
For air suspension, a shock pump is needed. For coil suspension, you can adjust sag by turning the preload collar. But air suspension cannot be set without the proper pump—never use a tire pump.
What Happens If I Ignore Sag Adjustment?
Ignoring sag can cause poor handling, reduced comfort, and increased crash risk. Your bike may feel stiff or too soft. Setting sag makes riding safer and more enjoyable.
Is Sag Adjustment Different For Each Bike?
Yes, sag depends on your bike’s suspension type, travel, and your weight. Always check your bike’s manual or manufacturer’s recommendations for the best settings.
Where Can I Find More Detailed Suspension Setup Guides?
A good resource is Pinkbike Suspension Setup Basics. It covers advanced tuning and troubleshooting.
Final Thoughts
Sag adjustment is a simple but powerful way to improve your mountain bike’s comfort, control, and safety. With the right tools and clear steps, anyone can set sag at home. Remember to wear your normal gear, measure carefully, and re-check regularly.
Fine-tuning your sag for your riding style and weight makes a big difference, whether you’re racing or enjoying weekend trails.
Most riders notice a dramatic improvement after adjusting sag—even if they thought their bike felt fine before. Don’t skip this step. With practice, sag adjustment becomes quick and routine, giving you more confidence on every trail.

Hello Guys! I am John Reese, a professional biker and my hobby is biking! I have been biking for last 12 years and I love using bikes while outing as well. Based on my experiences with the different type of bikes (mountain bikes, road bikes and hybrid bikes); I am sharing my opinion about various bikes so that a beginner can get started right away. Happy reading!