Mountain biking is a thrilling adventure, but it’s also tough on your bike—especially the gears. Mud, dust, and grit can quickly build up, making shifting harder and causing wear. If you want smoother rides and longer-lasting parts, you need to know how to clean gears on a mountain bike.
Many riders overlook this skill, but it’s one of the most effective ways to keep your bike performing well.
Clean gears can change your riding experience. You’ll enjoy easier shifting, less noise, and fewer breakdowns on the trail. This article will show you everything you need to know, from basic tools to advanced cleaning tips. Whether you’re new to mountain biking or have years of experience, you’ll find practical advice and clear steps to follow.
Cleaning gears isn’t just about looks—it’s about safety, efficiency, and saving money.
Why Clean Your Mountain Bike Gears?
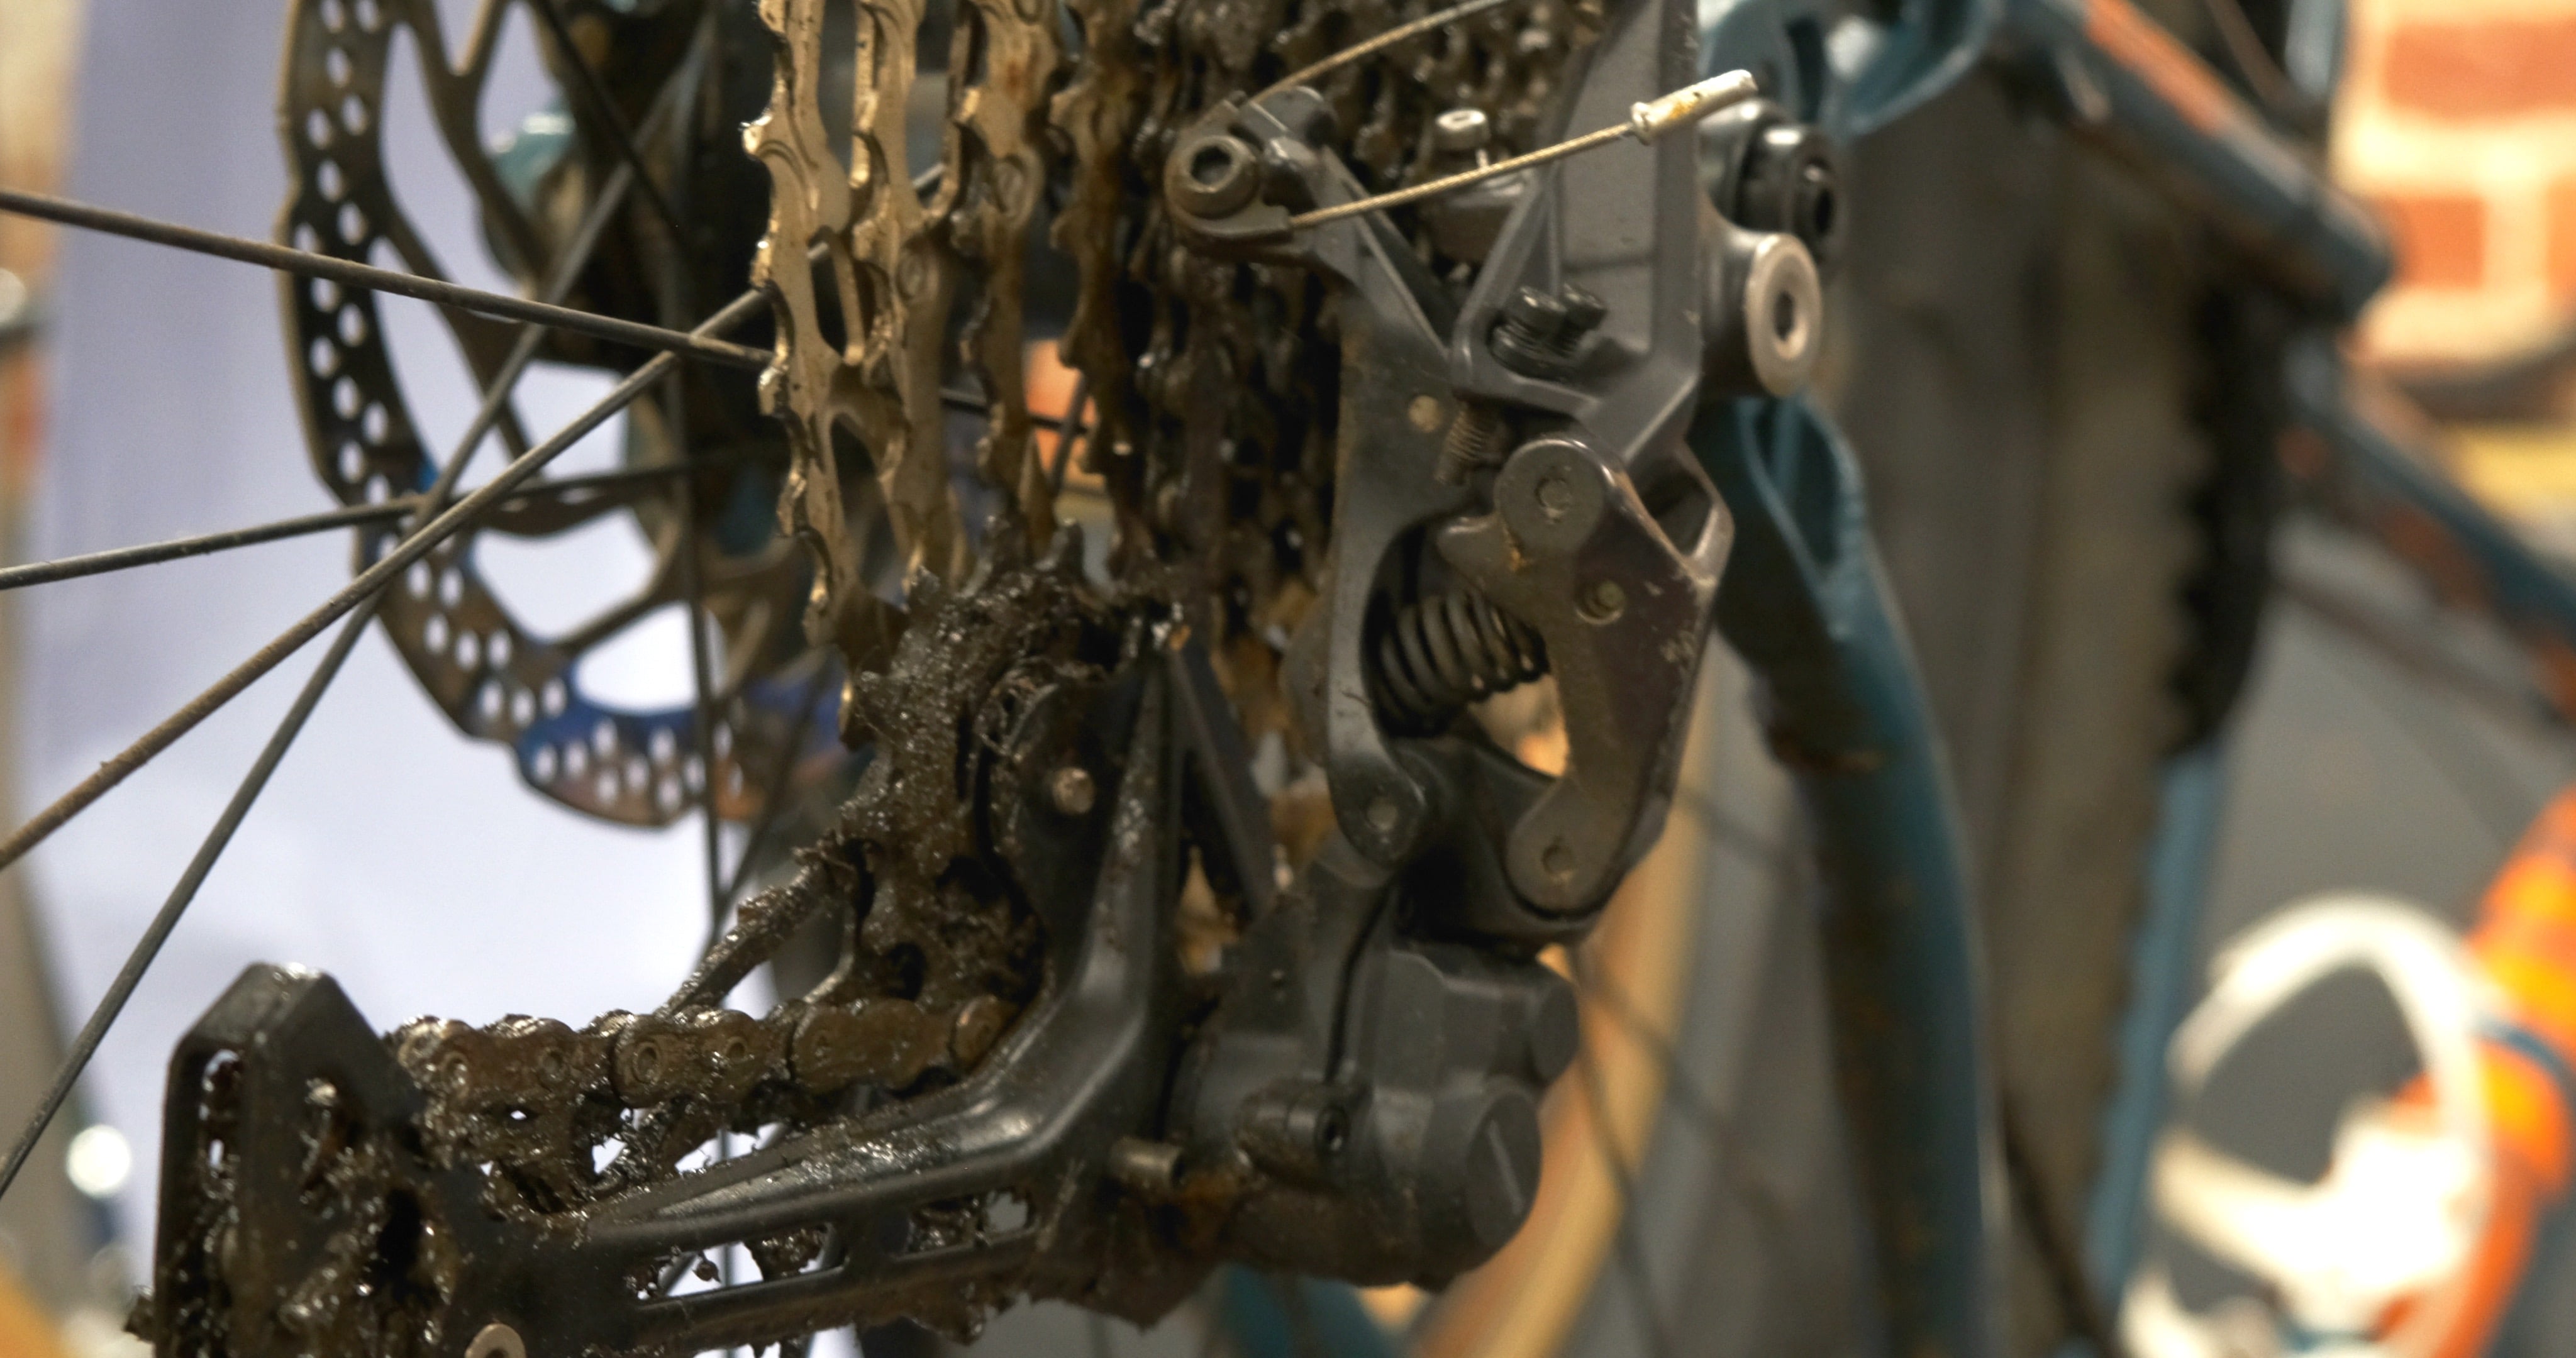
Mountain bike gears face more dirt than road bikes. Trails often bring mud, sand, leaves, and small stones. These materials stick to the cassette, chainrings, and derailleurs, causing friction and making your bike work harder.
Dirty gears can lead to:
- Harder shifting between speeds
- Chain skipping or slipping
- Faster wear and tear on parts
- Unpleasant noises while riding
A study by the International Mountain Bicycling Association found that regular cleaning can extend gear lifespan by up to 30%. This means fewer replacements and less money spent over time. Clean gears also improve your safety—if your chain skips during a climb, you could lose balance or control.
Essential Tools And Supplies
Before you start, gather the right tools. You don’t need expensive gear, but using proper tools makes cleaning easier and protects your bike.
Here’s what you’ll need:
- Degreaser: For breaking down oil, grease, and sticky dirt.
- Chain cleaning tool: A device with rotating brushes to clean chains deeply.
- Brushes: Different sizes for getting into tight spots. Toothbrushes work well for small gears.
- Rags: Old cotton t-shirts or microfiber cloths are best.
- Bucket of warm water: Mix with mild soap for general cleaning.
- Gloves: Protect your hands from grease and chemicals.
- Chain lubricant: For re-oiling after cleaning.
- Screwdriver or pick: For removing built-up grime from gear teeth.
- Bike stand (optional): Keeps the bike stable and lets you turn pedals easily.
Many bike shops sell cleaning kits. However, you can assemble your own tools for less money. Avoid harsh chemicals—they can damage bike paint and seals.

Credit: www.youtube.com
Pre-cleaning Preparation
Start by setting up your workspace. Choose a spot outside or in a garage. Lay out your tools and keep water and degreaser within reach. Place your bike on a stand or flip it upside down if you don’t have one.
Check your bike for visible damage before cleaning. Look for bent teeth, worn chains, or broken parts. If you see major damage, fix it first. Cleaning won’t help if your gears are already broken.
Remove the wheels for easier access to the gears. This isn’t always necessary, but it makes cleaning faster and more thorough. If you’re unsure how to remove wheels, check your bike manual or ask a local mechanic.
Step-by-step Gear Cleaning Process
Cleaning gears is simple once you know the steps. Follow this process for best results.
1. Clean The Chain
The chain is the most-used and dirtiest part of your bike’s gear system.
- Shift your chain onto the smallest chainring and sprocket. This makes it easier to reach.
- Apply degreaser along the chain while turning the pedals backward. Make sure the degreaser covers the entire chain.
- Use a chain cleaning tool or a stiff brush. Clamp the tool onto the chain, fill it with degreaser, and spin the pedals. If using a brush, scrub all sides of the chain.
- Wipe off excess degreaser with a rag.
- Rinse the chain with warm water to remove any remaining cleaner.
- Dry the chain thoroughly before applying lubricant.
2. Scrub The Cassette
The cassette is the group of gears at the back wheel.
- Remove the rear wheel for easier access.
- Spray degreaser onto the cassette. Let it sit for a few minutes.
- Use a narrow brush to clean between each sprocket. Turn the cassette as you go.
- For stubborn grime, use a screwdriver or pick to scrape dirt from the edges.
- Rinse with water and dry with a rag.
3. Clean The Chainrings
Chainrings are the large gears at the crank (pedal area).
- Apply degreaser around the chainrings.
- Scrub each tooth with a brush. Pay attention to the gaps between teeth.
- Wipe off excess degreaser with a cloth.
- Rinse with water and dry.
4. Clean The Derailleurs
The front and rear derailleurs move your chain across the gears.
- Spray degreaser onto both derailleurs.
- Use a small brush to scrub the jockey wheels and cages.
- Wipe with a rag, removing all visible dirt.
- Check for stuck debris—remove with a pick if needed.
- Rinse and dry both derailleurs.
5. Lubricate And Reassemble
Never skip lubrication after cleaning. Dry gears can rust and wear quickly.
- Apply chain lubricant to each link. Turn the pedals to spread it evenly.
- Wipe off excess oil—too much attracts dirt.
- Reinstall the wheels if removed.
- Shift through all gears to check that everything works smoothly.
Comparing Gear Cleaning Methods
Different riders use different methods for cleaning gears. Let’s compare the most common approaches:
| Method | Effectiveness | Time Required | Cost |
|---|---|---|---|
| Manual brushing | High (deep clean) | 20–30 min | Low ($5–$10) |
| Chain cleaning tool | Very high (thorough) | 15–20 min | Moderate ($20–$30) |
| Spray degreaser only | Medium (surface) | 5–10 min | Low ($5) |
| Professional bike wash | Excellent (complete) | 30–40 min | High ($40–$60) |
Manual brushing is best for home use. Chain cleaning tools save time and reach hidden dirt. Spray-only cleaning is quick but less thorough. Professional bike washes are ideal if you want a perfect result or don’t have time.
Cleaning Frequency: How Often Should You Clean?
How often you clean your gears depends on where and how you ride.
- Heavy mud and rain: Clean after every ride.
- Dry, dusty trails: Clean every 2–3 rides.
- Casual use: Clean every 1–2 weeks.
If you ride daily or in harsh conditions, clean more often. A survey by BikeRadar showed that riders who cleaned their bikes weekly had 25% fewer gear failures than those who cleaned monthly.
Some signs that your gears need cleaning:
- Shifting feels rough or sticky
- Chain makes noise or skips
- Visible dirt and buildup on gears
Advanced Cleaning Tips
If you want your mountain bike to work like new, try these advanced tips:
- Remove the cassette for deep cleaning. Use a cassette removal tool to take off the gear cluster. Clean each sprocket separately.
- Ultrasonic cleaning machines can remove stubborn grime from chains and gears. These are expensive but very effective.
- Inspect gear teeth for wear. Look for sharp or “hooked” teeth. Replace worn gears—cleaning won’t fix damage.
- Check for chain stretch. Use a chain measuring tool. Stretched chains cause poor shifting and wear out gears faster.
- Use bike-specific lubricants. Avoid car oil or WD-40—they’re not made for bike chains and can attract more dirt.
Many beginners don’t realize that cleaning alone isn’t enough. Regular inspection and replacement of worn parts are just as important for maintaining performance.
Comparing Gear Lubricants
Lubricant choice matters. Each type has strengths and weaknesses.
| Lubricant Type | Best For | Durability | Attracts Dirt |
|---|---|---|---|
| Wet lube | Muddy, wet conditions | Long-lasting | High |
| Dry lube | Dry, dusty trails | Medium | Low |
| Ceramic lube | High performance | Very long | Medium |
| Wax lube | Clean, fast rides | Short | Very low |
Choose wet lube for rainy rides, dry lube for summer, and ceramic or wax for competition or everyday use. Beginners often use the wrong lubricant, leading to faster wear or dirt buildup.
Credit: cykelhouse.com
Common Mistakes To Avoid
Many mountain bikers make mistakes when cleaning gears. Avoid these to keep your bike running well.
- Using too much degreaser: Excess degreaser can wash away oil from bearings and damage seals.
- Skipping lubrication: Always re-oil the chain after cleaning, or it will rust and squeak.
- Using high-pressure water: Strong water jets can force dirt into bearings and cause corrosion.
- Cleaning only the chain: Dirt on the cassette and chainrings can still cause problems.
- Leaving parts wet: Dry everything before reassembling. Moisture leads to rust.
- Ignoring worn parts: Cleaning won’t fix broken or stretched chains. Replace them when needed.
- Using household cleaners: Avoid bleach or strong chemicals—they can harm your bike’s finish and seals.
Many beginners think a quick rinse is enough, but gears need detailed cleaning. Always check each part, not just the chain.
Practical Examples: Real-life Cleaning Scenarios
Let’s look at two common situations:
After A Muddy Ride
You return from a wet trail with mud everywhere. Start by rinsing the bike gently to remove loose dirt. Focus on the chain, cassette, and chainrings. Use plenty of degreaser and scrub thoroughly. Don’t forget the derailleurs—mud often gets stuck in the pulleys.
Dry every part carefully. Apply wet lube, since you’ll ride in similar conditions next time. Shift through all gears to check for smooth operation.
Post-race Quick Clean
You finish a race and need fast cleaning for the next day. Use a chain cleaning tool and spray degreaser. Wipe the cassette and chainrings with a rag. Skip deep cleaning unless you have time. Use dry lube if the next ride is in good weather.
This keeps your bike ready for action without a full teardown.
Gear Cleaning For Different Bike Types
Mountain bikes come in many designs. Cleaning methods vary slightly:
| Bike Type | Cleaning Difficulty | Special Considerations |
|---|---|---|
| Hardtail | Easy | Few moving parts, quick access |
| Full suspension | Moderate | More pivots, careful water use |
| Fat bike | Moderate | Wide chain, extra cleaning needed |
| Electric mountain bike | Hard | Electronics, avoid water near motor |
Electric mountain bikes (e-bikes) need extra care. Never spray water near the motor or battery. Use a damp cloth for those areas.
Eco-friendly Gear Cleaning
Traditional bike cleaning uses chemical degreasers. If you want a greener approach, try these tips:
- Use biodegradable degreaser. Many brands offer plant-based options that clean well without harming the environment.
- Reuse water and rags when possible.
- Avoid letting cleaning chemicals run into drains or soil.
- Clean your bike over a patch of grass or gravel, not concrete.
Eco-friendly cleaning is better for your health and the planet. You’ll still get great results without toxic residue.
When To Replace Gears And Chains
Cleaning keeps your gears running well, but every bike part wears out eventually. Here’s how to tell when it’s time to replace:
- Chain: If your chain is stretched more than 0.5%, replace it. Use a chain checker tool.
- Cassette: If teeth look sharp, hooked, or uneven, it’s time for a new cassette.
- Chainrings: Replace if teeth are worn or the chain slips often.
- Derailleurs: Change if they’re bent or don’t move smoothly.
Most mountain bike chains last 2,000–3,000 miles. Cassettes can last up to 5,000 miles if cleaned regularly. However, rough terrain and mud can shorten this lifespan.
Gear Cleaning For Groupsets
Mountain bikes use different groupsets—Shimano, SRAM, or Campagnolo. Each has unique features.
- Shimano: Most common, easy to clean, standard tools fit.
- SRAM: Often uses wider spacing, easier to access.
- Campagnolo: Rare on mountain bikes, similar cleaning steps.
Always check your groupset manual for special instructions. Some parts need unique tools or lubricants.
Credit: www.youtube.com
Quick Cleaning Checklist
If you’re short on time, follow this fast cleaning routine:
- Wipe chain with rag.
- Spray degreaser on cassette and chainrings.
- Scrub with brush.
- Wipe derailleurs.
- Dry all parts.
- Lubricate chain.
- Shift through gears.
This checklist keeps your gears running smoothly between deep cleans.
The Value Of Regular Gear Cleaning
Keeping your gears clean pays off in many ways:
- Fewer mechanical problems
- Longer lifespan for expensive parts
- Easier shifting and better performance
- More enjoyable rides
For most mountain bikers, cleaning gears takes 20–40 minutes and saves hundreds of dollars per year. It’s a small task with big rewards.
If you want more detailed maintenance advice, the Park Tool Repair Help site offers expert guides.
Frequently Asked Questions
How Can I Tell If My Mountain Bike Gears Need Cleaning?
Look for signs like noisy shifting, chain skipping, or visible dirt buildup. If gears feel rough or don’t switch smoothly, it’s time to clean.
Can I Use Regular Household Cleaners On My Bike Gears?
No. Avoid household cleaners like bleach or ammonia. They can damage bike parts and seals. Use bike-specific or biodegradable degreasers.
What’s The Best Lubricant For Mountain Bike Gears?
Choose wet lube for muddy, wet conditions, and dry lube for dry, dusty trails. Ceramic and wax lubes work well for high performance and clean rides.
How Often Should I Deep Clean My Mountain Bike Gears?
Deep clean after every muddy ride, or every 2–3 weeks in normal conditions. If you ride daily, clean weekly for best results.
Is It Safe To Use A Pressure Washer On My Bike?
No. Pressure washers can force water into bearings and electronics, causing damage. Use gentle water and brushes instead.
Mountain biking is demanding, but regular gear cleaning makes it safer and more fun. Clean gears help you ride longer, shift easier, and avoid costly repairs. With the right tools and techniques, you’ll keep your mountain bike in top shape—ready for every adventure.

Hello Guys! I am John Reese, a professional biker and my hobby is biking! I have been biking for last 12 years and I love using bikes while outing as well. Based on my experiences with the different type of bikes (mountain bikes, road bikes and hybrid bikes); I am sharing my opinion about various bikes so that a beginner can get started right away. Happy reading!