Cleaning your mountain bike cassette might sound simple, but it’s one of the most important parts of keeping your bike running smoothly. If you ride often, mud, dust, and grime can build up fast. A dirty cassette affects shifting, wears down your chain, and can even damage other parts.
Many riders skip cassette cleaning because it looks tricky, but with the right steps, anyone can do it well—even beginners.
The cassette is the set of sprockets at the back wheel. It controls how easy or hard it is to pedal. Over time, dirt sticks to the cassette teeth and the gaps between them. This leads to noisy gears, poor performance, and faster wear.
Learning to clean your cassette is a skill that saves money and makes your rides better. In this guide, you’ll learn not just the basics, but also some pro tips people often miss. You’ll see comparisons between cleaning methods, tools, and products—so you can choose what works for you.
Whether you ride trails, commute, or race, you’ll find practical advice you can use right away.
Why Cleaning Your Mountain Bike Cassette Matters
A clean cassette does more than just look good. It keeps your bike working properly. When mud, sand, or dust gets stuck on the cassette, it mixes with chain oil and forms a sticky paste. This paste causes the chain to slip, gears to mis-shift, and can even grind down the cassette teeth.
There’s also a hidden cost. Studies show that a dirty drivetrain can waste up to 5% of your pedaling power—that’s like riding with a flat tire. If you clean your cassette regularly, your chain lasts longer, your shifting is smoother, and you avoid expensive repairs. For mountain bikers who ride in wet or gritty conditions, cleaning is even more important.
Many beginners don’t realize that a dirty cassette can also affect safety. Skipping gears or chain slippage can make you lose balance, especially on rough trails. It’s not just about performance—it’s about enjoying your ride with fewer problems.
Understanding The Mountain Bike Cassette
Before you clean it, it helps to know what your cassette is. The cassette sits on your rear wheel hub. It has multiple sprockets—usually between 8 and 12 for most mountain bikes. Each sprocket is a different size, letting you shift up or down for different terrain.
Some cassettes are one-piece, others are made of separate sprockets stacked together. The cassette works with the chain and derailleur to give you the right gear. The gaps between sprockets are tight—just wide enough for the chain to fit. Dirt likes to hide in these gaps.
Here’s a quick comparison of common cassette sizes:
| Number of Sprockets | Typical Range | Best Use |
|---|---|---|
| 8-Speed | 11-32T | Entry-level bikes |
| 9-Speed | 11-34T | Budget and mid-range bikes |
| 10-Speed | 11-42T | Trail and XC bikes |
| 11-Speed | 11-50T | Modern mountain bikes |
| 12-Speed | 10-52T | High-performance bikes |
The cleaning steps are similar for all cassettes, but higher speeds mean more sprockets and tighter gaps—so cleaning gets a bit harder.
Tools And Supplies You Need
To clean your cassette, you don’t need fancy equipment. But having the right tools makes the job faster and easier. Here’s what you’ll need:
- Basic tools: A chain whip and lockring tool (only if you want to remove the cassette)
- Cleaning brushes: Narrow brush or old toothbrush for tight gaps
- Degreaser: Bike-specific degreaser is best, but you can use mild dish soap in a pinch
- Rags or towels: Microfiber works well, but any old rag is fine
- Water spray bottle or hose: For rinsing off grime
- Gloves: Optional, but keeps your hands clean
- Chain cleaner tool (optional): Helps if you also want to clean the chain
If you want to deep clean, you’ll need to remove the cassette from the wheel. For a quick clean, you can do it with the cassette still in place.
Here’s a look at the difference between basic and advanced cleaning kits:
| Kit Type | Tools Included | Price Range | Best For |
|---|---|---|---|
| Basic Kit | Brush, rag, degreaser | $10–$25 | Quick cleaning |
| Advanced Kit | Chain whip, lockring tool, deep brushes | $30–$60 | Full maintenance |
Step-by-step Guide: Cleaning The Cassette On The Bike
For most riders, cleaning the cassette without removing it is enough. This method is fast and simple. Here’s how:
1. Shift To The Smallest Sprocket
Start by shifting your gears so the chain sits on the smallest sprocket. This gives you better access to the cassette teeth.
2. Apply Degreaser
Spray or brush a bike-specific degreaser onto the cassette. Focus on the spaces between the sprockets. Avoid getting degreaser on the brake rotor if you have disc brakes.
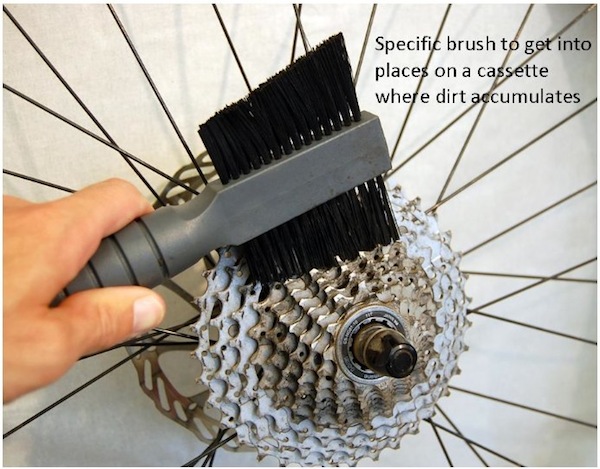
3. Scrub Between Sprockets
Use a narrow brush or old toothbrush. Scrub the cassette teeth and the gaps between each sprocket. Rotate the pedals so you can reach all sides.
Pro tip: Take a thin rag, wrap it around a sprocket, and pull back and forth. This “flossing” motion cleans deep inside the gaps.
4. Rinse And Wipe
Spray water (lightly) to rinse off dirt and degreaser. Don’t use high-pressure water—it can push dirt into the bearings. Wipe dry with a clean rag.
5. Check For Cleanliness
Look for shiny metal. If you see black grime, repeat steps 2–4. Once clean, you should see the original color of your cassette.
6. Lubricate The Chain
After cleaning, always re-lube the chain. Wipe off extra lubricant to avoid attracting dirt.
Deep Cleaning: Removing The Cassette
Sometimes, the cassette is so dirty that you need to take it off the wheel for a deep clean. This is also a good time to inspect for wear.
1. Remove The Rear Wheel
Shift to the smallest sprocket. Release the quick release or thru-axle. Remove the rear wheel.
2. Use Chain Whip And Lockring Tool
Fit the chain whip on a sprocket to hold it still. Use the lockring tool to turn the cassette lockring counterclockwise. The cassette slides off.
3. Soak In Degreaser
Put the cassette in a container. Pour in degreaser until it covers the sprockets. Let it soak for 10–15 minutes.
4. Scrub Thoroughly
Take each sprocket and scrub with a brush. Clean all surfaces, especially inside the teeth.
Non-obvious insight: Many beginners forget to clean the spacers between sprockets. These collect hidden dirt and affect shifting.
5. Rinse And Dry
Rinse the cassette with water. Dry each piece fully. Water left on the cassette can cause rust.
6. Reassemble
Slide the cassette back onto the freehub. Tighten the lockring. Reinstall the wheel and check for smooth shifting.
Comparing Cleaning Methods
Different methods suit different needs. Here’s how they compare:
| Method | Time Required | Effectiveness | Difficulty |
|---|---|---|---|
| Quick On-Bike Clean | 10–15 min | Good for light dirt | Easy |
| Deep Off-Bike Clean | 30–45 min | Best for heavy grime | Moderate |
| Ultrasonic Cleaner | 20–30 min | Excellent (pro-level) | Advanced |
If you ride in dusty or muddy conditions, deep cleaning every 1–2 months is smart. For casual riders, quick cleaning after every 3–5 rides is enough.
Choosing The Right Degreaser
Not all degreasers are equal. Bike-specific degreasers are made to cut through grease but not damage parts. Household degreasers can be too strong and harm paint or plastic.
Look for these features:
- Biodegradable: Safer for you and the environment
- Non-corrosive: Won’t damage aluminum or steel
- Quick rinse: Makes cleaning faster
Some popular brands include Finish Line, Muc-Off, and Park Tool. Avoid using gasoline or strong industrial cleaners—they can damage your cassette.
A non-obvious tip: Citrus-based degreasers work well but can leave a sticky residue. Always rinse well after using them.
Cassette Maintenance Tips
Keeping your cassette clean is only part of maintenance. Here are some tips to extend its life:
- Clean regularly: Don’t wait until the cassette looks black. Clean every few rides.
- Check for wear: Look for teeth that look sharp or hooked. These are signs you need a new cassette.
- Use the right lubricant: Too much lube attracts dirt; too little causes wear.
- Inspect chain and derailleur: A worn chain can damage your cassette.
- Avoid cross-chaining: Don’t ride with the chain at extreme angles—this wears out cassette teeth faster.
Pro insight: Many riders forget to clean the cassette after wet rides. Water mixed with grit speeds up wear.
Common Mistakes Beginners Make
Cleaning a cassette isn’t hard, but there are mistakes you should avoid:
- Using too much water: High-pressure water can push dirt into bearings and hubs.
- Skipping lubrication: Cleaning removes old lube. Always re-lube after cleaning.
- Not drying fully: Moisture left behind causes rust.
- Forgetting to check spacers: Dirt between spacers causes shifting problems.
- Using harsh chemicals: Strong cleaners damage paint and plastic parts.
Many beginners also clean only the outside of the cassette. Dirt hides inside the gaps—so flossing with a rag is important.
How Often Should You Clean Your Cassette?
How often depends on your riding style and conditions. Here’s a general guide:
- Trail and mountain riders: Clean after every muddy or wet ride
- Commuters: Clean every 2–3 weeks
- Casual riders: Clean every 1–2 months
If you hear grinding noises, see black grime, or your gears feel rough—clean your cassette right away.

Credit: www.youtube.com
Signs Your Cassette Needs Cleaning
Some signs are obvious, others are subtle. Watch for:
- Black buildup on cassette teeth
- Chain skips or mis-shifts
- Noisy gears
- Difficulty changing gears
- Visible dirt in sprocket gaps
If you see these, cleaning will improve performance.
Advanced Cleaning: Ultrasonic Cleaners
Some bike shops use ultrasonic cleaners. These use sound waves in water to shake off dirt. They clean deep, even in tiny gaps. If you want pro-level cleaning, you can buy a small ultrasonic cleaner for home use.
Ultrasonic cleaning is best for heavy grime and when you want every part spotless. But for most riders, manual cleaning is enough.
When To Replace Your Cassette
Cleaning helps, but cassettes eventually wear out. Here’s how to know:
- Teeth look sharp or hooked
- Chain slips even after cleaning
- Visible damage or bent sprockets
A cassette lasts 2,000–4,000 miles for most riders, but muddy conditions can shorten this. Always check your cassette when you clean it.
Cleaning Other Drivetrain Parts
While cleaning the cassette, it’s smart to clean the chain and derailleur too. Dirty chains and derailleurs send dirt back to your cassette. Here’s a quick guide:
- Chain: Use a chain cleaning tool or scrub with degreaser and rag
- Derailleur: Wipe with a rag, scrub jockey wheels with a brush
Keeping all parts clean means smoother rides and longer lasting parts.
Environmental Considerations
Bike cleaning creates dirty water and leftover degreaser. Always dispose of these responsibly. Use biodegradable degreasers and avoid pouring dirty water into drains. Many cities have bike shops that recycle old parts and fluids.
Real-world Example: Cleaning After A Muddy Ride
Let’s say you just finished a muddy trail ride. Your cassette is caked in mud, and shifting feels rough.
- Shift to the smallest sprocket.
- Spray degreaser generously.
- Scrub with a brush, floss with a rag.
- Rinse lightly with water.
- Dry fully.
- Lubricate the chain.
If mud is stuck inside, remove the cassette for a deep clean. This prevents problems on your next ride.
Cassette Cleaning Vs. Professional Servicing
Sometimes, a bike shop can clean your cassette more thoroughly. Pros have ultrasonic cleaners and special tools. But home cleaning is usually enough for most riders.
Here’s a comparison:
| Cleaning Location | Cost | Depth of Clean | Time Needed |
|---|---|---|---|
| Home | $0–$20 | Good | 10–45 min |
| Bike Shop | $20–$40 | Excellent | 1–2 days |
If you ride often, learning to clean your cassette saves money and keeps your bike in top shape.
Cleaning Frequency: Mountain Bike Vs. Road Bike
Mountain bikes get dirtier than road bikes. This means more frequent cleaning. Here’s a quick comparison:
| Bike Type | Typical Cleaning Interval | Reason |
|---|---|---|
| Mountain Bike | Every 1–2 weeks | Mud, dust, grit |
| Road Bike | Every 3–4 weeks | Mainly dust |
If you ride in rain or on sandy trails, clean more often.
Credit: www.aistudio.co.jp
Safety Tips While Cleaning
Cleaning your cassette is safe if you follow basic rules:
- Wear gloves to protect your skin from degreaser
- Avoid slipping tools—lockring tool can slip and cause injury
- Don’t use high-pressure water near bearings
- Keep degreaser away from brake rotors
If you’re unsure, watch a video or ask for help at your local bike shop.
Pro-level Tips For Perfect Cassette Cleaning
Here are some tips that most people miss:
- Use a paintbrush to apply degreaser—gets deep into gaps
- Rotate the wheel while brushing—covers all sides quickly
- “Floss” each sprocket with a thin rag—removes hidden grime
- Clean after every wet ride—water speeds up rust and wear
- Store your bike indoors—keeps cassette cleaner longer
For more expert guidance, see Park Tool.

Credit: cykelhouse.com
Frequently Asked Questions
How Do I Know If My Cassette Is Worn Out?
Check the teeth. If they look sharp, pointed, or hooked, it’s time for a new cassette. Also, if your chain skips even after cleaning and lubricating, the cassette may be worn.
Can I Use Household Degreaser On My Cassette?
Some household degreasers work, but many are too strong and can damage bike parts. It’s safest to use a bike-specific degreaser. If you must use household products, choose mild dish soap.
Should I Remove The Cassette Every Time I Clean?
No. For regular cleaning, leave the cassette on. Only remove it for deep cleaning if there’s heavy buildup or for inspection. Removing the cassette takes more time and tools.
How Do I Clean Cassette Spacers?
If you remove the cassette, clean the spacers with a brush and degreaser. Dirt hides here and can affect shifting. Dry spacers fully before reassembling.
Does Cleaning The Cassette Improve Shifting?
Yes. A clean cassette leads to smoother shifting and less chain slip. Dirt and grime block the chain from moving easily between gears, so cleaning is essential for good performance.
Cleaning your mountain bike cassette isn’t just a chore—it’s a skill that pays off every time you ride. With the right tools, methods, and tips, you can keep your bike running smoother, safer, and longer. Whether you’re a beginner or experienced rider, regular cassette cleaning will save you money, prevent problems, and make every ride more enjoyable.

Hello Guys! I am John Reese, a professional biker and my hobby is biking! I have been biking for last 12 years and I love using bikes while outing as well. Based on my experiences with the different type of bikes (mountain bikes, road bikes and hybrid bikes); I am sharing my opinion about various bikes so that a beginner can get started right away. Happy reading!