Mountain biking is thrilling, but even the best rides can be ruined by a wobbly wheel. If your mountain bike wheel isn’t straight, you’ll feel shaking, hear odd noises, and risk your safety—especially on rough trails. Learning how to true a mountain bike wheel is a valuable skill for any rider. It saves money, prevents bigger problems, and keeps your rides smooth. This guide will walk you through the process step by step, using simple language and clear examples. Whether you’re a beginner or have some experience, you’ll find practical advice here that will boost your confidence and riding enjoyment.
Why Wheel Truing Matters
A mountain bike’s wheels take a lot of punishment. Jumps, rocks, and sudden stops all put pressure on the spokes and rim. Over time, even a strong wheel can become out of true—meaning it wobbles side to side or up and down. A wheel that isn’t true can:
- Rub against the brake pads, making the bike harder to stop or pedal.
- Wear out parts like brake pads, tires, and bearings faster.
- Make rides uncomfortable or even dangerous, especially at high speed or on tricky terrain.
You don’t always need to visit a mechanic. Many riders fix these problems at home with basic tools, a bit of patience, and the right guidance.
Tools You Need For Wheel Truing
Before you begin, gather the right tools. Using the correct equipment makes the job easier and reduces the risk of making mistakes.
1. Spoke Wrench
This small tool fits over the spoke nipples (the part that connects the spoke to the rim) and turns them. Make sure you have the correct size for your bike.
2. Wheel Truing Stand (optional)
A stand holds the wheel steady and makes small wobbles easier to see. If you don’t have one, you can keep the wheel on your bike and use the brake pads as a guide.
3. Tire Lever (if Removing Tire)
Sometimes, you’ll need to remove the tire to see the rim clearly.
4. Marker Or Zip Tie
A marker helps you find where the rim wobbles. A zip tie can act as a simple pointer when attached to the frame.
5. Lubricant
Spoke nipples can be tight. A drop of oil makes them easier to turn.
6. Rag Or Cloth
For cleaning the rim and spokes before and after truing.
7. Good Light
A bright workspace helps you spot small bends or wobbles.
Here’s a quick comparison of essential and optional tools for truing a mountain bike wheel:
| Tool | Essential? | Purpose |
|---|---|---|
| Spoke wrench | Yes | Adjusts spoke tension |
| Wheel truing stand | No | Holds wheel steady |
| Marker/zip tie | Yes | Locates rim wobbles |
| Tire lever | No | Removes tire if needed |
| Lubricant | No | Loosens spoke nipples |
Pro tip: If you’re missing a wheel truing stand, leave the wheel on your bike. Use your brake pads as a guide—they work surprisingly well for most basic jobs.
Credit: www.jonghartproducties.nl
Understanding Wheel True: Lateral, Radial, And Dish
To fix a wheel, you must know what’s wrong. There are three main problems:
1. Lateral True
This is a side-to-side wobble. The rim moves left and right as it spins.
2. Radial True
This is an up-and-down hop. The rim moves closer to or farther from the hub, making a “bump” as the wheel spins.
3. Dish
This means the rim must be centered between the two sides of the hub. If it’s not, the wheel sits off-center in the frame.
Most home repairs focus on lateral truing. Radial and dish problems are less common, but fixing them requires the same basic skills.
How To Inspect Your Mountain Bike Wheel
Before you start adjusting anything, check your wheel carefully. This helps you understand where the problem is and how bad it is.
Step 1: Clean The Wheel
Dirt hides problems. Use a damp cloth to wipe the rim and spokes. This gives you a clear view and prevents grit from getting into the spoke nipples.
Step 2: Spin And Observe
- Put the wheel in your bike or a truing stand.
- Spin it slowly.
- Watch the gap between the rim and the brake pad (or zip tie pointer) as the wheel turns.
Look for:
- Side-to-side movement (lateral wobble)
- Up-and-down hops (radial issues)
- Loose or broken spokes (tap them gently—tight spokes make a higher “ping” sound)
Step 3: Mark Problem Areas
When you spot a wobble, mark the rim at the widest point with a marker or tape. This makes it easier to find the spot when you start adjusting.
Non-obvious insight: Don’t rush this step. Small errors in identifying the problem area often lead to bigger mistakes later.
The Basics Of Spoke Tension
Spokes are like tiny springs holding the rim straight and strong. If some spokes are too tight or too loose, the rim bends toward the looser side or bulges toward the tighter side.
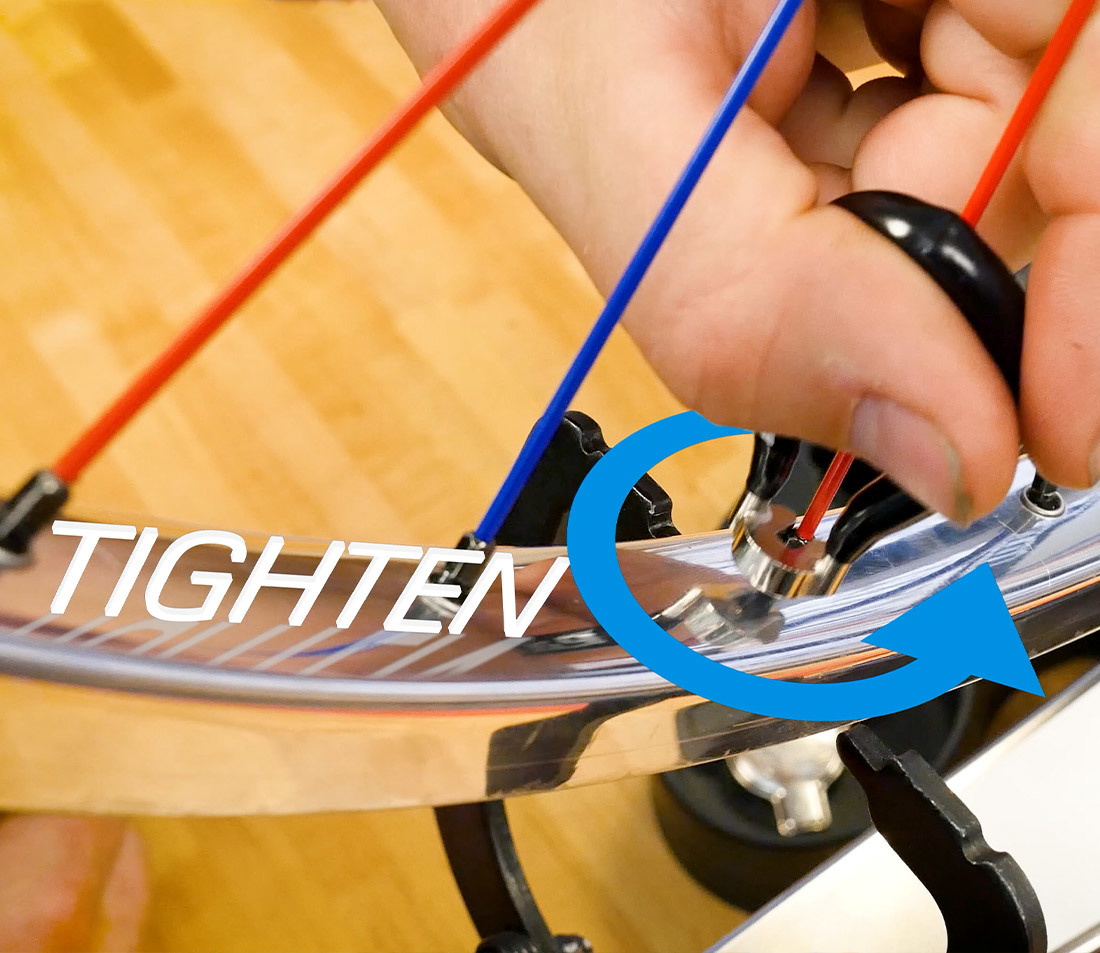
- Tightening a spoke (turning the nipple clockwise) pulls the rim toward that spoke.
- Loosening a spoke (turning the nipple counter-clockwise) lets the rim move away.
It’s important to make tiny changes, usually 1/4 turn or less at a time. Big adjustments can make the problem worse or even break the spoke.
Here’s a simple comparison of the effects of tightening vs. loosening spokes:
| Action | Result on Rim | Common Use |
|---|---|---|
| Tighten spoke | Pulls rim toward spoke | Fix left/right wobbles |
| Loosen spoke | Pushes rim away from spoke | Straighten rim |
Step-by-step Guide: Truing A Mountain Bike Wheel
Step 1: Prepare Your Workspace
Find a well-lit area and set up your tools. Remove the wheel from your bike if you have a truing stand, or leave it on if you’re using the frame and brake pads as a guide.
Step 2: Identify The Largest Wobble
Spin the wheel slowly. Watch for the point where the rim comes closest to the brake pad or zip tie. Mark this spot. This is where you’ll focus first.
Step 3: Find The Spokes To Adjust
When the rim moves left, tighten the spoke(s) on the right side at that spot. If the rim moves right, tighten the left-side spokes.
- Usually, adjust the three spokes closest to the wobble: One at the center and one on each side.
- Make small adjustments—no more than 1/4 turn per spoke.
Step 4: Make Adjustments
- Use the spoke wrench to turn the nipple (the small square part at the rim end of the spoke).
- Always turn clockwise to tighten and counter-clockwise to loosen (when looking at the nipple from outside the rim).
- Check the tension by gently squeezing pairs of spokes. They should all feel about the same.
Step 5: Recheck And Repeat
After each set of adjustments, spin the wheel again. If the wobble improves, move to the next problem area. If it gets worse, undo the change and try smaller adjustments.
Non-obvious insight: Don’t try to fix every wobble at once. Work on the worst spot first, then move to the next. This keeps the wheel strong and prevents new problems.
Step 6: Check Radial True (up And Down)
If you feel a “bump” each time the wheel turns, the rim may be out of round.
- Find the high spot.
- Tighten both left and right spokes at the high spot, 1/4 turn each.
- If the rim is low, loosen those spokes.
Note: Severe radial problems are harder to fix. If the bump is big, it may be safer to visit a professional.
Step 7: Check Wheel Dish
The rim should sit centered between the frame. Use a ruler or your eyes to check the gap between the rim and each chainstay.
- If the rim is off-center, adjust the spokes on one side only.
- Make small, even changes to bring the rim back to the middle.
Pro tip: Most modern mountain bikes are close enough for home repairs, but if you’re unsure, a bike shop can check the dish with a special tool.
Common Mistakes And How To Avoid Them
Even careful riders make errors when truing wheels. Here’s how to avoid the most frequent problems:
1. Turning The Wrong Way
Always check which way tightens or loosens the spoke. It’s easy to get confused—remember, turn the nipple as if you’re tightening a screw.
2. Over-tightening Spokes
Too much tension can snap a spoke or bend the rim. Make small changes and check often.
3. Ignoring Radial Or Dish Problems
Fixing only side-to-side wobbles can make up-and-down or centering issues worse. Always check all three.
4. Not Checking Spoke Tension
Spokes should all feel about the same. Uneven tension makes the wheel weak.
5. Truing With A Flat Tire
Inflate your tire before checking for wobbles. A flat tire can hide or exaggerate problems.
When To Seek Professional Help
Some wheel problems are too severe or complex for a home fix. Consider visiting a bike shop if:
- The rim is badly bent or cracked.
- More than two spokes are broken.
- The wheel has large hops or can’t be centered.
- You’re unsure about your adjustments.
A professional has special tools and experience. It’s better to pay for expert help than risk making the problem worse.
Keeping Wheels True: Maintenance Tips
Once your wheel is straight again, good habits can keep it that way.
- Check spoke tension monthly by squeezing pairs of spokes.
- Avoid hard impacts when possible—land jumps smoothly, and ride around big obstacles.
- Clean your wheels after muddy or sandy rides.
- Inspect for broken or loose spokes before every ride.
- Keep your tires inflated—low pressure puts extra stress on the rim.
Here’s a simple maintenance schedule to follow:
| Action | How Often |
|---|---|
| Check spoke tension | Monthly |
| Clean rim and spokes | After muddy rides |
| Inspect for broken spokes | Before every ride |
| Check wheel true | Every 2-3 months |
Non-obvious insight: Small, regular adjustments are easier and safer than waiting for a big wobble. Frequent checks catch issues early.
How Truing Affects Your Ride
A well-trued wheel doesn’t just look better—it transforms your riding experience. You’ll notice:
- Smoother handling: The bike feels more stable, especially at speed and on technical trails.
- Better braking: The brake pads contact the rim evenly, improving control.
- Longer life for parts: Spokes, rims, and tires last longer when stress is distributed evenly.
- Fewer surprises: A straight wheel is less likely to fail suddenly, which is vital for your safety.
Example: If you fix a 2mm side-to-side wobble, you can reduce brake rub and make climbing hills 5–10% easier, especially on long rides.

Credit: www.youtube.com
Should You Remove The Tire To True A Wheel?
For small adjustments, you can true the wheel with the tire on. For bigger problems, or if you suspect a broken spoke or rim damage, remove the tire. This lets you see the rim clearly and makes it easier to adjust spoke nipples.
Tip: If the wheel is only slightly out of true and you don’t hear rubbing or feel bumps, leave the tire on. Save time and effort for bigger repairs.
Understanding The Limits Of Home Truing
Most mountain bike wheels can be kept in good shape at home, but some problems need more than a spoke wrench. If you see:
- A rim with a sharp bend or “kink”
- Cracks at the spoke holes
- Spokes that won’t tighten or loosen
It’s time for professional repair or even replacement. Riding with serious rim damage can cause sudden failure.
For more about bike wheel maintenance, visit this Wikipedia page on bicycle wheels.

Credit: www.mbr.co.uk
Frequently Asked Questions
How Often Should I True My Mountain Bike Wheel?
Most riders should check their wheels every few months, or after a big impact. If you ride rough trails often, check for wobbles monthly. It’s easier to fix small problems before they get worse.
Can I True My Wheel Without A Truing Stand?
Yes, you can use the brake pads as a guide. Attach a zip tie to the frame if you want a more precise pointer. A truing stand is helpful but not necessary for small adjustments.
What If A Spoke Is Broken?
If one spoke is broken, you can replace it and then true the wheel. If more than two are broken, the wheel may need professional help. Riding with missing spokes can damage the rim further.
Is It Normal For A New Wheel To Need Truing?
Yes, new wheels often “settle” after a few rides. The spokes stretch and adjust to your riding style. Check the wheels after your first few rides and make small adjustments if needed.
What Size Spoke Wrench Do I Need?
Most mountain bikes use 3. 23mm or 3. 30mm spoke nipples. Check your bike’s manual or measure a nipple with calipers. Using the wrong size can round off the nipple and make it hard to adjust.
Mountain biking is more fun when your bike runs smoothly. Learning how to true a mountain bike wheel gives you more control, saves money, and keeps you safe. With practice, you’ll be able to fix small wobbles quickly and confidently. Keep your tools handy, inspect your wheels often, and enjoy the ride—wherever the trail takes you.

Hello Guys! I am John Reese, a professional biker and my hobby is biking! I have been biking for last 12 years and I love using bikes while outing as well. Based on my experiences with the different type of bikes (mountain bikes, road bikes and hybrid bikes); I am sharing my opinion about various bikes so that a beginner can get started right away. Happy reading!