Mountain biking is exciting, but it also demands attention to detail. One area that often gets overlooked is tire maintenance—specifically, tubeless tire resealing. Many riders switch to tubeless setups for better traction, fewer flats, and lower pressures. However, the sealant inside these tires does not last forever. Knowing how often to reseal tubeless mountain bike tires is crucial for both performance and safety.
This article gives a clear answer for riders of all levels. We’ll explore the resealing schedule, signs your tire needs attention, the factors that affect sealant longevity, and common mistakes. You’ll also see practical data, comparison tables, and expert insights to help you make confident decisions. Whether you’re a weekend warrior or a daily trail rider, you’ll find actionable guidance here.
Why Resealing Matters For Tubeless Mountain Bike Tires
Tubeless tires rely on liquid sealant inside the tire. This sealant fills small holes and punctures automatically, so you don’t have to stop riding. Over time, though, the sealant dries up, becomes less effective, or even disappears. If you don’t reseal, you risk losing air, facing more flats, and compromising your tire’s grip.
Many beginners think once the tire is set up, it’s “done.” But regular resealing is as important as checking your chain or brakes. Without it, you may experience:
- Sudden air loss mid-ride
- Poor puncture repair
- Harder tire casing (less grip)
- Difficulty adding new sealant
Non-obvious insight: Resealing is not just about adding more liquid. It’s also an opportunity to inspect the tire for damage, clean old sealant, and check for rim or valve issues. Neglecting this step can lead to hidden problems you might not notice until it’s too late.
How Often Should You Reseal Tubeless Mountain Bike Tires?
Most experts recommend resealing tubeless mountain bike tires every 2 to 6 months. This range depends on several factors:
- Climate and temperature
- How often you ride
- Tire and sealant brands
- Tire size and volume
Here’s a quick overview of common resealing intervals:
| Riding Frequency | Recommended Interval | Notes |
|---|---|---|
| Frequent (3+ times/week) | Every 2-3 months | Sealant dries faster due to heat and tire flex |
| Moderate (1-2 times/week) | Every 3-4 months | Check sealant before each season |
| Occasional (1-2 times/month) | Every 5-6 months | Sealant may dry slower but still needs replacement |
Non-obvious insight: The resealing interval is not only about riding frequency. If you store your bike in a hot garage or cold shed, sealant can degrade quicker. Even if you don’t ride much, extreme temperatures can shorten its lifespan.
Factors That Affect Tubeless Tire Sealant Longevity
Climate And Temperature
Sealant dries faster in hot, dry climates. For example, in Arizona or California, you may need to reseal every 2 months. In cooler, humid areas like Oregon, you might stretch it to 4 months. Temperature swings (hot days, cold nights) also speed up evaporation.
Riding Conditions
If you ride on rocky trails, sharp roots, or thorny paths, your tire flexes more and sealant circulates rapidly. This can break down the sealant faster. Muddy or wet conditions may help sealant last a bit longer, but not by much.
Tire And Sealant Types
Not all sealants are equal. Some brands use latex, others use synthetic formulas. Larger tires (like plus-size or fat bike tires) need more sealant and may dry out slower, but they’re also more prone to flats.
Here’s a comparison of three popular sealants:
| Sealant Brand | Average Lifespan | Puncture Sealing Ability | Notes |
|---|---|---|---|
| Stan’s NoTubes | 2-4 months | Up to 6mm | Latex-based, dries faster in heat |
| Orange Seal | 3-6 months | Up to 8mm | Contains more additives for durability |
| Effetto Mariposa | 4-6 months | Up to 5mm | Synthetic, lasts longer in mild climates |
Tire Volume And Size
Wider tires mean more air volume and more sealant. But if you run low pressures, the tire flexes more, which churns the sealant and can cause it to dry faster.
Storage And Maintenance Habits
Storing your bike indoors (at room temperature) helps sealant last longer. If you keep your bike outside or in a hot, humid place, check sealant more often.
Practical tip: Mark your calendar with the date you last added sealant. It’s easy to forget, and many riders go too long without checking.
Signs Your Tubeless Tires Need Resealing
There are clear indicators your tire is overdue for resealing. Watch for:
- Loss of air overnight or after a ride
- Poor puncture repair (sealant doesn’t fill holes)
- Dry or crusty residue inside tire
- Unusual noises (slosh, rattling, or squeaking)
- Visible gaps between tire and rim
If you notice any of these, reseal immediately—even if it’s before your scheduled interval.
Pro insight: An easy test is to remove the valve core and insert a zip tie or straw inside the tire. If no liquid comes out or the zip tie comes out dry, your sealant is gone.
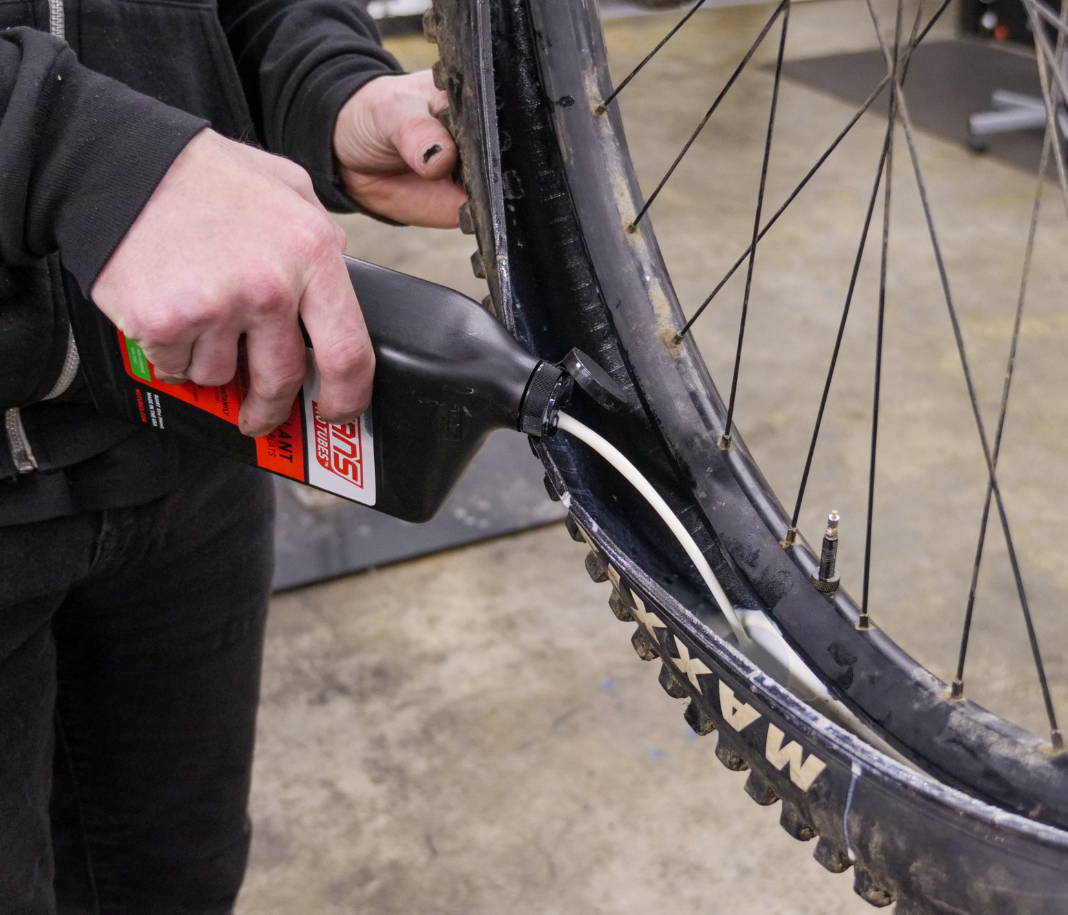
Step-by-step: How To Reseal Tubeless Mountain Bike Tires
Resealing is straightforward, but beginners often make mistakes. Here’s a clear guide:
1. Gather Your Tools And Supplies
You’ll need:
- Fresh tubeless sealant (check brand for amount)
- Tire lever (if you need to remove tire)
- Valve core remover
- Syringe or injector
- Clean rag
- Gloves (optional)
2. Remove The Valve Core
Use the valve core remover to unscrew the core from the valve. This lets you add sealant directly.
3. Check Old Sealant
Insert a zip tie, straw, or stick inside the valve. If it comes out dry or with crusty residue, you need to add sealant. If you see liquid, but it’s thick or clumpy, remove the tire and clean inside.
4. Add Fresh Sealant
Use the syringe to add the recommended amount. Most mountain bike tires need 60-120ml (about 2-4 ounces) per tire. Larger tires need more.
5. Reinstall Valve Core And Inflate
Screw the valve core back in, inflate the tire, and spin the wheel. The spinning helps distribute the sealant evenly.
6. Inspect For Leaks
Check the tire bead and valve for air leaks. If you see bubbles, tighten the valve or add more sealant.
7. Clean Up And Record Date
Wipe any excess sealant and mark the date in your phone or calendar.
Common mistake: Adding too little sealant. It’s better to add slightly more than needed (but not double). Too little won’t seal punctures, and too much can add unnecessary weight.
How Much Sealant Should You Use?
The amount depends on your tire size:
| Tire Size | Recommended Sealant Amount | Notes |
|---|---|---|
| 26″ x 2.1-2.4″ | 60-80ml | Standard XC tires |
| 27.5″ x 2.4-2.8″ | 80-100ml | Trail/all-mountain tires |
| 29″ x 2.4-3.0″ | 100-120ml | Enduro or plus-size tires |
| Fat bike (any size) | 120-150ml | Extra volume needs more sealant |
Pro tip: If you ride in thorny areas, add 10-15% more than recommended. The extra liquid boosts puncture protection.
Resealing Frequency For Different Rider Types
Weekend Riders
If you ride mainly on weekends, reseal every 4-5 months. Check sealant at the start of each new season.
Daily Riders
For those who ride daily, reseal every 2-3 months. Tire flex and heat dry sealant quickly.
Racers And Competitors
Reseal every 2 months or before each major event. This ensures maximum puncture protection and optimal performance.
Occasional Riders
If you ride less often (once a month or less), reseal every 6 months. But always check before big rides.
Non-obvious insight: Even if you don’t ride much, sealant can “age out” and lose effectiveness. Don’t rely on ride frequency alone—always check physical signs.
Common Mistakes When Resealing Tubeless Tires
- Waiting too long: Many riders forget about sealant until they have a flat. This is risky and can ruin a ride.
- Adding sealant without cleaning: Old, dried sealant can clog the valve or make new sealant less effective. If you see crust, remove the tire and scrape it clean.
- Using wrong sealant type: Some sealants are made for road tires or specific brands. Always use sealant made for your tire type.
- Ignoring leaks: If you spot bubbles after resealing, fix them immediately. Small leaks can become big problems.
- Overfilling: Too much sealant can cause splatter, weight gain, and valve clogging.
- Not recording reseal date: Memory fades fast—write down the date so you stay on schedule.
How To Check Sealant Without Removing The Tire
Removing the tire can be messy. Here are simple ways to check:
- Remove the valve core and insert a zip tie or straw. If it comes out wet, you have sealant. If not, reseal.
- Spin the wheel and listen for sloshing sounds. No sound may mean no sealant.
- Squeeze the tire. If it feels hard and doesn’t flex, it may be dry inside.
Advanced tip: Some brands sell sealant check tools that measure liquid inside. These are handy but not essential.
How Tubeless Tire Resealing Affects Performance
Tubeless tires offer better grip, traction, and fewer flats. But only if the sealant is fresh.
Performance benefits of regular resealing:
- Faster puncture repair (sealant fills holes quickly)
- Consistent tire pressure (better control and grip)
- Longer tire lifespan (less damage from flats)
- Improved ride feel (softer, more responsive tires)
Statistic: In a survey of mountain bikers by Stan’s NoTubes, riders who resealed every 3 months had 40% fewer flats compared to those who resealed only once per year.
Non-obvious insight: Old sealant can become thick and sticky, making it harder to repair punctures. Fresh sealant stays liquid and flows into holes faster.
Comparing Tubeless Vs. Tubed Tire Maintenance
Tubeless tires require more regular resealing, but less frequent tube replacement.
| Maintenance Task | Tubeless Tires | Tube Tires |
|---|---|---|
| Resealing/Sealant Addition | Every 2-6 months | N/A |
| Tube Replacement | N/A | After every major flat |
| Puncture Repair | Automatic (via sealant) | Manual patch or tube replacement |
| Tire Removal | Occasionally for cleaning | Frequently for tube changes |
| Air Pressure Check | Weekly | Weekly |
Tubeless is lower-maintenance in some ways, but you must stay alert to sealant health. Tube tires are simpler but have more flats and manual repairs.
Best Practices For Long-lasting Tubeless Sealant
- Store your bike indoors to slow sealant drying.
- Check air pressure weekly; low pressure can signal sealant loss.
- Inspect tires for cuts and damage during each reseal.
- Use quality sealant—cheap brands dry faster and seal less reliably.
- Rotate tires regularly to spread sealant evenly.
- Replace tires after two years—rubber can degrade and become less airtight.
Non-obvious insight: Quality sealant costs more but lasts longer and seals larger punctures. It’s worth the investment, especially for aggressive riders.

Credit: mbaction.com
Resealing For Different Mountain Bike Disciplines
Cross-country (xc)
XC riders benefit from lightweight tires and minimal sealant. Reseal every 3-4 months.
Trail And All-mountain
Trail riders face more punctures and rough terrain. Reseal every 2-3 months and use extra sealant.
Enduro/downhill
These disciplines demand maximum protection. Reseal every 2 months and check sealant before races.
Fat Biking
Fat tires hold more sealant and may last longer, but cold weather can slow sealant flow. Reseal every 4-6 months.
Pro tip: For downhill and enduro, carry a small bottle of sealant and valve core remover on long rides. Quick repairs can save your race or adventure.
How To Make Your Sealant Last Longer
- Avoid extreme temperatures (hot cars, freezing sheds).
- Seal tire beads tightly—loose beads let air and sealant escape.
- Clean rims and tires before each reseal to prevent leaks.
- Don’t mix sealant brands—different formulas can react and cause clumping.
- Check for valve clogging—clean or replace cores as needed.
Non-obvious insight: Some riders use a tire liner or foam insert. While these can help with punctures, they may cause sealant to dry faster due to increased contact.
Credit: thelostco.com
The Cost Of Tubeless Tire Resealing
Sealant is affordable, but costs add up over time. Here’s a rough breakdown:
- Sealant: $5-$10 per tire (every 2-6 months)
- Valve core remover: $2-$5 (one-time)
- Syringe/injector: $5-$10 (one-time)
- Tire lever: $5-$10 (one-time)
- Time: 10-20 minutes per tire
Over a year, expect to spend $30-$60 for sealant per bike. This is less than replacing tubes and patch kits for frequent riders.
Pro insight: Buying sealant in bulk can save money. Some brands sell 1-liter bottles for less per ounce.
When To Replace Tubeless Tires Instead Of Resealing
Resealing is only effective if the tire is in good shape. Replace your tire if:
- There are large cuts or gashes in the tread or sidewall
- The tire rubber is cracked, aged, or brittle
- You see bulges or deformities
- The tire won’t hold air even after resealing
Pro tip: If you need to add sealant more than once a month, your tire may be worn out.
Expert Advice: Real-world Resealing Stories
Many mountain bikers have learned the hard way about tire maintenance. For example, a rider in Colorado found that resealing every 2 months prevented flats during rocky, hot summers. In contrast, a casual rider in Vermont managed with a 6-month interval thanks to cool weather and storage indoors.
Non-obvious insight: Some riders set reminders in their phone or use a sticker on the rim to track resealing dates. Simple habits like this can prevent costly mistakes.
If you want even more technical details, check out Bicycling Magazine for deep research and troubleshooting tips.
Frequently Asked Questions
How Can I Tell If My Tubeless Tire Sealant Is Still Good?
Remove the valve core and insert a zip tie or straw. If it comes out wet, the sealant is still good. If dry or crusty, add more. Listen for sloshing sounds when spinning the wheel—no sound may mean no sealant.
What Happens If I Don’t Reseal Tubeless Tires Regularly?
You risk more flats, poor puncture repair, sudden air loss, and even tire failure. Old sealant won’t seal holes, and your tire may lose pressure overnight.
Can I Mix Different Brands Of Sealant?
It’s best not to mix brands. Different formulas can react and create clumps, making puncture repair less effective. Always use the same brand or clean out old sealant before switching.
Is It Possible To Reseal Too Often?
Adding fresh sealant too often is not harmful, but overfilling can cause valve clogging and extra weight. Stick to recommended amounts and intervals for best performance.
Does Tubeless Tire Resealing Work The Same For Road Bikes?
The principle is similar, but road bike tires use less sealant and have higher pressures. Reseal every 4-6 months for road bikes, but always check manufacturer instructions.
Mountain biking is all about adventure, but it requires smart maintenance. Resealing tubeless tires is simple, quick, and vital for safe, fun rides. By following these guidelines, you’ll enjoy fewer flats, better grip, and longer tire life. Keep track of your resealing schedule, and your bike will be ready for anything the trail throws your way.
Credit: thelostco.com

Hello Guys! I am John Reese, a professional biker and my hobby is biking! I have been biking for last 12 years and I love using bikes while outing as well. Based on my experiences with the different type of bikes (mountain bikes, road bikes and hybrid bikes); I am sharing my opinion about various bikes so that a beginner can get started right away. Happy reading!