Mountain biking is thrilling, but safety is always first. One key part of staying safe on the trail is having properly adjusted brake levers. Many riders focus on upgrading tires or suspension, yet overlook brake lever setup. The right adjustment can make your rides smoother, reduce hand fatigue, and help you react quickly to obstacles. If your brake levers are too high, too low, or too far from your fingers, you risk slow stops or sore hands. Luckily, adjusting them is straightforward if you follow the right steps. Let’s explore everything you need to know to adjust brake levers on a mountain bike, with clear instructions, practical tips, and real-world examples.
Why Brake Lever Adjustment Matters
The position of your brake levers affects more than just comfort. It impacts:
- Control: Well-adjusted levers help you brake smoothly and confidently.
- Speed: Quick access lets you react faster to hazards.
- Fatigue: Poor setup causes wrist pain, numb fingers, and tired hands.
- Safety: Proper lever reach ensures you can stop quickly in emergencies.
A study published in the Journal of Sports Science found that hand discomfort is one of the main complaints among mountain bikers, especially during long rides. This discomfort is often linked to improper lever positioning and reach. In downhill races, milliseconds matter.
Even casual riders notice how a tiny change in lever angle can make steep descents much less stressful.
Tools You Need Before Adjusting
You don’t need a full toolbox, but a few items are essential. Gather these before starting:
- Allen wrenches (usually 4mm or 5mm)
- Screwdriver (for some older models)
- Bike stand (optional, but helpful for stability)
- Clean rag
- Lubricant (for stubborn bolts)
- Gloves (optional for grip and comfort)
Most modern mountain bikes use hex bolts for lever mounting. Some older or budget models might need a Phillips screwdriver. A bike stand keeps your bike steady, but you can also lean it against a wall.
Credit: enduro-mtb.com
Understanding Brake Lever Types
Mountain bikes come with two main types of brake levers:
- Hydraulic brake levers: Found on most mid-to-high-end bikes. Smooth action, easy adjustment, and more stopping power.
- Mechanical brake levers: Common on entry-level bikes. They use cables and may require extra attention to setup.
The adjustment process is similar for both, but hydraulic levers often have extra features like reach adjustment dials. Always check your lever type before starting.
Comparing Hydraulic Vs. Mechanical Levers
Here’s a quick look at the differences:
| Brake Lever Type | Adjustment Difficulty | Common Features | Maintenance Needs |
|---|---|---|---|
| Hydraulic | Easy | Reach dial, angle adjustment | Low |
| Mechanical | Moderate | Cable tension adjustment | Medium |
Hydraulic levers are more forgiving if your adjustment isn’t perfect, thanks to their self-adjusting nature. Mechanical levers need careful cable tensioning to avoid weak braking.
How To Adjust Brake Levers: Step-by-step Guide
Adjusting brake levers involves three main parts: positioning, reach, and angle. Each plays a unique role in how your hands interact with the bike.
Step 1: Positioning The Levers On The Handlebar
The goal is to place the levers where your fingers naturally reach them. Here’s how:
- Loosen the mounting bolt: Use an Allen wrench to loosen (not remove) the bolt holding the lever clamp.
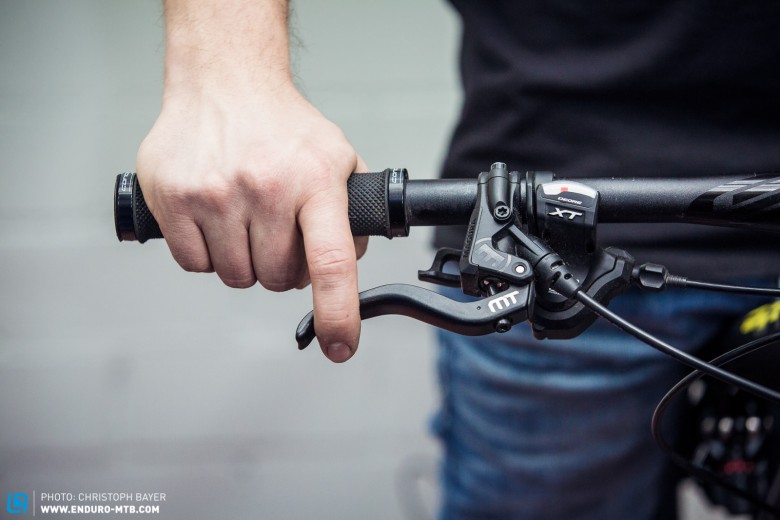
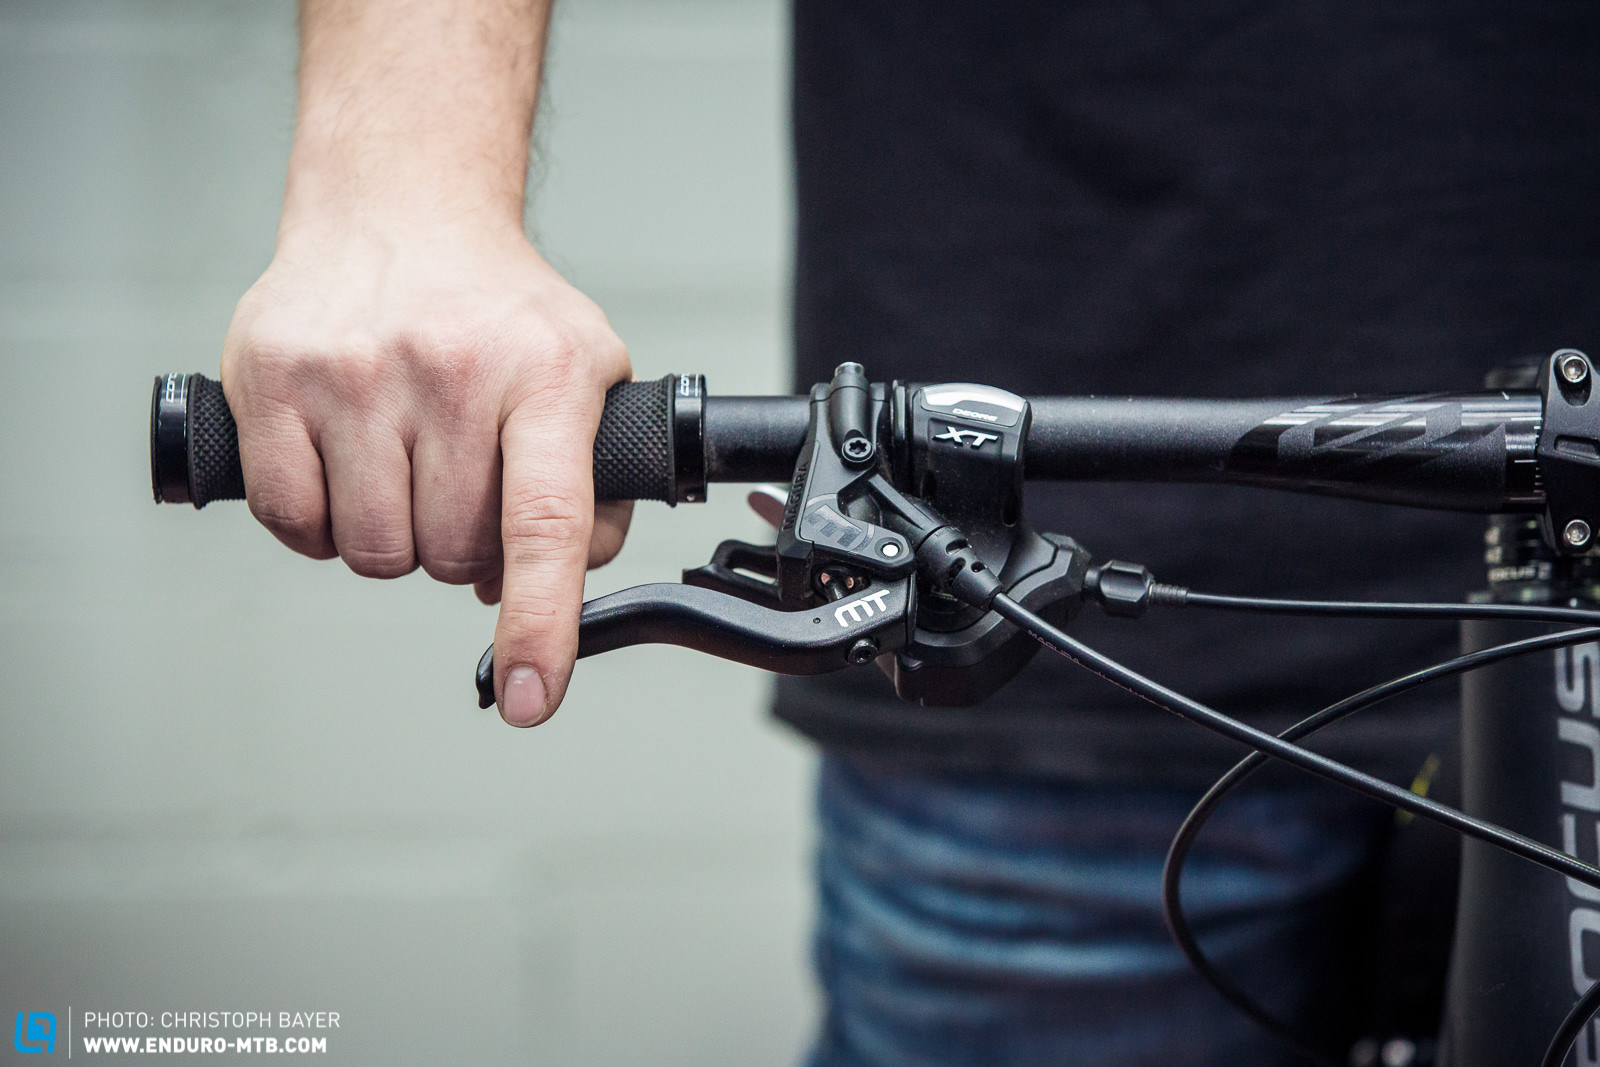
- Slide the lever: Move it inward or outward along the handlebar. If you ride with one finger on the brake, position the lever so your index finger sits comfortably on it when gripping the bar.
- Check grip alignment: Your hand should wrap around the grip, with the lever resting under your index finger’s pad. Avoid stretching or awkward wrist angles.
- Tighten the bolt: Once satisfied, tighten the clamp just enough to prevent movement. Don’t overtighten—this risks damaging the bar or lever.
Common Mistakes
- Too far out: You’ll need to stretch, reducing control.
- Too close in: The lever may pinch your other fingers or limit grip space.
Many beginners think levers should be placed right at the edge of the grips, but this often leads to uncomfortable hand positions. Try moving the lever a bit inward and test it on the trail before finalizing.
Step 2: Adjusting Lever Reach
Lever reach is the distance from the handlebar to the lever itself. This matters if you have small hands or ride with gloves. Most hydraulic levers have a reach adjustment dial. Mechanical levers may require a small screw.
- Locate the reach dial or screw: It’s usually near the lever pivot.
- Turn to adjust: Clockwise brings the lever closer; counterclockwise moves it further away.
- Test with your finger: Place your index finger on the lever and check if you can comfortably squeeze with all four fingers wrapped around the grip.
- Fine-tune: Make small changes and re-test. It’s better to err on the side of closer, especially for technical trails.
Non-obvious Insight
Many riders set their lever reach too far, thinking it helps avoid accidental braking. In reality, a closer lever reduces fatigue and improves control. If you switch gloves or ride in cold weather, you might need to re-adjust.
Step 3: Setting Lever Angle
Lever angle affects wrist comfort and braking power. The ideal angle is roughly in line with your forearm when you’re in a riding position.
- Sit on your bike: Assume your normal riding stance.
- Loosen the lever clamp: Use your Allen wrench as before.
- Rotate up or down: Adjust until the lever is in line with your forearm. Avoid an angle that forces your wrist to bend too much.
- Tighten clamp: Secure the lever once you find the sweet spot.
Practical Example
If you ride mainly downhill, a slightly downward angle helps you brake without lifting your elbow. For cross-country, a flatter angle can improve comfort on long rides.
Step 4: Cable Tension (for Mechanical Levers)
Mechanical levers need proper cable tension to work well.
- Check cable slack: Squeeze the lever. If it feels loose, adjust the barrel adjuster near the lever.
- Turn the barrel adjuster: Clockwise tightens; counterclockwise loosens.
- Test brake response: The lever should feel firm, not spongy. Too tight and you risk brake drag; too loose and braking power drops.
Step 5: Testing Your Adjustments
Never assume your changes are perfect without testing.
- Ride around: Check braking response and comfort.
- Try different hand positions: Simulate trail riding, standing, and sitting.
- Adjust again if needed: It’s normal to fine-tune after your first test.
It’s surprising how a small change—just 5mm—can transform your ride. Pro riders often tweak lever angle before big races, as weather and terrain can affect grip and wrist movement.
How Lever Adjustment Improves Riding Experience
Proper lever setup isn’t just about comfort. It can boost your performance in several ways:
- Better braking control: You can modulate brakes smoothly, avoiding sudden stops or skidding.
- Reduced hand fatigue: Especially on long descents, your hands stay relaxed.
- Increased confidence: Knowing you can stop quickly makes technical trails less intimidating.
- Faster reaction times: Immediate access to brakes lets you avoid obstacles or hazards.
A survey by the International Mountain Bicycling Association showed that 68% of riders who adjusted their levers reported less hand pain and more confidence.
Lever Adjustment For Different Riding Styles
Different riding styles demand unique lever setups. Here’s how you should adjust based on your preferred terrain:
Downhill Riding
- Lever angle: Slightly downward for easy access while standing.
- Reach: Close, so you can brake quickly with one finger.
- Position: Inward, letting your index finger wrap around easily.
Cross-country
- Lever angle: Flatter for comfort during long rides.
- Reach: Slightly further, as you may brake less aggressively.
- Position: Neutral, allowing two-finger braking if needed.
Trail/enduro
- Lever angle: Moderate, matching your forearm angle.
- Reach: Close for fast, technical braking.
- Position: Balanced for quick shifts between riding styles.
Table: Lever Setup By Riding Style
| Riding Style | Lever Angle | Reach Setting | Lever Position |
|---|---|---|---|
| Downhill | Downward | Close | Inward |
| Cross-Country | Flat | Further | Neutral |
| Trail/Enduro | Moderate | Close | Balanced |
Fine-tuning For Small Hands, Gloves, And Other Factors
Not everyone has the same hand size or riding gear. Here’s how to adapt:
- Small hands: Set levers closer with a short reach. Some brands offer levers with extra adjustment range.
- Thick gloves: Increase reach slightly to account for extra padding.
- Cold weather: Gloves and numb fingers mean you need easier access. Adjust levers closer and angle downward.
- Arthritis or hand pain: Prioritize comfort by setting reach as close as possible, and angle to reduce wrist strain.
Many beginners forget to adjust for seasonal changes or new gear. Always re-check lever setup after buying new gloves or grips.
Tips For Preventing Common Adjustment Problems
Some issues can frustrate even experienced riders. Here are ways to avoid them:
- Overtightening bolts: Use a torque wrench if possible. Recommended torque is usually 5–6 Nm.
- Ignoring cable tension: For mechanical levers, check tension every few months.
- Neglecting test rides: Always test before heading to the trails.
- Wrong lever angle: Don’t copy other riders blindly. Adjust for your own hand and wrist position.
Table: Common Problems And Solutions
| Problem | Likely Cause | Solution |
|---|---|---|
| Hand pain | Wrong angle | Align lever with forearm |
| Weak brakes | Loose cable | Adjust tension |
| Lever slips | Loose clamp bolt | Tighten bolt |
| Brake drag | Too tight cable | Loosen barrel adjuster |

Credit: www.youtube.com
Advanced Adjustments: Lever Bite Point
Some hydraulic levers allow you to set the bite point—the point where the brakes start to engage. This is useful for customizing brake feel.
- Find the bite point dial: Usually near the lever or caliper.
- Adjust as needed: Closer bite point means brakes engage sooner.
- Test: Find a balance between fast engagement and smooth modulation.
This adjustment is often overlooked. Riders who fine-tune bite point report more consistent braking, especially on steep or technical trails.
Maintenance Tips After Adjusting
Once you’ve set your levers, keep them in top shape:
- Check bolts regularly: Vibrations can loosen clamps.
- Inspect cables/hydraulic lines: Look for wear, leaks, or fraying.
- Clean levers: Dirt and mud can cause sticking.
- Lubricate moving parts: A drop of bike-specific oil keeps pivots smooth.
Even well-adjusted levers degrade over time. Routine checks prevent sudden braking failures.
When Should You Re-adjust Brake Levers?
Your lever setup is not “set and forget.” You should re-check and adjust when:
- Switching grips or bars: Different shapes change hand position.
- Changing gloves: Thicker or thinner gloves affect reach.
- After a crash: Levers can shift or bend.
- Feeling hand discomfort: Any pain means it’s time to review your setup.
Some riders re-adjust every few months, while others do it before every big ride. Listen to your hands—if you notice pain or slow braking, it’s time to tweak.
Real-world Example: Lever Adjustment In Action
Maria, a trail rider from Colorado, struggled with wrist pain on long rides. She moved her levers inward and angled them downward, matching her forearm. After one test ride, the pain was gone. By fine-tuning reach, she could brake with just her index finger, improving confidence on rocky descents.
Her experience is common. Most riders notice instant benefits after adjusting levers, even if they’ve been riding for years. The difference is often dramatic.
Expert Insights And Non-obvious Tips
- Don’t ignore hand shape: Wide palms or short fingers change ideal lever setup.
- Adjust for riding position: Standing vs. sitting changes wrist angle and lever access.
- Always check both levers: Front and rear may need different setups. Many riders prefer the front lever slightly closer.
- Use a mirror: Watching your hand position from the side can reveal wrist bends you don’t notice on the trail.
Professional mechanics often use a small bubble level to align levers precisely. While not required, this shows how much even tiny adjustments matter.
Frequently Asked Questions
How Often Should I Adjust My Brake Levers?
It’s best to check lever setup every few months or after any change in grips, gloves, or handlebars. Adjust sooner if you feel discomfort or notice weak braking.
Can I Adjust Brake Levers Without Special Tools?
Most adjustments need only a basic Allen wrench. Some older bikes require a screwdriver. Specialized tools, like a torque wrench, are optional for precise tightening.
What’s The Ideal Lever Angle For Mountain Biking?
The lever should align with your forearm when in your normal riding stance. This reduces wrist strain and improves braking control.
Why Do My Levers Feel Loose After Adjustment?
This usually means the clamp bolt is not tight enough. Check and re-tighten to manufacturer specifications. For mechanical levers, also check cable tension.
Are Hydraulic Levers Easier To Adjust Than Mechanical?
Yes, hydraulic levers often have reach dials and self-adjusting features, making setup quicker and simpler. Mechanical levers need careful cable tensioning.
For more in-depth information about mountain bike brake systems, visit BikeRadar’s Mountain Bike Brakes Guide.
Mountain biking is all about fun and challenge, but safety starts with your hands. Adjusting brake levers properly is one of the easiest ways to ride longer, safer, and with more confidence. Whether you’re bombing down hills or cruising forest trails, take a few minutes to fine-tune your setup.
Your hands—and your riding buddies—will thank you.
Credit: enduro-mtb.com

Hello Guys! I am John Reese, a professional biker and my hobby is biking! I have been biking for last 12 years and I love using bikes while outing as well. Based on my experiences with the different type of bikes (mountain bikes, road bikes and hybrid bikes); I am sharing my opinion about various bikes so that a beginner can get started right away. Happy reading!