Mountain biking is full of surprises—steep hills, sudden turns, and rough trails. If your bike’s front gears aren’t shifting smoothly, these adventures can quickly turn into frustration. Many riders think adjusting front gears is complicated, but with the right guidance, it’s a skill you can easily master. This article gives you clear, step-by-step advice to help you adjust your mountain bike’s front gears confidently. Whether you’re preparing for your next ride or fixing a problem you’ve noticed, you’ll learn everything you need to make your bike shift smoothly and reliably.
Understanding Front Gears On A Mountain Bike
Front gears, also known as chainrings and the front derailleur, play a big role in how your mountain bike handles different terrains. The front derailleur moves the chain between the chainrings, letting you choose between easier and harder gears. Most mountain bikes have two or three chainrings, controlled by a shifter near your handlebars.
If you’re riding up a steep hill, you shift to a smaller chainring for easier pedaling. On fast, flat sections, the largest chainring helps you go quicker. The smooth movement between these gears is what makes mountain biking enjoyable and efficient.
Why Proper Adjustment Matters
A poorly adjusted front derailleur can cause:
- Chain rub: The chain touches the derailleur, making noise.
- Missed shifts: The chain doesn’t move to the right chainring.
- Chain drop: The chain falls off the chainrings.
These problems make riding harder and can even damage your bike over time. Proper adjustment helps your bike shift easily, prevents wear, and keeps your ride safe.
Imagine trying to shift gears during a steep climb, only for the chain to slip off. Not only can this interrupt your momentum, but it can also be dangerous if you lose balance. Over time, rough shifting wears out your chainrings and chain faster, leading to expensive repairs.
Common Types Of Front Derailleurs
Mountain bikes use different types of derailleurs. Here’s a quick comparison:
| Type | Mounting Style | Typical Use |
|---|---|---|
| Top Pull | Cable pulls from above | Modern mountain bikes |
| Bottom Pull | Cable pulls from below | Older bikes or some road bikes |
| Dual Pull | Cable can pull from above or below | Flexible setups |
Knowing your derailleur type helps you follow the right steps during adjustment. For example, a dual pull derailleur gives you flexibility with cable routing, which is useful if you upgrade your bike frame or components. Beginners often miss this detail, but it can save time and effort later.
Tools And Preparation
Before you start, gather these basic tools:
- Phillips screwdriver
- 5mm Allen wrench
- Bike lubricant
- Clean rag
Having these ready prevents interruptions. If you don’t have a bike stand, use a sturdy wall or fence to keep your bike upright. A steady bike makes every step easier and safer.
Quick Pre-check
Inspect your front derailleur for:
- Bent cage: The metal part that guides the chain should be straight.
- Loose bolts: Check mounting bolts and cable anchor bolts.
- Cleanliness: Wipe away dirt and old grease.
A clean and properly mounted derailleur makes adjustment easier and more reliable. Dirt can hide problems, such as a slightly bent cage or worn cable. It’s smart to check for old lubricant build-up as well, which can affect shifting.
If the derailleur is very dirty, use a gentle degreaser and clean everything thoroughly before starting. This simple step can prevent misdiagnosis and wasted effort.
Credit: www.parktool.com
Step-by-step Guide To Adjusting Front Gears
Let’s break down the process into clear steps. Take your time with each part, and don’t rush—small adjustments make a big difference.
Step 1: Set The High And Low Limit Screws
The limit screws control how far the derailleur can move. They’re usually marked “L” (low) and “H” (high).
- Shift to the smallest chainring (closest to the bike frame) and the largest rear cog.
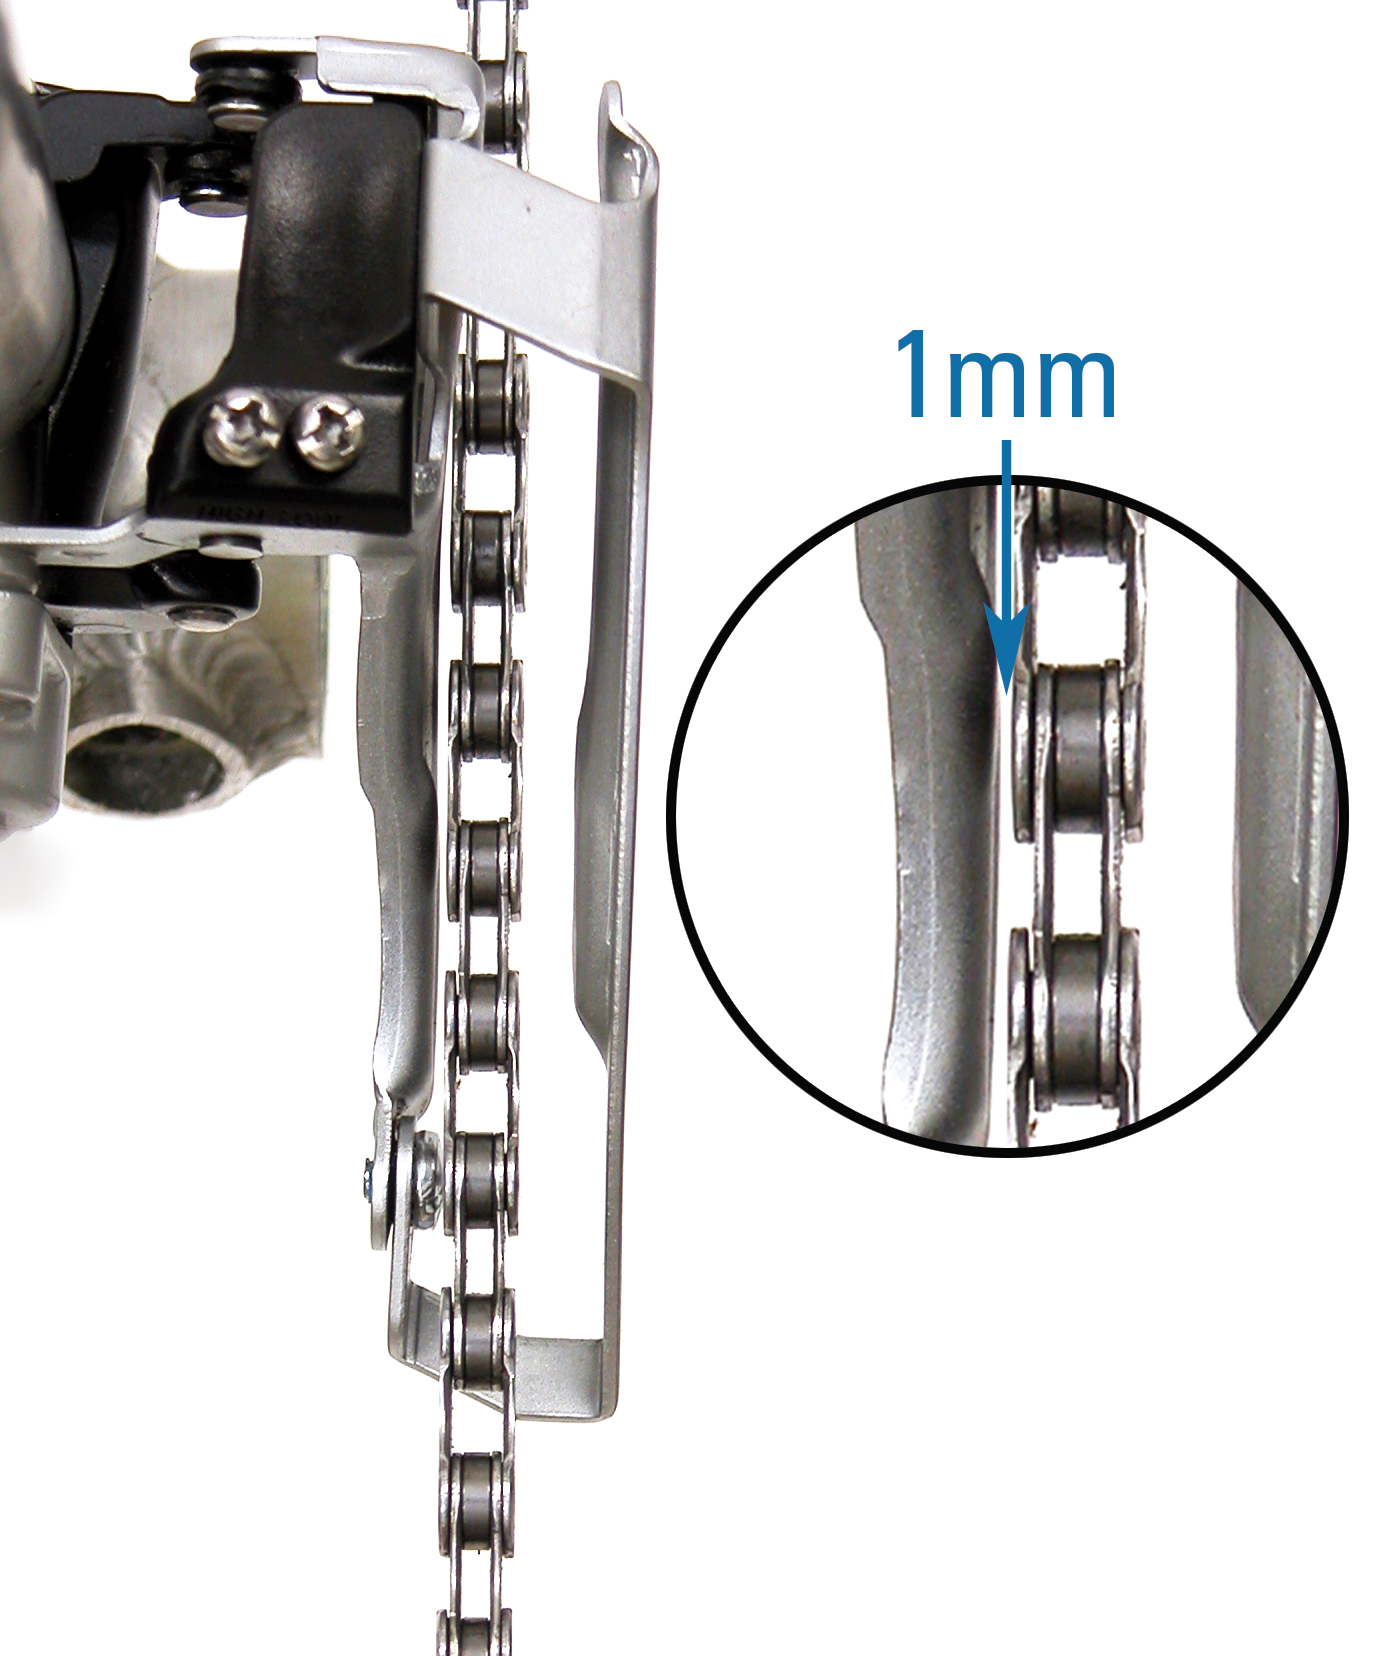
- Locate the “L” screw. Turn it so the derailleur cage sits just 1–2 mm away from the chain, without rubbing.
- Shift to the largest chainring and smallest rear cog.
- Adjust the “H” screw so the cage sits just 1–2 mm from the chain on the outside.
These screws prevent the chain from falling off the chainrings. It’s important to use small turns—about a quarter turn at a time. Beginners often make the mistake of turning screws too much, which can lead to new problems.
If you’re unsure about which screw does what, look for markings next to each screw or check your bike’s manual. Some derailleurs have both screws close together, so double-check before adjusting.
Step 2: Check Derailleur Height And Alignment
The derailleur cage should sit 1–3 mm above the largest chainring. It should be parallel to the chainrings.
- If the cage is too high or angled, loosen the mounting bolt with your Allen wrench.
- Adjust the height and angle, then tighten the bolt.
Misalignment is a common beginner mistake. If the cage isn’t parallel, shifting will always be rough.
A real-world tip: Stand behind your bike and look straight at the derailleur. If the cage isn’t perfectly in line with the chainrings, adjust it. Even a slight angle can cause chain rub or missed shifts.
Some bikes may have a curved frame, making it tricky to see alignment. Try using a flat ruler or the edge of a book to help guide your adjustments.
Step 3: Adjust Cable Tension
Cable tension controls how well the derailleur moves. If the cable is too loose, shifting will be slow or incomplete. If it’s too tight, the derailleur may overshoot.
- Shift to the smallest chainring.
- Loosen the cable anchor bolt.
- Pull the cable tight (but not overly tight) and re-tighten the bolt.
- Use the barrel adjuster (on the shifter or derailleur) for fine-tuning. Turn it clockwise to loosen, counterclockwise to tighten.
Try shifting between the chainrings. If the chain hesitates or rubs, adjust the barrel until shifting feels smooth.
A practical example: If you notice the chain doesn’t move to the largest chainring, add more tension. If it overshoots and drops off, reduce tension. Many new riders skip fine-tuning with the barrel adjuster, but it’s the easiest way to improve shifting.
Step 4: Test Shifting Performance
Shift through all the chainrings several times, both slowly and quickly. Watch for:
- Chain rub: Try different rear cogs to see if the chain rubs the cage.
- Missed shifts: If the chain doesn’t move, add more cable tension.
- Chain drop: If the chain falls off, check the limit screws.
Fine-tune each adjustment as needed. Make sure to test while pedaling gently; hard pedaling can mask problems. If shifting feels rough only in certain gear combinations, focus on those areas.
Step 5: Lubricate The System
Apply a thin layer of bike lubricant to the derailleur pivot points and chain. This reduces friction and helps shifting.
Use a small brush or cloth to spread lubricant evenly. Avoid getting lubricant on brake pads or tires. A well-lubricated system is quieter and lasts longer.
Step 6: Final Check And Ride Test
Take your bike for a short ride. Shift gears under real conditions—on flat ground and small hills. If you notice any problems, repeat the steps as needed.
Try shifting under load, such as when going uphill. This real-world test helps reveal hidden issues. If your bike shifts smoothly, you’ve done the job right.
Troubleshooting Common Issues
Even after careful adjustment, some issues can appear. Here’s how to fix the most common problems.
Chain Rub
If the chain rubs the derailleur cage, try these steps:
- Check alignment: Make sure the cage is parallel.
- Adjust limit screws: Often, the “L” or “H” screw needs a small turn.
- Use the trim function: Some shifters let you “trim” the cage slightly.
Sometimes chain rub happens only in certain gear combinations. For example, the smallest front chainring and the smallest rear cog. This is called “cross-chaining” and is best avoided for smoother riding.
Missed Shifts
If the chain doesn’t move to the next chainring:
- Increase cable tension: Turn the barrel adjuster counterclockwise.
- Check for worn cables: Old cables can stretch or stick.
- Inspect shifter: Sometimes the problem is in the shifter, not the derailleur.
If shifting is slow, check cable housing for kinks or dirt. Clean or replace as needed. A sticky shifter can often be fixed by cleaning and lubricating inside.
Chain Drop
If the chain falls off the chainrings:
- Tighten limit screws: The “L” or “H” screw may be too loose.
- Check cage height: Too high or too low can cause drops.
- Look for bent chainrings: Damaged rings don’t hold the chain well.
A common mistake is adjusting the limit screws too far, allowing the derailleur to push the chain past the chainrings. Always use small turns and test after each adjustment.
Stuck Shifter
If the shifter won’t move:
- Lubricate cables: Apply lubricant to the cable housing.
- Replace cable: Old cables can break or jam.
- Check shifter mechanism: Sometimes dirt or damage inside the shifter causes sticking.
If the shifter still doesn’t work after cleaning, you may need a replacement. This is rare but can happen on older bikes.

Credit: www.bike-components.de
Comparing Front Gear Adjustment With Rear Gear Adjustment
Many riders find the rear derailleur easier to adjust than the front. Here’s a quick comparison:
| Adjustment Area | Front Derailleur | Rear Derailleur |
|---|---|---|
| Limit Screws | Controls chainring range | Controls rear cog range |
| Cable Tension | Fine-tuning often needed | Fine-tuning needed, but easier |
| Alignment | Parallel with chainrings | Parallel with rear cogs |
| Common Mistakes | Cage misalignment, limit screws | Cable tension, limit screws |
Non-obvious insight: Many beginners ignore cage height on the front derailleur, but it’s a critical factor. Even a few millimeters too high or low can ruin shifting.
Another detail: Rear derailleurs usually have more range of motion, making them more forgiving. Front derailleurs require precise setup because chainrings are larger and shifts need more force.
How To Know If Your Front Gears Need Adjustment
Here are signs your front gears need attention:
- Strange noises: Clicking or rubbing sounds when shifting.
- Difficulty shifting: You have to push hard or shift several times.
- Chain drops: The chain falls off when you shift.
- Visible misalignment: The cage isn’t parallel to the chainrings.
Regular maintenance prevents these problems and keeps your ride smooth.
If you notice a sudden change after a crash or rough ride, check adjustment right away. Sometimes, a small impact can bend the cage or move the limit screws.

Credit: www.youtube.com
How Often Should You Adjust Front Gears?
Adjustment frequency depends on how often you ride, the terrain, and your bike’s age. For most riders:
- Check adjustment every 3–6 months.
- Adjust after a crash, heavy ride, or if you notice problems.
- Lubricate cables and pivot points monthly.
If you ride in muddy or rough conditions, check more often. Dirt and impacts can change alignment quickly.
A non-obvious insight: Cable stretch is a common cause of shifting issues after new cable installation. Always re-check tension after the first few rides.
Key Mistakes Beginners Make
Adjusting front gears is easy to learn, but many beginners make these mistakes:
- Ignoring cage height: The cage must be 1–3 mm above the largest chainring.
- Forgetting alignment: The cage must be parallel, not angled.
- Over-tightening cable: Too much tension causes rough shifting.
- Not checking limit screws: Loose screws let the chain fall off.
- Skipping lubrication: Dry cables and pivots make shifting harder.
- Adjusting while dirty: Dirt hides problems and makes adjustment unreliable.
Another mistake: Not testing shifting under real riding conditions. Always take a quick ride and shift gears with some force before finishing adjustments.
Advanced Tips For Smooth Shifting
If you want your mountain bike to shift like a professional’s, use these advanced tips:
Use Quality Cables
Cheap cables stretch quickly and make shifting rough. High-quality cables are smoother and last longer. Stainless steel or coated cables resist corrosion and friction, making a noticeable difference in shifting quality.
Upgrade Your Shifter
Modern shifters offer better control and “trim” functions, letting you adjust the cage’s position for perfect alignment. If your bike’s shifter feels loose or imprecise, upgrading can help avoid missed shifts.
Inspect Chainrings Regularly
Worn chainrings cause poor shifting. Look for bent teeth, missing teeth, or sharp edges. If you see shiny spots or the chain slips often, it’s time to replace the ring.
Set Up Barrel Adjuster For Fine Tuning
The barrel adjuster lets you make small changes without tools. Learn to use it during rides for quick fixes.
Keep Your Bike Clean
Dirt and mud build up fast on mountain bikes. Clean your drivetrain after every ride for the best performance. Use a soft brush to remove debris from the chainrings, derailleur, and chain.
Real-world Examples
Let’s look at two typical adjustment situations.
Example 1: Chain Rub After A Crash
A rider crashes and the chain starts rubbing. They check the cage height—it’s too low. Raising the cage 2 mm fixes the problem. The rider also tightens the “L” screw to keep the chain from falling off.
This scenario shows how quick inspection and small adjustments solve big problems.
Example 2: Missed Shifts On Steep Hills
A rider struggles to shift to the largest chainring during steep climbs. They increase cable tension and lubricate the cable. Shifting becomes smooth again.
Sometimes, adding a drop of lubricant to the cable housing is enough to restore smooth shifting. If you notice slow shifts after riding in rain or mud, this is a simple fix.
These examples show that most problems are easy to fix with careful adjustment.
When To Visit A Bike Shop
Sometimes, adjustment isn’t enough. Seek professional help if:
- The cage is badly bent or cracked.
- The shifter doesn’t move, even after cleaning and lubing.
- You see worn or broken chainrings.
Bike shops have special tools and experience to fix complex issues. Don’t risk riding with unsafe gears.
If you’re unsure about compatibility, ask a mechanic for advice before buying replacement parts. This prevents wasted money and time.
Quick Reference: Adjustment Steps At A Glance
Here’s a summary of the adjustment process:
- Shift to smallest chainring and largest rear cog.
- Adjust “L” limit screw.
- Shift to largest chainring and smallest rear cog.
- Adjust “H” limit screw.
- Check cage height and alignment.
- Adjust cable tension.
- Test shifting through all chainrings.
- Lubricate pivots and cables.
- Ride test and fine-tune as needed.
Print or save these steps for quick reference.
Data: How Common Are Front Gear Problems?
According to a survey by BikeRadar in 2023:
- 37% of mountain bike riders reported front gear issues in the last year.
- 62% fixed problems themselves at home.
- Only 23% needed a bike shop for help.
This shows that most riders can solve front gear problems with a little guidance.
A non-obvious insight: Many riders don’t realize regular maintenance prevents most shifting issues. Keeping cables clean and lubricated is more important than frequent adjustments.
Comparing Two Adjustment Approaches
Some riders prefer the “quick fix” method—only adjusting cable tension. Others use the full step-by-step process. Here’s a comparison:
| Method | Speed | Reliability | Skill Needed |
|---|---|---|---|
| Quick Fix (Cable Only) | Fast (5–10 min) | Temporary | Beginner |
| Full Adjustment | Medium (15–30 min) | Long-lasting | Intermediate |
For lasting results, always use the full adjustment process. The quick fix is helpful if you’re in a hurry, but problems often return soon after.
Using Online Resources For Extra Help
If you want more visual guidance, try video tutorials or official guides. One trusted resource is Park Tool. Videos show each step and can help if you’re unsure about alignment or cable tension.
Don’t hesitate to pause and re-watch tricky parts. Seeing the process can make things much clearer, especially if English is not your first language.
Frequently Asked Questions
How Do I Know If My Front Derailleur Is Compatible With My Bike?
Check your bike’s frame and derailleur mount. Most mountain bikes use clamp-on or direct-mount derailleurs. The size of your chainrings and cable routing (top or bottom pull) also matter. Check the manufacturer’s specifications for compatibility.
If you plan to upgrade, consider the number of chainrings and the shifter type. Compatibility is key for smooth shifting.
What Should I Do If The Chain Keeps Dropping After Adjustment?
If the chain drops after adjustment, re-check the limit screws and cage height. Make sure the cage is parallel and 1–3 mm above the largest chainring. If the problem continues, inspect the chainrings for damage or wear.
Also, check if your chain is stretched or worn out. A tired chain is more likely to drop, even with perfect adjustment.
Can I Use The Same Steps For Bikes With Only Two Front Chainrings?
Yes, the process is almost the same. Adjust the limit screws, cable tension, and alignment as usual. With two chainrings, focus more on fine cable tuning to prevent chain rub.
If you ride mainly on flat terrain, you might use only one chainring most of the time. Still, proper adjustment ensures smooth shifting when you need it.
How Often Should I Clean And Lubricate The Front Derailleur?
Clean and lubricate the front derailleur every month or after muddy rides. Dirt and moisture cause rust and rough shifting. Wipe down the cage and apply a small amount of bike-specific lubricant to the pivots.
If you ride in dry, dusty conditions, cleaning more often can prevent grit from damaging moving parts.
Is It Possible To Adjust Front Gears Without A Bike Stand?
Yes. You can lean your bike against a wall or use a sturdy support. A bike stand makes the job easier, but isn’t required. Just make sure your bike is stable and the pedals can turn freely.
A tip: Place a towel or mat under your bike to catch any dropped screws or tools.
Getting your mountain bike’s front gears adjusted right makes every ride smoother and more fun. With careful steps and regular maintenance, you’ll spend less time fixing and more time riding. Small adjustments often make the biggest difference. Now, you have the tools and knowledge to keep your bike shifting perfectly—no matter where the trail takes you.

Hello Guys! I am John Reese, a professional biker and my hobby is biking! I have been biking for last 12 years and I love using bikes while outing as well. Based on my experiences with the different type of bikes (mountain bikes, road bikes and hybrid bikes); I am sharing my opinion about various bikes so that a beginner can get started right away. Happy reading!