Mountain biking gives you freedom, adventure, and challenge. But nothing ruins a ride faster than a loose or creaky headset. The headset is a small part between your bike’s frame and fork, but it does an important job. It lets your handlebars turn smoothly and safely.
If your headset is not set up right, you might feel shakes, hear noises, or even lose control. Luckily, adjusting a mountain bike headset is not difficult if you know how. Whether you’re new to bike maintenance or want to do things yourself, this guide will help you adjust your headset step by step.
What Is A Mountain Bike Headset?
The headset is the part that connects the bike fork to the frame at the front. It has bearings that let the fork rotate when you turn the handlebars. Most mountain bikes use a threadless headset, but older bikes may have threaded types. A well-adjusted headset means your steering is smooth, stable, and safe.
Parts Of A Headset
Knowing the main parts helps you understand what you’re working on:
- Top cap: Sits on top of the steerer tube and is held by a bolt.
- Stem: Holds your handlebars and clamps onto the steerer tube.
- Upper and lower bearings: Let the fork turn smoothly inside the frame.
- Preload bolt: The bolt in the top cap, used to adjust bearing tension.
- Head tube: The front tube on the bike frame where the headset sits.
Signs Your Headset Needs Adjustment
Riding with a poorly adjusted headset can cause problems. Look for these signs:
- Front-end play: When you rock the bike with the front brake on, you feel movement or knocking in the headset area.
- Sticky steering: Turning the handlebars feels rough, tight, or notchy instead of smooth.
- Unusual noises: Creaking, clicking, or grinding sounds from the front of the bike, especially when turning.
- Loose steering: The handlebars and fork feel loose or wobbly, making control harder.
- Visible gaps: The headset parts or spacers have visible gaps, or the stem does not sit flush.
Ignoring headset issues can lead to:
- Faster bearing wear
- Poor handling
- Damage to the frame or fork
Tools And Supplies You Need
You don’t need a shop full of tools to adjust a headset. Most mountain bike headsets use simple hex bolts. Here’s what you need:
- Allen (hex) keys: Usually 4mm, 5mm, or 6mm sizes
- Torque wrench (optional): For precise tightening
- Clean rag: To wipe parts
- Grease: For reassembly, if you remove bearings
- Bike stand (optional): Makes work easier but not required
Handy Tip
If you’re unsure about bolt sizes, check your bike manual or try different keys gently. For most modern bikes, a 5mm Allen key fits both the stem and top cap bolts.
How To Check Your Headset
Before making adjustments, you need to check if your headset is loose or too tight.
- Check for play: Stand over your bike, hold the front brake, and rock the bike back and forth. Feel at the junction where the fork meets the frame. If you feel movement, your headset is loose.
- Check for tightness: Lift the front wheel off the ground and slowly turn the handlebars left and right. If the movement is rough, tight, or notchy, the headset is too tight or the bearings are damaged.
- Look for gaps: Check if there’s a space between the stem, spacers, and headset. Everything should sit flush.
If your headset passes these checks, you don’t need to adjust it. But if you find play or tightness, follow the steps below.
Step-by-step: How To Adjust A Threadless Mountain Bike Headset
Adjusting a threadless headset is a common job for modern mountain bikes. Here’s how to do it safely and correctly.
1. Prepare Your Bike
- Put your bike in a stand or lean it against a wall.
- Make sure the front wheel is straight and the handlebars are aligned.
- Wipe the headset area clean with a rag.
2. Loosen The Stem Bolts
- Find the two (sometimes four) bolts on the side of the stem that clamp it to the steerer tube.
- Use the correct size Allen key (usually 4mm or 5mm).
- Loosen both bolts a few turns, but do not remove them.
Why? The stem must move freely up and down the steerer tube for you to adjust the headset preload.
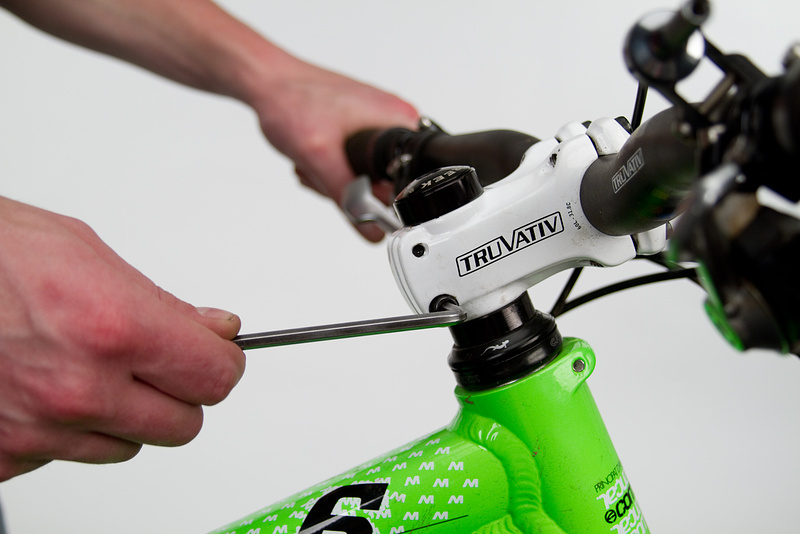
3. Adjust The Top Cap
- On top of the stem, there’s a small cap held by a single bolt.
- Use an Allen key (usually 5mm) to turn the top cap bolt clockwise to tighten or counterclockwise to loosen.
- Tighten the bolt gently. You are not trying to make it very tight—just enough to remove play.
- Check for play as you go (see the earlier method). A good approach is to tighten until you feel no knocking, but the steering is still smooth.
Important: Do not overtighten! Too much preload crushes the bearings and makes steering stiff.
4. Align The Handlebars
- Make sure the stem and handlebars are straight and in line with the front wheel.
- Fine-tune the alignment before tightening the stem bolts.
5. Tighten The Stem Bolts
- With the stem aligned, use your Allen key to tighten the stem bolts evenly.
- Tighten each bolt a bit at a time, moving back and forth between them.
- If you have a torque wrench, check your bike’s recommended torque (usually 5–7 Nm) and tighten to that value.
Why torque matters: Over-tightening can strip the bolts or crush the steerer tube. Under-tightening can let the bars slip while riding.
6. Re-check Your Work
- Test for play by rocking the bike with the front brake on.
- Turn the handlebars to check for smooth, easy movement.
- If you feel play, repeat the steps and add a tiny bit more preload.
- If steering feels tight, loosen the top cap slightly.
7. Test Ride
- Take your bike for a short test ride.
- Notice any noises, looseness, or stiffness.
- Re-check bolts after your ride; sometimes things settle and need a final touch.
Common Mistakes When Adjusting A Headset
Even experienced riders sometimes make these mistakes:
- Overtightening the top cap: This crushes the bearings, causing rough steering and early wear.
- Forgetting to loosen the stem bolts: If the stem is tight, the top cap won’t adjust bearing tension—it only pulls against the stem, not the headset.
- Not aligning the bars: Tightening the stem with the bars crooked means they’ll stay misaligned.
- Ignoring torque settings: Too much force can damage parts; too little can let things move.
- Not re-checking after a ride: Sometimes, things settle after the first ride and need a quick re-check.

Credit: www.youtube.com
Difference Between Loose And Tight Headset
Understanding the difference helps you diagnose problems correctly.
| Symptom | Loose Headset | Tight Headset |
|---|---|---|
| Steering feel | Wobbly, with play or knocking | Stiff, sticky, or notchy |
| Noises | Clicking or rattling | Grinding or squeaking |
| Bike handling | Unstable, poor control | Hard to steer accurately |
| Long-term effect | Frame and bearing damage | Bearing wear and possible failure |
When To Replace Headset Bearings
Not all headset problems can be fixed with adjustment. Sometimes, the bearings are worn out and need replacement. Signs you need new bearings include:
- Grinding or crunching when turning, even after adjusting
- Visible rust or water inside the headset
- Notchy feeling that does not go away with adjustment
- Water or dirt coming out of the headset area
Tip: Modern headsets usually use cartridge bearings, which are easy to replace. If your headset uses loose ball bearings, replacing them can be messier but still possible at home.
Threaded Vs. Threadless Headsets
Most modern mountain bikes use threadless headsets. Older or some budget bikes may have threaded headsets. The adjustment steps are different.
Comparison: Threadless Vs. Threaded Headset
| Feature | Threadless | Threaded |
|---|---|---|
| Common on | Modern mountain bikes | Older/budget bikes |
| Adjustment method | Top cap bolt and stem bolts | Locknut and adjustable race |
| Tools needed | Allen keys | Adjustable wrench |
| Upgrading | Easy to swap stems/handlebars | More limited options |
Adjusting A Threaded Headset
- Loosen the top locknut using a wrench.
- Adjust the lower race (cone) for correct bearing tension.
- Hold the race in place and tighten the locknut.
- Check for play or tightness and repeat if needed.
Note: If you’re not sure which type your bike has, look for threads at the top of the fork or a quill stem—these mean a threaded headset.
Tips For Smooth Headset Adjustment
- Clean and grease: If you remove the bearings, clean them and add fresh grease to keep things smooth and prevent rust.
- Replace spacers if needed: Cracked or compressed spacers can cause problems. Use only quality spacers that fit snugly.
- Check headset regularly: Every few months, or after a crash, check your headset. Early fixes prevent bigger problems.
- Use correct tools: A torque wrench helps avoid over-tightening. Invest in one if you do your own bike work.
- Don’t ignore creaks: Creaks at the front end often mean loose or dirty headset parts.
Example: Real-world Scenario
Imagine you’re riding a trail and suddenly notice your steering feels odd. At the next stop, you:
- Grab the front brake.
- Rock the bike and feel a slight click at the headset.
- Use your multi-tool to loosen the stem bolts, add a quarter turn to the top cap, align the bars, and retighten.
After this quick adjustment, the click is gone and your steering feels perfect. This simple fix can save your ride and prevent damage.
Advanced: Upgrading Your Headset
Some riders want to upgrade their headset for lighter weight, better durability, or smoother steering.
What To Consider
- Bearing type: Cartridge bearings are smoother and last longer than loose balls.
- Material: Aluminum or titanium headsets are lighter but can be pricier.
- Sealing: Good seals keep out water and dirt, protecting the bearings.
- Compatibility: Make sure the new headset fits your frame and fork. There are different sizes and types (e.g., integrated, semi-integrated, external).
Example: Integrated Vs. External Headsets
| Type | Pros | Cons |
|---|---|---|
| Integrated | Lower weight, clean look | Needs compatible frame, less protection |
| External | Better bearing protection, easier service | Heavier, bulkier |
Tip: Only upgrade your headset if you have a specific problem or goal. For most riders, a well-adjusted standard headset works perfectly.
Credit: www.pnwcomponents.com
Maintenance: Keeping Your Headset In Top Shape
A headset that is clean and well-lubricated lasts longer and performs better. Here’s how to keep yours running smoothly:
- Clean your bike after wet or muddy rides. Pay attention to the headset area.
- Check for play every month or after crashes.
- Regrease bearings at least once a year, or more if you ride in wet conditions.
- Replace bearings if they feel rough, notchy, or noisy after cleaning and adjustment.
Pro insight: Many riders forget headset maintenance because the part is out of sight. But it’s one of the most important for safety and bike feel.
When To See A Bike Mechanic
Adjusting a headset is usually simple, but sometimes you need expert help:
- If you see cracks or damage on the headset, steerer tube, or frame.
- If the bearings are stuck, rusty, or won’t move smoothly after cleaning.
- If you’re not confident doing the job yourself.
A good shop can replace bearings, check for deeper issues, or recommend upgrades if needed. This protects your bike and your safety.
Credit: www.pinkbike.com
Environmental Factors That Affect Headset Adjustment
Where and how you ride can affect your headset:
- Wet and muddy conditions: Water and dirt can get into the bearings, causing wear or rust.
- Frequent impacts: Aggressive riding or jumps can cause headset parts to settle or loosen.
- Transport: Putting your bike in a car or on a rack can sometimes knock things out of alignment.
Check your headset more often if you ride in tough conditions.
Non-obvious Tips Most Beginners Miss
- Re-check after first rides: Even if you adjust the headset perfectly in the garage, parts can settle after a bumpy ride. Always check again after your first trail ride.
- Don’t overtighten the top cap: The top cap only sets bearing preload. Once the stem bolts are tight, the top cap does nothing. Over-tightening here is a common mistake that can damage parts.
Useful Resources
If you want to see more headset types, step-by-step videos, or technical details, the Wikipedia Headset Article gives a deep look at headset history and technology.
Frequently Asked Questions
How Often Should I Check My Mountain Bike Headset?
It’s smart to check your headset every month, or after a crash or tough ride. Even if you don’t hear noises, a quick check can catch small issues before they become big problems.
What Happens If I Ride With A Loose Headset?
A loose headset can cause poor steering control, extra noise, and can damage your bike’s frame or bearings. In extreme cases, it can cause a crash if the front end separates or fails.
Can I Use Regular Grease For My Headset Bearings?
Yes, any quality bike or waterproof grease is fine for headset bearings. Avoid thin oils. Grease keeps out water and makes bearings last longer.
Do I Need Special Tools To Adjust My Headset?
Most threadless headsets only need a set of Allen (hex) keys. A torque wrench is helpful but not required. For threaded headsets, you may need an adjustable wrench.
How Do I Know If My Headset Bearings Need Replacement?
If you feel grinding, roughness, or notchy movement even after adjustment, your bearings are probably worn or damaged. Visible rust, pitting, or water inside the headset are also signs you need new bearings.
Adjusting your mountain bike headset is an easy skill that keeps your rides safe and fun. With the right tools and a bit of care, you can handle this job yourself and enjoy every trail with confidence.

Hello Guys! I am John Reese, a professional biker and my hobby is biking! I have been biking for last 12 years and I love using bikes while outing as well. Based on my experiences with the different type of bikes (mountain bikes, road bikes and hybrid bikes); I am sharing my opinion about various bikes so that a beginner can get started right away. Happy reading!