Adjusting mountain bike forks is one of the most important skills for any rider who wants better control, comfort, and performance on the trail. Forks are not just about looks—they affect how your bike handles bumps, corners, and even your own fatigue.
Many beginners believe factory settings are “good enough,” but most forks need fine-tuning for your weight, riding style, and terrain. If you’ve ever felt your front wheel bounce too much, dive too deep, or just didn’t grip the trail, chances are your fork isn’t adjusted right.
This guide will show you, step by step, how to adjust mountain bike forks so your ride feels smoother and safer—no matter your experience level.
Understanding Mountain Bike Forks
Before making any changes, it helps to know what you’re adjusting. The mountain bike fork is the suspension at the front of your bike. It absorbs shocks from rocks, roots, and drops, keeping your wheel on the ground. Most modern forks are either air or coil (spring-based). Each has different ways to adjust.
Types Of Forks
- Air Forks: These use air pressure for suspension. They are lighter, easier to adjust, and common on mid- to high-end bikes.
- Coil Forks: These use metal springs. They are heavier but give a smoother feel. Adjusting them usually means changing the spring.
Main Adjustments
- Sag: How much the fork compresses under your weight.
- Rebound: How quickly the fork returns after compressing.
- Compression: How much force is needed to compress the fork.
- Volume Spacers: Change how the fork behaves near full compression.
Knowing these terms helps you follow the steps and understand what each adjustment does.
Why Fork Adjustment Matters
A properly adjusted fork changes everything. It can make your bike feel more stable, less tiring, and safer. Here are some real benefits:
- Improved control: The front wheel stays in contact with the ground.
- Less fatigue: The fork absorbs shocks, so your arms and hands don’t.
- Safer descents: The fork prevents sudden dives and unpredictable movement.
- Better cornering: Adjustments help your bike grip, not slide, in turns.
Many riders don’t realize a poorly adjusted fork can actually make crashes more likely. Studies from the International Mountain Bicycling Association show that the right suspension settings reduce loss of control incidents by up to 30%.
Tools You’ll Need
You don’t need a full workshop to adjust your fork, but a few basic tools are essential:
- Shock pump (for air forks)
- Allen keys (usually 4mm, 5mm, or 6mm)
- Small ruler or tape measure
- Clean rag
- Bike stand (optional, but handy)
- Fork manufacturer’s manual (for specific settings)
Having these ready makes the process quicker and safer.
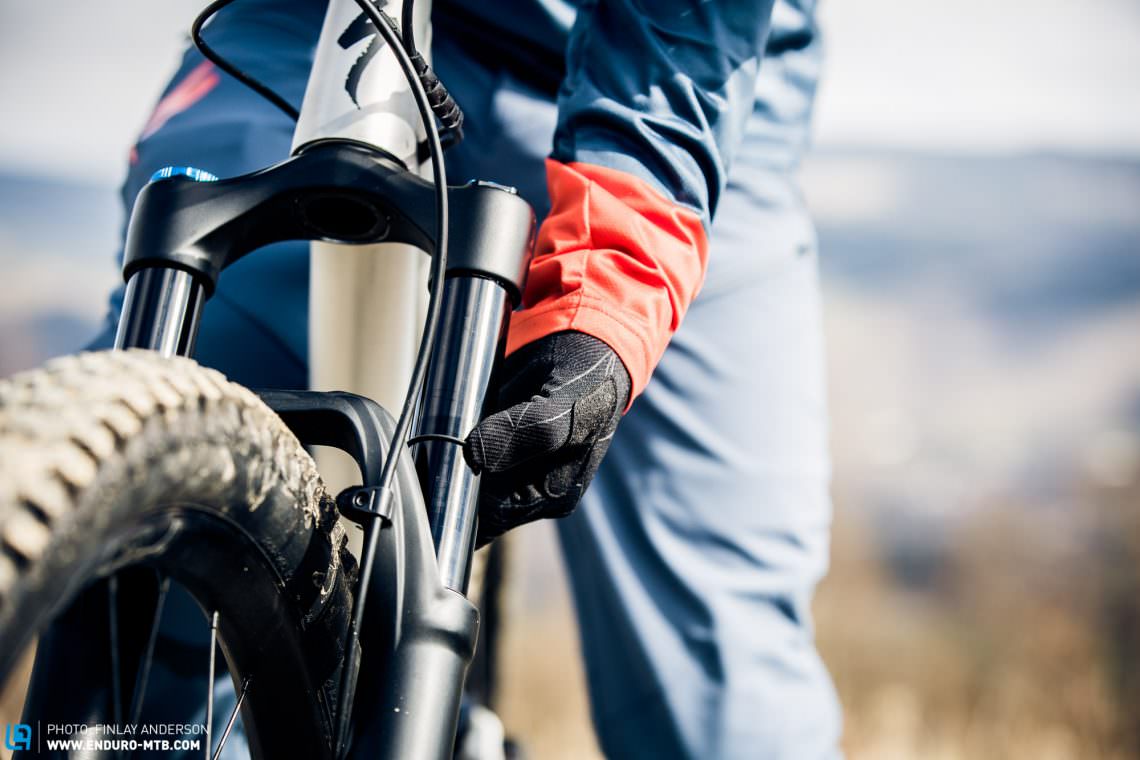
Setting The Sag
Sag is the most basic—and most important—fork adjustment. It’s how much your fork compresses when you sit on the bike. Too little sag means the fork won’t absorb bumps well; too much sag means you’ll bottom out easily.
How To Set Sag
1. Find The Manufacturer’s Recommendation
Most brands suggest 15-25% of the fork’s total travel as sag. For example, if your fork has 100mm travel, aim for 15–25mm sag.
2. Put On Your Riding Gear
Wear what you’d usually ride with, including helmet, pack, and shoes.
3. Sit On Your Bike
Have a friend hold the bike upright, or use a wall for support.
4. Slide The O-ring
Many forks have a rubber O-ring on the stanchion. Slide it down to the dust seal.
5. Stand Up In Neutral Position
Stand on the pedals, balanced, as you would while riding. Let the fork settle.
6. Measure The O-ring Movement
Carefully step off the bike. Measure how far the O-ring moved. This is your sag.
7. Adjust Air Pressure Or Spring
If the sag is too much, add air with the shock pump. If too little, release air. For coil forks, you may need to swap springs.
8. Repeat Until Correct
Check and adjust until you hit the recommended sag.
Example
If your fork is 120mm and you want 20% sag:
- 120mm × 0.20 = 24mm sag
Slide the O-ring, stand on the bike, measure. If you get 18mm, add air. If you get 28mm, let some air out.
Common Mistakes
- Not wearing riding gear when measuring sag.
- Forgetting to reset the O-ring.
- Using the wrong percentage for fork travel.
Credit: www.corkicycles.com
Adjusting Rebound
Rebound controls how fast your fork “rebounds” after a bump. Too fast, and your wheel bounces; too slow, and the fork feels sluggish.
How To Adjust Rebound
1. Locate The Rebound Knob
Usually found at the bottom of the fork’s right leg. It’s often red.
2. Start With Manufacturer’s Setting
Check the manual for a recommended starting point. Most forks have 10–20 clicks of adjustment.
3. Test And Adjust
Push down hard on the handlebars, let go, and watch how fast the fork rises. If it “pogo-sticks,” slow it down. If it sticks, speed it up.
4. Trail Test
The best way to dial in rebound is to ride over a rough section. If the front wheel bounces, add more rebound. If the fork stays compressed, reduce rebound.
Tips For Rebound
- Faster rebound is better for smooth trails.
- Slower rebound helps on rough, rocky terrain.
- Adjust in small steps—one or two clicks at a time.
Example Table: Rebound Adjustment Effects
| Rebound Setting | Trail Behavior | Best For |
|---|---|---|
| Fast | Fork returns quickly, risk of bouncing | Smooth, flowy trails |
| Medium | Balanced response, less bounce | General use |
| Slow | Fork returns slowly, more control | Technical, rocky terrain |
Compression Adjustment
Compression controls how the fork compresses under load. Many forks have two types: low-speed compression (bumps, braking) and high-speed compression (big hits, jumps).
How To Adjust Compression
1. Find The Compression Knob
Usually on top of the fork’s right leg. Sometimes labeled LSC (low-speed) or HSC (high-speed).
2. Set To Manufacturer’s Start Point
Begin with the recommended setting.
3. Test On Trail
Ride and notice how the fork feels during turns, braking, and jumps. If it dives too much while braking, increase low-speed compression. If it bottoms out on jumps, add high-speed compression.
4. Fine Tune
Make small changes—one click at a time. Too much compression makes the fork harsh; too little makes it soft.
Example Table: Compression Setting Comparison
| Compression Setting | Fork Response | Rider Feedback |
|---|---|---|
| Low | Smoother ride, more fork movement | Comfortable, but may bottom out |
| Medium | Balanced, less fork dive | Good for most riders |
| High | Stiffer fork, less movement | Rougher ride, more control for aggressive riders |
Practical Example
If you notice your fork dives too much during corners, increase low-speed compression. If you feel harshness on big drops, decrease high-speed compression.
Volume Spacers: Advanced Adjustment
Volume spacers are small plastic pieces that change the air spring’s volume. Adding spacers makes the fork harder to bottom out; removing them makes it softer.
How To Adjust Volume Spacers
1. Check Compatibility
Not all forks support volume spacers. Check your fork manual.
2. Remove Top Cap
Use an Allen key to unscrew the air spring’s top cap.
3. Add Or Remove Spacers
Most forks use clip-in spacers. Add for more bottom-out resistance, remove for a softer feel.
4. Reassemble And Test
Put the cap back, inflate to your usual pressure, and test on the trail.
When To Use Volume Spacers
- If you often bottom out, add spacers.
- If your fork feels too firm near the end of travel, remove spacers.
Non-obvious Insight
Many riders think volume spacers only affect big drops. In reality, they also change how the fork feels in corners and rough terrain. Too many spacers can make the fork feel “dead” on small bumps.
Adjusting For Rider Weight And Style
Fork settings are not “one size fits all. ” Heavier riders need more air pressure or stiffer springs; lighter riders need less. Aggressive riders (downhill, jumps) need firmer settings; casual riders need softer settings.
Weight Adjustment
- Riders under 150 lbs: Use lower air pressure, softer compression.
- Riders 150–200 lbs: Start with manufacturer’s recommended settings.
- Riders over 200 lbs: Increase air pressure, add volume spacers.
Riding Style Adjustment
- Trail and XC riders: Softer settings for comfort.
- Enduro/DH riders: Firmer settings for control and bottom-out resistance.
Example Table: Rider Weight Vs. Fork Setting
| Weight (lbs) | Air Pressure (psi) | Compression | Rebound |
|---|---|---|---|
| 120–150 | 50–70 | Low–Medium | Medium–Fast |
| 150–200 | 70–100 | Medium | Medium |
| 200–250 | 100–120 | Medium–High | Slow–Medium |
*Note: Actual values depend on fork model. Always check the manual for your fork.*
Trail Testing And Fine Tuning
After making adjustments, it’s important to test your settings on real trails. Forks behave differently on pavement compared to dirt, rocks, and roots.
How To Trail Test
1. Pick A Familiar Trail
Choose a trail you know well. This makes it easier to notice changes.
2. Ride In Different Conditions
Try your fork settings on smooth, rough, and downhill sections.
3. Notice Feedback
Pay attention to how the fork feels on bumps, turns, and drops. Does your front wheel grip better? Is your fork bottoming out?
4. Make Small Adjustments
Change one setting at a time—sag, rebound, compression—then retest.
Practical Tips
- Write down your settings after each adjustment.
- Don’t change more than one setting at a time.
- Ask a friend to watch your fork movement during jumps and drops.
Non-obvious Insight
Many riders overlook how temperature affects fork pressure. On cold days, air pressure drops, making your fork softer. Check and adjust fork pressure before every ride, especially if weather changes.
Common Fork Adjustment Problems And Solutions
Some issues happen often, even to experienced riders. Knowing how to fix them saves time and frustration.
Problem: Fork Bottoms Out Easily
- Solution: Add air pressure, increase compression, add volume spacers.
Problem: Fork Feels Too Harsh
- Solution: Lower air pressure, decrease compression, remove volume spacers.
Problem: Front Wheel Bounces
- Solution: Slow down rebound.
Problem: Fork Doesn’t Use Full Travel
- Solution: Lower air pressure, decrease compression.
Problem: Fork Dives During Braking
- Solution: Increase low-speed compression.
Problem: Settings Change After A Ride
- Solution: Check for air leaks, damaged seals, or loose knobs.
Step-by-step Fork Adjustment Guide
Here’s a practical step-by-step summary to adjust your mountain bike fork:
1. Read The Fork Manual
Find recommended settings for your model.
2. Set Sag
Put on your gear, measure sag, adjust air pressure.
3. Adjust Rebound
Set to manufacturer’s start point, test, fine-tune.
4. Adjust Compression
Set to recommended, test, adjust for your style.
5. Check Volume Spacers
Add or remove as needed.
6. Trail Test
Ride, notice feedback, adjust one setting at a time.
7. Record Your Settings
Write down air pressure, rebound clicks, compression clicks, and spacer count.
8. Maintain Your Fork
Clean regularly, check for leaks, and service as needed.
Maintenance Tips For Long-term Fork Performance
Adjusting your fork is only part of the story. Proper maintenance keeps it working well and makes future adjustments easier.
Regular Checks
- Clean stanchions after every ride.
- Inspect seals for dirt and leaks.
- Check air pressure before every ride.
- Lubricate moving parts monthly.
Service Intervals
- Lower leg service: Every 50–100 hours of riding.
- Full fork service: Once per year or every 200 hours.
Why Maintenance Matters
A dirty or worn fork won’t respond to adjustments. Keeping your fork clean and serviced makes all your tuning efforts count.
Fork Adjustment Myths
There are many myths about fork adjustment. Here are some you should ignore:
- Myth: “Factory settings are always right.”
Reality: You need to adjust for your weight and style.
- Myth: “More air means better performance.”
Reality: Too much air makes the fork harsh and reduces grip.
- Myth: “Rebound doesn’t matter.”
Reality: Rebound affects control and safety.
- Myth: “Volume spacers are only for pro riders.”
Reality: Anyone can use them to improve fork feel.
Fork Adjustment For Different Terrain
Different trails need different settings. Here’s how to adjust for three common types:
Flow Trails
- Use softer settings for comfort.
- Faster rebound helps with quick bumps.
Technical Trails
- Firmer compression to avoid bottom-out.
- Slower rebound for control over rocks.
Downhill Tracks
- Maximum air pressure, high compression.
- Add volume spacers for drops.
Credit: enduro-mtb.com
Fork Adjustment For Women And Youth Riders
Many female and younger riders are lighter than average. Forks often feel too firm for them.
- Use lower air pressure.
- Softer compression.
- Faster rebound.
Some brands offer custom “women’s” or “youth” springs, but adjusting air pressure is usually enough.
When To Seek Professional Help
Not every fork problem can be fixed at home. If you notice these issues, visit a bike shop:
- Knobs don’t turn or feel stuck.
- Fork leaks oil or air.
- Travel feels rough even after adjustment.
- You hear loud noises from the fork.
A certified mechanic can help, and may spot problems you missed.
How Fork Adjustment Improves Your Riding
A well-adjusted fork makes your rides safer, faster, and more enjoyable. You’ll notice:
- More grip in corners
- Better control on rough trails
- Less arm fatigue
- Safer jumps and drops
Professional riders spend hours dialing in their fork settings. Even small changes can make a big difference.
Real-world Fork Adjustment Example
Let’s look at a practical scenario. You ride a RockShox Recon fork on a 120mm travel trail bike. You weigh 180 lbs.
- Manufacturer recommends 80 psi for your weight.
- You set sag to 24mm (20%).
- Rebound knob has 12 clicks; you set it at 6 (middle).
- Compression knob has 10 clicks; you start at 5.
- Ride your favorite trail. Fork feels harsh on small bumps, so you drop air pressure to 75 psi and move rebound to 8 clicks.
- Now the fork feels better—uses more travel, less harshness.
- You record settings for future reference.
This process shows how simple changes can improve your ride.
Fork Adjustment Vs. Rear Shock Adjustment
Many riders focus only on fork settings, but the rear shock matters too. A balanced bike (front and rear suspension) gives the best performance.
Key Differences
- Forks handle steering and front-end control.
- Rear shocks handle traction and comfort.
- Both need matching settings for your weight and terrain.
If your fork is too firm and rear shock too soft, your bike feels unstable. Always check both.
Fork Adjustment For E-bikes
E-bikes are heavier and need firmer settings. Increase air pressure, compression, and check rebound more often.
- Heavier bikes: Add volume spacers.
- More speed: Firmer compression for safety.
E-bike fork adjustments make a big difference, especially on descents.
Using Technology For Fork Adjustment
Many modern forks come with apps or sensors. For example, the Fox Live Valve system uses sensors to adjust compression automatically. Apps like Trailforks can help you record settings and track changes.
If your fork has electronic controls, follow the manufacturer’s instructions.
Frequently Asked Questions
How Often Should I Adjust My Mountain Bike Fork?
You should check and adjust your fork every few months, or whenever you change riding style, weight, or trail type. Also, after any major service.
Can I Adjust A Coil Fork The Same Way As An Air Fork?
No. Coil forks require changing the spring for big adjustments. Air forks use a shock pump. Both have rebound and compression, but coil forks are less adjustable.
What Is The Best Fork Setting For Beginners?
Start with the manufacturer’s recommended settings for your weight. Use softer settings for comfort, and adjust rebound to a medium speed.
Why Does My Fork Lose Air Pressure?
Air forks can lose pressure from temperature changes, leaks, or old seals. Check pressure before every ride and service seals regularly.
Is It Safe To Adjust Fork Settings Myself?
Yes, as long as you follow the manual and don’t force knobs. For advanced changes (like volume spacers), follow safety instructions or ask a mechanic.
—
Adjusting your mountain bike fork is not just for pros—it’s for anyone who wants a smoother, safer, and more enjoyable ride. With the right tools and a little patience, you can make your bike fit your riding style and body perfectly. If you want more detailed information, check official resources like Pinkbike Fork Setup Guide. Remember, each change you make is a step toward mastering your mountain bike and getting more out of every ride.

Credit: www.youtube.com

Hello Guys! I am John Reese, a professional biker and my hobby is biking! I have been biking for last 12 years and I love using bikes while outing as well. Based on my experiences with the different type of bikes (mountain bikes, road bikes and hybrid bikes); I am sharing my opinion about various bikes so that a beginner can get started right away. Happy reading!