Adjusting your mountain bike seat angle might seem like a small detail, but it can change everything about your ride. If your seat is angled wrong, you could feel pain, lose control, or waste energy. But when it’s set just right, your bike feels like an extension of your body.
You ride longer, climb easier, and descend with more confidence. This guide will show you how to adjust your seat angle step-by-step, why it matters, and how to avoid common mistakes.
Why Seat Angle Matters For Mountain Biking
The seat angle affects how you sit, how you pedal, and how stable you feel. On a mountain bike, this is even more important than on a road bike. With rough trails, steep climbs, and fast descents, your seat angle can help you:
- Reduce knee pain: A bad angle puts strain on joints.
- Boost power: The right angle lets you use your muscles efficiently.
- Improve control: You move your weight easily when the seat is set correctly.
- Stay comfortable: Long rides feel easier with a good seat angle.
Many beginners think only about seat height, but the angle plays a big role. If you ignore it, you’ll notice discomfort, numbness, or even injury over time.
Understanding Mountain Bike Seat Angles
Seat angle is measured by how much the seat points up or down. The main types are:
- Neutral angle: The seat is flat, parallel to the ground.
- Nose up: The front of the seat tilts higher.
- Nose down: The front tilts lower.
Most riders start with a neutral angle. However, you might need a slight tilt depending on your riding style, body shape, or trail conditions.
| Angle Type | How It Feels | Best For |
|---|---|---|
| Neutral | Balanced, stable | Most riders, general trails |
| Nose Up | Pressure on sit bones, reduces sliding forward | Steep climbs, some comfort needs |
| Nose Down | Can slide forward, less pressure on sit bones | Fast descents, aggressive riding |
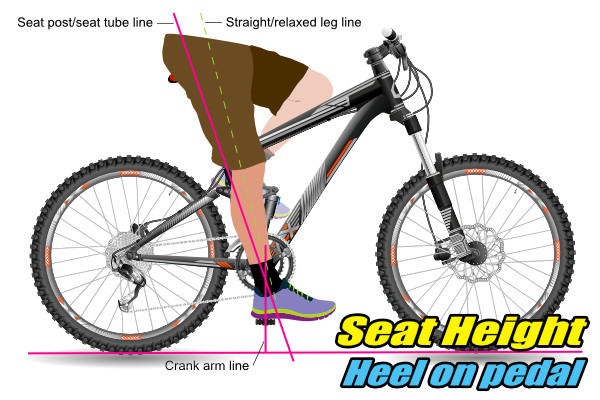
How To Check Your Current Seat Angle
Before making changes, look at your bike:
- Place your bike on a flat surface.
- Stand beside it and look at the seat. Is it flat or tilted?
- Use a bubble level tool or a smartphone app to check if it’s parallel to the ground.
If your seat doesn’t look or feel right, it’s time to adjust.
Tools You Need
You don’t need many tools to adjust your mountain bike seat angle. Most bikes use simple bolts, but it’s important to use the right tools:
- Allen keys (usually 5mm or 6mm)
- Torque wrench (optional but recommended)
- Bubble level or smartphone level app
- Bike stand (optional, keeps your bike steady)
Having these tools ready will make the job easier and help you avoid mistakes.
Step-by-step Guide: Adjusting Your Mountain Bike Seat Angle
1. Prepare Your Bike
Put your bike on a flat surface. If you have a bike stand, use it to keep the bike steady. Make sure the seat and seatpost are clean. Dirt can hide problems or make bolts harder to turn.
2. Loosen The Saddle Clamp
Most mountain bikes use a seatpost clamp with one or two bolts under the seat. Use the correct Allen key to gently loosen these bolts. You don’t need to remove them—just loosen enough so the seat can move.
3. Set The Angle
- Place a bubble level or use your phone’s level app on the widest part of the seat.
- Adjust the seat until it’s flat (neutral) or at your desired angle.
- For most riders, starting with the seat parallel to the ground is best.
If you want to experiment:
- Tilt the nose up slightly for steep climbs or if you feel you slide forward.
- Tilt the nose down for descents or if you feel pressure on sensitive areas.
Never tilt too much. A change of 1–2 degrees is plenty. Extreme angles cause discomfort and can lead to injury.
4. Tighten The Clamp
Hold the seat steady and tighten the bolts evenly. If you have a torque wrench, check your bike manual for the recommended torque (usually 5–7 Nm). Don’t overtighten—you could damage the seatpost or clamp.
5. Double-check Alignment
Sit on your bike. Pedal and move around. Does the seat feel stable? Is the angle comfortable? Small adjustments make a big difference, so don’t rush this step.
How Seat Angle Affects Riding Style
Seat angle isn’t just about comfort. It changes how your body moves and how you control the bike.
| Riding Style | Seat Angle | Effect |
|---|---|---|
| Cross-country | Neutral or slightly nose up | Balanced power, comfort for long rides |
| Downhill | Nose down | Better weight shift, easier movement |
| Trail/All-mountain | Neutral | Versatile, suits mixed terrain |
| Climbing | Nose up | Reduces sliding, boosts stability |
Example: Climbing Steep Hills
On a steep climb, your body wants to slide forward. If your seat is too flat or nose down, you’ll struggle to stay stable. By tilting the nose up just a bit, you anchor your hips and pedal with more power.
Example: Descending Fast Trails
When going downhill, you often shift your weight back. A nose-down angle helps you move quickly without catching your shorts or feeling stuck. It’s a small change, but it helps you react faster and stay safe.
Mistakes To Avoid When Adjusting Seat Angle
Many riders make errors that lead to discomfort or bike damage. Here are the most common mistakes and how to avoid them:
- Tilting the seat too much: Extreme angles cause pain and poor control. Always make small changes.
- Ignoring seat height: Angle and height work together. After adjusting the angle, check if you need to change the height.
- Overtightening bolts: This can break the clamp or seatpost. Use a torque wrench if possible.
- Not testing the new angle: Ride for at least 20 minutes after any adjustment. Sometimes changes feel good at first but cause discomfort later.
- Missing uneven terrain: Adjust your seat angle for your main riding style but check how it feels on different trails.
Credit: www.infinibandta.org
Practical Tips For Finding Your Perfect Seat Angle
Everyone’s body is different. What works for one rider might not work for you. Here are practical ways to find your ideal angle:
- Start neutral: Begin with the seat flat, then test on your favorite trail.
- Listen to your body: If you feel numbness, pain, or slide forward/backward, adjust the angle slightly.
- Change in small steps: Move the angle by 1 degree at a time. Small changes can solve big problems.
- Ask friends or local bike shops: Sometimes another rider’s experience can help you fine-tune your setup.
- Use a bike fitting service: If you ride often or feel chronic pain, a professional fit can make a huge difference.
Non-obvious Insights
- Seat padding can affect angle comfort. Some seats are soft, others are firm. If you switch seats, recheck your angle.
- Seatpost design matters. Some seatposts have micro-adjust features, making fine tuning easier. Others only allow big changes. Know your bike’s hardware before adjusting.
How Seat Angle Impacts Injury Risk
Seat angle isn’t just about comfort—it affects your health. Here are some risks:
- Too much nose down: Can cause pressure on soft tissue, leading to numbness or even nerve damage.
- Too much nose up: Adds stress to your lower back and knees.
- Wrong angle for your riding style: Increases risk of falling or losing control.
Studies show that adjusting seat angle reduces the risk of overuse injuries, especially in mountain biking where terrain changes often. For more details on cycling injury prevention, check this Cycling UK guide.
Comparing Seat Angle Adjustment Methods
Different bikes and seatposts use different clamp designs. Here’s a quick comparison of common types:
| Clamp Type | Adjustment Ease | Common Problems |
|---|---|---|
| Single Bolt | Quick, but less precise | Can slip, hard to fine-tune |
| Double Bolt | More precise, secure | Takes longer, must tighten evenly |
| Micro-Adjust | Very precise | Can be tricky to learn, more expensive |
| Integrated Seatpost | Fixed angle, no adjustment | Cannot change angle |
If you plan to change angles often, a double bolt or micro-adjust seatpost is best.
How Often Should You Adjust Your Seat Angle?
There’s no one-size-fits-all answer. Here’s what most riders do:
- Check every season: Trails and weather change, so adjust for your current needs.
- After any crash or big ride: Sometimes seats move after a fall or rough ride.
- When changing gear: New shoes or shorts can affect how you sit.
Regular checks keep your bike feeling right and prevent problems before they start.
Adjusting Seat Angle For Different Body Types
Your body shape affects how you sit on the bike. Taller riders, those with longer legs, or heavier riders might need special adjustments.
- Long legs: May need a slightly nose-up angle for better hip stability.
- Short torso: Neutral or nose-down helps avoid back pain.
- Heavier riders: Firmer seats and careful angle adjustment can prevent discomfort.
If you’re unsure, experiment with small changes and notice how your body responds.
Example: Female Riders
Women often need a slightly different setup. Wider sit bones and different hip angles mean a neutral or slightly nose-down angle is more comfortable. Many women’s seats are designed with this in mind, but personal testing is still best.
Advanced Seat Angle Adjustments
Experienced riders sometimes use advanced techniques:
- Dynamic adjustment: Some seatposts let you change angle on the fly, using remote levers.
- Tilt for specific trails: Adjust before a ride if you know the trail is steep or rough.
- Combine with dropper seatposts: Dropper posts let you change seat height quickly. Adjusting angle together can maximize performance.
These advanced methods are not needed for beginners but are useful as you gain experience.
Signs Your Seat Angle Needs Adjustment
Watch for these signs:
- Frequent numbness: Especially in sensitive areas.
- Slipping forward or backward: Hard to stay centered.
- Lower back or knee pain: Especially after rides.
- Difficulty shifting weight: Hard to move during technical trails.
If you notice any of these, check your seat angle as a first step.
How Seat Angle Works With Other Bike Settings
Seat angle is just one part of bike fit. It connects to:
- Seat height: If you change angle, you might need to raise or lower the seat.
- Seat position: Moving the seat forward or back changes your reach and balance.
- Handlebar height: Higher bars often need a flatter seat, lower bars might benefit from a nose-down angle.
Always adjust angle first, then check height and position.
Real-world Data: Rider Preferences
A study by the International Journal of Sports Medicine found that:
- 68% of mountain bikers use a neutral seat angle for most riding.
- 22% prefer nose-down for fast descents.
- 10% use nose-up for climbing.
What’s surprising is how small changes made big differences. Riders who changed their seat angle by just 2 degrees saw less pain and better performance in most cases.
Adjusting Seat Angle For E-mountain Bikes
E-mountain bikes are heavier and often ridden on steeper terrain. Many e-bike riders tilt the nose up a bit more for climbing, since the motor helps with power but you still need stability.
- Start neutral, then adjust nose up by 1–2 degrees for steep climbs.
- On descents, check if nose-down helps with weight shifts.
E-mountain bikes often have more advanced seatposts, making adjustment easier.
Seat Angle And Bike Suspension
Suspension affects how your weight shifts. If you have a full-suspension bike:
- Set seat angle with suspension fully extended.
- Check how it feels when the suspension compresses.
Sometimes, a seat that feels perfect on flat ground feels wrong when riding bumpy trails. Test on real terrain.
Seat Angle For Long-distance Mountain Biking
For long rides, comfort is key. Too much tilt causes pain over time. Neutral or slight nose-down is best for endurance.
- Use a professional bike fitting if you ride over 30 miles often.
- Check seat angle at mid-ride breaks.
Long-distance riders often use firmer seats and adjust angle more precisely.

Credit: devanshi.com
Expert Tips For Mountain Bike Seat Angle
- Don’t copy pro riders: Their setup is for racing, not for your body or trails.
- Keep a log: Write down your adjustments and how you feel after each ride.
- Use technology: Smart seatposts and apps can help track angles.
- Fine-tune for each trail: Some riders change angle before every ride based on the terrain.
Frequently Asked Questions
How Do I Know If My Seat Angle Is Wrong?
Look for signs like numbness, pain, or sliding forward/backward. If you feel discomfort after every ride, your seat angle might need adjustment.
Can Seat Angle Cause Knee Pain?
Yes. A bad seat angle changes how your knees move. Too much tilt can stress your joints. Always adjust in small steps and test after each change.
Is There A “perfect” Seat Angle For Mountain Biking?
No single angle fits everyone. Most riders start with neutral, then adjust based on their body, riding style, and trail. Small changes (1–2 degrees) make a big difference.
Should I Adjust Seat Angle For Different Trails?
Yes. Steep climbs might need a nose-up angle, while fast descents often use nose-down. Adjust for your main trail, then fine-tune as needed.
Can I Adjust Seat Angle Myself Or Do I Need A Bike Shop?
You can adjust it yourself with basic tools. If you feel chronic pain or can’t get comfortable, a professional bike fitting is a good idea.
Getting your mountain bike seat angle right takes a bit of patience, but the rewards are huge. You’ll ride longer, feel better, and enjoy every trail more. Always start with small changes, listen to your body, and don’t be afraid to ask for help.
With these steps, your bike will feel better than ever, and your rides will be smoother and safer.

Credit: www.youtube.com

Hello Guys! I am John Reese, a professional biker and my hobby is biking! I have been biking for last 12 years and I love using bikes while outing as well. Based on my experiences with the different type of bikes (mountain bikes, road bikes and hybrid bikes); I am sharing my opinion about various bikes so that a beginner can get started right away. Happy reading!