If you ride a mountain bike often, you probably know how important brake performance is, especially on challenging trails. But what happens when your brakes feel spongy, weak, or inconsistent—and you don’t have a dedicated bleed kit? Many riders face this problem. While using a professional kit is always best, there are ways to bleed mountain bike brakes with basic tools you might already own. If you want to restore your stopping power without special equipment, this guide explains everything you need to know.
Why Bleeding Mountain Bike Brakes Matters
Brakes are your most important safety feature on rough or steep terrain. Over time, air bubbles and contaminated fluid can enter the hydraulic system. This can make the brake lever feel soft, slow, or even useless under pressure. Bleeding removes these air pockets and replaces old fluid, restoring a firm, reliable brake feel.
Hydraulic brakes rely on an airtight, fluid-filled system. Even a small amount of air affects performance because air compresses more than brake fluid. Regular bleeding keeps your brakes consistent and powerful, which is especially important if you ride steep descents or technical trails.
Is It Safe To Bleed Brakes Without A Kit?
You might wonder if it’s safe to try this at home. The answer is: yes, with care—but only for minor bleeds or emergencies. A proper bleed kit is safer and more effective, but you can get good results with household items if you follow the right steps. This is not a long-term replacement for professional maintenance, but it can get you back on the trail quickly.
One insight many riders miss: Always check your bike’s manual first. Some brake systems are very sensitive to contamination, and using the wrong fluid can damage seals or even cause brake failure. If in doubt, contact your bike shop or check online resources for your specific brake model.
What Tools And Materials Do You Need?
Before you start, gather everything you need. Most of these items are found at home or a local hardware store. Missing even one tool can make the job much harder or risk damaging your bike.
Basic Tools
- Allen keys (usually 4mm, 5mm, or 6mm)
- Flathead screwdriver (for pad removal, if needed)
- Old clean rags or paper towels
- Zip ties or rubber bands (to hold levers if needed)
- Small container or bottle for old fluid
Makeshift Bleed Tools
- Plastic syringe (10–20 ml, from a pharmacy)
- Clear plastic tubing (about 10–15 cm, aquarium tubing works)
- Small funnel (optional, for top-up at lever reservoir)
Fluids
- Mineral oil (for Shimano, Magura, Tektro, TRP brakes)
- DOT brake fluid (for SRAM, Avid, Hayes brakes)
- Isopropyl alcohol (for cleaning, at least 90%)
- Distilled water (for emergency cleaning)
Never mix mineral oil and DOT fluid—they are not compatible. Always use the correct fluid for your brake system.
Safety Items
- Nitrile gloves (protect your skin)
- Eye protection (fluid can squirt under pressure)
How Hydraulic Brakes Work (in Simple Terms)
If you’re new to bike maintenance, it helps to know what’s happening inside your brakes. Hydraulic brakes use a closed system filled with fluid. When you squeeze the lever, fluid pushes a piston, which moves the brake pads onto the rotor.
If air or old fluid gets inside, the system becomes less efficient.
Here’s a basic diagram:
| Component | Function | Common Problems |
|---|---|---|
| Master cylinder (lever) | Pushes fluid when you squeeze the brake | Spongy feel if air enters |
| Brake hose | Carries fluid to the caliper | Leaks, kinks, air bubbles |
| Caliper | Moves pads onto the rotor | Sticky pistons, uneven wear |
When you bleed the brakes, you’re pushing new fluid through the hose and caliper, forcing air and old fluid out. This restores full braking force.
Credit: www.mueritz-brise.de
Preparing Your Bike And Work Area
Before starting, set up your workspace carefully. Preparation makes the whole job faster and cleaner.
- Choose a well-lit, flat area. Lay down old towels or cardboard to catch spills.
- Remove the wheel if possible. This gives better access and avoids contaminating the rotor.
- Remove the brake pads. Fluid can damage pads, so keep them clean and dry.
- Insert a pad spacer or a piece of clean plastic (an old credit card works) into the caliper to prevent pistons from moving too far.
- Clean around the brake lever and caliper with isopropyl alcohol.
One thing beginners often overlook: Secure your bike so it doesn’t tip over. A work stand is best, but you can lean the bike carefully against a wall.
Choosing The Right Fluid
Not all brake fluids are the same. Using the wrong one can destroy your brake system. Check the writing on your brake lever or caliper, or consult your manual.
| Brake Brand | Correct Fluid | Notes |
|---|---|---|
| Shimano | Mineral oil | NEVER use DOT fluid |
| SRAM | DOT 5.1 or DOT 4 | NEVER use mineral oil |
| Magura | Mineral oil | Use Magura Royal Blood for best results |
| Tektro/TRP | Mineral oil | Check your model for specifics |
| Hayes | DOT 4 or 5.1 | Check your manual |
Important: DOT fluid absorbs water from the air. Never leave the bottle open, and avoid skin contact. Mineral oil is safer but still should not touch your eyes or mouth.
Step-by-step: Bleeding Mountain Bike Brakes Without A Kit
Now let’s get practical. This process works for most common hydraulic brakes. The details may vary depending on your brand, but the core ideas are the same.
Step 1: Open The Reservoir
Most brake levers have a small cover or rubber plug on top. Remove the screws (if present) or gently lift the rubber cap. Be careful not to let dirt fall inside.
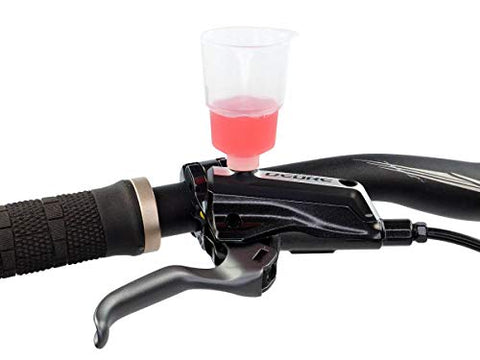
If your lever has a bleed screw, use the correct Allen key or screwdriver. Some levers (like Shimano) use a small plastic funnel instead. If you don’t have one, a clean plastic bottle cap or tiny funnel can work.
Step 2: Attach Your Tubing
Push one end of your clear tubing over the bleed nipple on the caliper. The other end should go into your waste container. This helps you see air bubbles and keeps your workspace clean.
If you don’t have a perfect fit, use a zip tie to hold the tubing tight. A loose fit risks leaks and mess.
Step 3: Remove Old Fluid
Put on your gloves and eye protection. Loosen the bleed nipple (usually 7mm or 8mm wrench). Pull the brake lever slowly. Old fluid and air will flow out through the tube. Keep the lever pressed.
Tighten the bleed nipple before releasing the lever. Otherwise, air can be sucked back into the system. Repeat this process until little or no fluid comes out.
Step 4: Add New Fluid
Fill your syringe or funnel with fresh brake fluid. Gently push or pour new fluid into the reservoir at the lever. Avoid overfilling.
If you’re using a syringe, push the fluid slowly through the system while opening the bleed nipple just enough to let fluid and air escape. Watch for bubbles in the tube.
Continue until only clear, bubble-free fluid comes out at the caliper. If your system is very empty, you may need to repeat several times.
Step 5: Final Air Removal (lever Squeeze Method)
Close the bleed nipple firmly. Squeeze the brake lever several times. Sometimes, holding the lever squeezed overnight with a zip tie can encourage trapped air to rise to the top.
Tap the caliper and lever gently with a screwdriver handle to help small bubbles move up and out.
Step 6: Seal The System
Remove your tubing and tighten the bleed nipple. Clean away all spilled fluid with isopropyl alcohol. Replace the reservoir cover or rubber plug, making sure it’s clean and sealed.
Step 7: Reinstall Pads And Wheel
Put the brake pads back in, making sure they’re not contaminated. Reinstall the wheel and check for rotor drag. Squeeze the lever to center the pads.
Check brake function before riding. The lever should feel firm, not spongy. If it still feels soft, repeat the bleed process.
Common Mistakes And How To Avoid Them
Bleeding brakes without a kit is not hard, but many riders make the same errors. Avoid these for a safer, more effective bleed:
- Mixing fluids: Never use DOT fluid in mineral oil brakes, or vice versa.
- Letting air in: Always tighten the bleed nipple before releasing the lever.
- Contaminating pads or rotors: Keep all fluid away from brake surfaces.
- Using dirty tools: Even small dirt particles can harm your system.
- Not checking lever feel: If the lever is still spongy, there’s still air inside.
A little patience goes a long way. Don’t rush, and double-check each step.
How To Bleed Different Brake Types Without A Kit
Not all brakes bleed exactly the same way. Here are a few examples:
Shimano Brakes
Shimano uses mineral oil. Their levers often have a small bleed port on top. If you don’t have a funnel, use a clean plastic bottle cap as a reservoir.
- Open the bleed port.
- Attach tubing to the caliper bleed nipple.
- Push new mineral oil from the lever down, or use a syringe to push from the caliper up.
- Tap the caliper and lever to release trapped bubbles.
- Seal everything tightly.
Sram/avid Brakes
These use DOT fluid and often require a two-syringe method for best results. If you lack two syringes, you can carefully push fluid through with one and catch old fluid in your tubing.
- Open the lever bleed port.
- Attach tubing to the caliper.
- Use a syringe to push fresh DOT fluid from the caliper up to the lever.
- Watch for bubbles escaping at the lever.
- Close up and clean all parts.
Magura/tektro/trp Brakes
Similar to Shimano, but some Magura levers use a different bleed port design. Use only mineral oil and follow the same basic process: fill, squeeze, tap, and seal.
How Often Should You Bleed Mountain Bike Brakes?
The answer depends on how often and where you ride. For most trail riders:
- Every 6–12 months for regular use
- After heavy rain or mud rides
- Whenever you notice spongy brakes or lever travel increases
Racers or downhill riders may need more frequent bleeding. If you ride in very hot or wet conditions, or do long descents, bleed more often.
One useful tip: If you replace a brake hose, always bleed the system fully—don’t rely on a quick top-up.
Risks And Limitations Of Bleeding Without A Kit
While bleeding brakes without a kit is possible, it comes with some risks:
- Incomplete air removal: Without proper syringes, some bubbles may remain.
- Spills and contamination: Home tools are less precise, increasing mess risk.
- Shorter fluid life: Emergency bleeds may not last as long as a full professional job.
- Potential damage: Forcing the wrong tool or overtightening can strip threads or crack parts.
If you notice persistent problems after bleeding, visit a bike shop for a full bleed. Consider this DIY method as a temporary fix, not a permanent solution.
Tips For Cleaner, Safer Brake Bleeds
- Always protect your brake pads and rotors from fluid.
- Use only clean, unopened brake fluid.
- Label your home tools so you don’t use them for food or other chemicals later.
- Wear gloves and eye protection.
- Dispose of old brake fluid responsibly—never pour it down the drain.

Credit: www.mueritz-brise.de
Can You Bleed Brakes With Household Items Alone?
Some riders try to bleed brakes with only items like zip ties, straws, or old bottles. This can work in a pinch, but results are less reliable. The most important item is a snug-fitting tube and a clean syringe or funnel.
If you must, cut a plastic bottle to catch fluid, and use a new straw as a tube.
Never use a mouth suction method—brake fluid is toxic. Even if you’re stuck on the trail, prioritize safety.
Comparing Professional Bleed Kits And Diy Methods
Here’s a quick look at the differences between professional kits and homemade solutions:
| Method | Pros | Cons | Best For |
|---|---|---|---|
| Professional Kit | Complete air removal, cleaner process, longer fluid life | More expensive, requires purchase | Regular maintenance, high-end bikes |
| DIY Without Kit | Cheap, quick, uses household items | May leave small air bubbles, messier | Emergency fixes, casual riders |
If you ride often, investing in a real bleed kit pays off in long-term performance and safety.
Signs Your Brakes Need Bleeding
Sometimes it’s hard to know if your brakes need attention. Watch for these signs:
- Lever pulls all the way to the handlebar
- Brakes feel soft or slow to respond
- Squealing, inconsistent braking
- Brakes fade on long descents
If you notice these symptoms, it’s time to bleed your brakes—even without a kit if necessary.
Real-world Example: Emergency Bleed On The Trail
Imagine you’re riding in the mountains, and your brakes suddenly lose power. You have no kit, but you do have some basic tools and a small bottle of fluid.
- Remove the wheel and pads with your Allen key.
- Use a small piece of tubing and a water bottle as a waste container.
- Open the lever bleed port, attach tubing to the caliper.
- Gently pour fluid into the lever reservoir while squeezing the lever and opening the bleed nipple.
- Watch for bubbles, then close everything up.
- Clean all parts before reinstalling pads and wheel.
You may not get a perfect bleed, but your brakes should feel firmer and safer until you can do a full service.
When To Visit A Bike Shop
DIY bleeds are good for emergencies, but some problems need a pro:
- Fluid leaks from caliper or lever after bleeding
- Brake lever still sinks to handlebar after several bleeds
- Seized pistons or sticky brake action
- Damaged threads or stripped bleed ports
In these cases, a shop has the tools and experience to fix deeper problems.
Key Takeaways For Bleeding Mountain Bike Brakes Without A Kit
- Use the correct fluid for your brake type (never mix DOT and mineral oil)
- Work slowly, keep everything clean, and protect your pads/rotors
- Most household items can substitute for a bleed kit in a pinch
- This method is a temporary fix—get a professional bleed when possible
- Always test your brakes in a safe area before riding at speed
For more technical details on brake fluid types and compatibility, you can check the Bicycle brake Wikipedia page.

Credit: www.youtube.com
Frequently Asked Questions
Can I Use Cooking Oil Or Other Substitutes Instead Of Brake Fluid?
No. Only use manufacturer-approved brake fluid—mineral oil for Shimano and Magura, DOT for SRAM and others. Cooking oil or other substitutes can damage seals, reduce braking performance, and make your brakes unsafe.
Is It Possible To Bleed Brakes Without Removing The Wheel Or Pads?
It’s possible, but not recommended. Brake pads are easily contaminated by fluid, which reduces stopping power and causes noise. Removing the pads and wheel gives you better access and prevents damage.
How Do I Know If All The Air Is Out Of My Brake System?
The brake lever should feel firm and consistent after bleeding. If it still feels soft, or if you see bubbles in the fluid, there’s still air inside. Repeat the process, tapping the caliper and lever to help bubbles escape.
Can I Reuse Old Brake Fluid?
No, you should never reuse old brake fluid. Brake fluid absorbs water and dirt over time, which reduces performance and causes corrosion. Always use fresh, unopened fluid for best results.
What Should I Do If I Spill Brake Fluid On My Bike?
Clean the area immediately with isopropyl alcohol and a clean rag. DOT fluid can damage paint and plastics, while mineral oil is less aggressive but still needs cleaning. Don’t let fluid touch your pads or rotors—replace them if contaminated.
Bleeding mountain bike brakes without a kit is not perfect, but it can restore most of your stopping power in a pinch. With care, patience, and the right fluid, you can get back on the trail and ride with more confidence. But always remember: when in doubt, trust a professional for a full service.

Hello Guys! I am John Reese, a professional biker and my hobby is biking! I have been biking for last 12 years and I love using bikes while outing as well. Based on my experiences with the different type of bikes (mountain bikes, road bikes and hybrid bikes); I am sharing my opinion about various bikes so that a beginner can get started right away. Happy reading!