If you ride a mountain bike, you know that smooth gear shifting can make your ride much easier and more fun. But sometimes, gears slip, hesitate, or make noise. Many riders—even experienced ones—don’t know how to fix these problems themselves.
Learning to adjust your mountain bike gear shifter isn’t just about fixing issues; it’s about making sure every ride feels right. This guide will show you, step by step, how to adjust your shifter, what tools you need, common mistakes, and how to get the best performance.
Even if you’re new to bike maintenance, you’ll find practical advice and clear explanations to help you understand and fix your gears.
Why Proper Gear Shifter Adjustment Matters
If your gears aren’t set up correctly, you might notice chain skipping, slow shifting, or strange noises. These issues can lead to more serious damage, like a bent derailleur or even a broken chain. A well-adjusted gear shifter gives you:
- Smooth shifting: No hesitation between gears.
- Longer bike life: Less wear on drivetrain parts.
- Safer rides: No surprises when climbing hills or speeding downhill.
Many beginners think shifting problems only come from the derailleur or chain. But the shifter itself, cables, and housing play a big part. Ignoring these can mean you miss the real cause of your trouble.
Understanding Mountain Bike Gear Shifters
Before you start adjusting, it helps to know how gear shifters work. On most mountain bikes, you’ll find:
- Trigger shifters: Buttons or levers you push with your fingers.
- Grip shifters: Twist the handlebar to change gears.
Both types pull or release a cable that moves the derailleur, which shifts the chain between gears. If the cable tension is wrong, or the shifter isn’t aligned, you’ll get poor performance.
Key Components
- Shifter: The device you use to change gears.
- Cable and housing: The wire and protective tube that connect shifter to derailleur.
- Derailleur: The mechanism that moves the chain across sprockets.
- Cassette: The set of gears on your rear wheel.
- Chain: Transfers power from pedals to wheels.
Here’s a simple comparison of shifter types:
| Shifter Type | How It Works | Common Brands | Typical Use |
|---|---|---|---|
| Trigger | Push levers to shift up/down | Shimano, SRAM | Most modern mountain bikes |
| Grip | Twist handlebar to shift | SRAM, MicroShift | Some entry-level or kids’ bikes |
Tools And Preparation
Getting ready is half the job. You don’t need expensive gear, but having the right tools makes everything easier.
Basic Tools
- Allen wrenches (usually 4, 5, or 6 mm)
- Phillips screwdriver
- Needle-nose pliers
- Bike lubricant
- Clean rag
Extra Tools (if Needed)
- Cable cutters: For replacing cables.
- Chain checker: To measure chain wear.
- Derailleur hanger alignment tool: For serious issues.
Before you start, shift your bike to the smallest gear (the smallest sprocket in the back). This makes adjustments easier and prevents cable tension problems. If your bike is muddy or dirty, clean the drivetrain first. Dirt can hide problems and make adjustments harder.
Step-by-step Guide To Adjusting Your Gear Shifter
Let’s walk through each part of the adjustment process. These steps work for most mountain bikes, whether you have trigger or grip shifters.
1. Inspect The Cable And Housing
Check the cable for rust, fraying, or kinks. Damaged cables make precise shifting impossible. Look at the housing—if it’s cracked or bent, replace it.
- If you see damage, replace the cable and housing before adjusting anything else.
- Lubricate the cable with a small amount of bike-specific oil.
2. Check The Derailleur Alignment
A bent derailleur hanger is a common cause of shifting problems. Stand behind your bike and look at the derailleur. It should be vertical and in line with the cassette. If it’s crooked, you may need a special tool or visit a bike shop.
3. Set The Limit Screws
Limit screws stop the derailleur from moving too far. There are two: High (H) and Low (L).
- High limit screw: Controls movement toward the smallest gear.
- Low limit screw: Controls movement toward the largest gear.
Use a Phillips screwdriver:
- Shift to the smallest gear.
- Turn the H screw until the derailleur aligns with the smallest sprocket.
- Shift to the largest gear.
- Turn the L screw until the derailleur aligns with the largest sprocket.
Many beginners forget these screws. If they’re wrong, your chain can fall off the cassette.
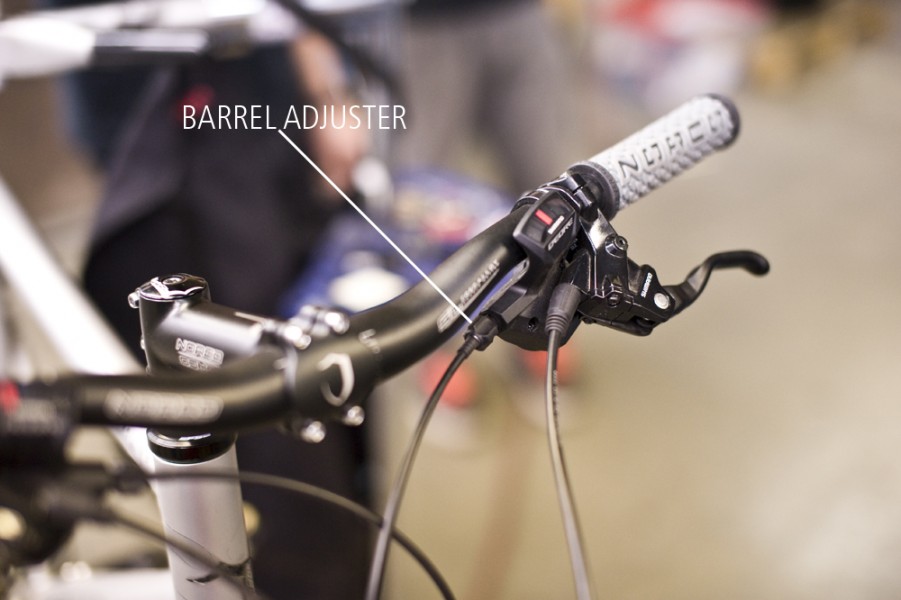
4. Adjust The Cable Tension
Cable tension is the most important part. If it’s too loose, the derailleur won’t move enough. If it’s too tight, it overshoots.
- Find the barrel adjuster (a round knob, usually where the cable enters the shifter).
- Shift to the middle gear.
- If shifting is slow up the gears, turn the barrel adjuster counterclockwise to increase tension.
- If shifting is slow down the gears, turn clockwise to decrease tension.
Make small changes—a quarter turn at a time—then test the shifting.
5. Fine-tune Indexing
Indexing means the shifter matches the gears exactly. Shift one gear at a time and listen for noise or hesitation.
- If the chain won’t move up, add tension.
- If it won’t move down, reduce tension.
Repeat until every gear shifts smoothly.
6. Test Under Real Conditions
Don’t just adjust while the bike is on a stand. Ride your bike and shift through all gears, especially under load (when pedaling hard). Sometimes, gears behave differently when you’re riding.
Credit: ipmba.org
Common Problems And How To Fix Them
Even after adjusting, you might face some issues. Here’s how to solve them:
Chain Skipping
Usually caused by:
- Worn chain or cassette
- Incorrect cable tension
- Bent derailleur hanger
Check wear with a chain checker. If parts are worn, replace them.
Slow Shifting
If shifting feels slow or sticky:
- Clean and lubricate cables.
- Check for bent derailleur or misaligned hanger.
- Adjust barrel adjuster as described above.
Noisy Shifting
Noise can come from:
- Dirty drivetrain
- Poor lubrication
- Misaligned limit screws
Clean your chain and cassette. Lubricate, and check screw settings.
Inconsistent Shifting
If gears work sometimes but not always:
- Inspect cable routing for sharp bends.
- Check for loose shifter or derailleur bolts.
- Replace damaged cables or housing.
Here’s a quick comparison to help you diagnose common shifting issues:
| Problem | Likely Cause | Quick Fix |
|---|---|---|
| Chain skips | Worn chain/cassette | Replace worn parts |
| Slow shifting | Dirty cable/housing | Clean/lubricate |
| Gear won’t shift | Cable tension | Adjust barrel |
| Chain falls off | Limit screws | Adjust screws |
Tips For Reliable Gear Shifting
Getting your gears right is not just about one-time adjustment. These tips help keep your bike shifting smoothly for months.
- Clean regularly: Dirt is a big enemy of smooth shifting.
- Lubricate cables: A tiny bit of oil can prevent sticky movement.
- Check tension often: Cables stretch over time.
- Avoid cross-chaining: Don’t use the biggest gear in front with the biggest gear in back—this wears parts faster.
- Replace worn parts promptly: Chains and cassettes wear out, usually every 2,000–3,000 miles.
Many riders miss that cable stretch happens naturally. If your gears worked perfectly after adjustment, but start slipping weeks later, check cable tension again.
When To Replace Your Gear Shifter
Sometimes, adjustment isn’t enough. If your shifter is sticky, won’t click, or skips gears even after proper setup, it might be time to replace.
Signs You Need A New Shifter
- Physical damage: Cracked or broken housing.
- Internal failure: Lever doesn’t return or feels loose.
- Consistent skipping: Even with new cables and derailleur.
Most shifters last 3–5 years, depending on use and conditions. If you ride in mud or rain, expect to replace sooner.
Comparing Shifter Models
Here’s a simple comparison of two popular shifters:
| Model | Type | Average Price | Durability | Ease of Adjustment |
|---|---|---|---|---|
| Shimano Deore | Trigger | $35 | High | Easy |
| SRAM X5 | Grip | $30 | Medium | Moderate |
Advanced Adjustment: Front Derailleur (if Your Bike Has One)
Most modern mountain bikes use a single chainring up front, but if yours has multiple, you may need to adjust the front derailleur too.
Steps For Front Derailleur Adjustment
- Shift to the smallest chainring and smallest rear sprocket.
- Use the L limit screw to align the derailleur with the chainring.
- Shift to the largest chainring and largest rear sprocket.
- Use the H limit screw to prevent the chain from falling off.
- Adjust cable tension so the derailleur shifts smoothly.
Front derailleurs are trickier. If you’re struggling, consider visiting a bike shop or reading an expert guide like this one from Park Tool.

Credit: www.youtube.com
Practical Examples: Real-world Adjustment Scenarios
Let’s look at a couple of situations you might face:
Example 1: Bike Won’t Shift Into Highest Gear
You try to shift up, but the chain stops before reaching the smallest sprocket.
- Check the high limit screw. If it’s too tight, loosen it a quarter turn.
- Test again. If it still won’t shift, check for bent hanger or low cable tension.
Example 2: Gear Changes Are Slow After Rain Ride
After riding in wet conditions, shifting feels rough.
- Clean the chain and cassette thoroughly.
- Lubricate cables.
- Check for water inside cable housing.
Example 3: New Cable Installed, Gears Won’t Shift
You replaced the cable, but shifting is worse.
- Cables stretch after installation. Adjust barrel adjuster to add tension.
- Double-check cable routing—sharp bends reduce performance.
These scenarios show why adjustment isn’t always one-size-fits-all. Real-world conditions change how your gears work.
Gear Shifter Adjustment For Different Mountain Bikes
Different bikes need different approaches. Here’s how to adjust for various setups:
Hardtail Mountain Bikes
Usually have simpler gearing. Adjust as described above. Check for frame flex—sometimes, heavy pedaling can shift alignment.
Full Suspension Bikes
Cable routing is often more complex. Make sure housing doesn’t get pinched when suspension compresses.
E-mountain Bikes
Extra torque can cause faster wear. Adjust more frequently, and use high-quality cables.
Kids’ Mountain Bikes
Often use grip shifters. Adjustment is similar, but cables may be shorter and wear faster.

Credit: www.liv-cycling.com
Avoiding Common Beginner Mistakes
Many new riders make mistakes that can cause bigger problems. Here are a few to watch out for:
- Over-tightening screws: Can strip threads or break parts.
- Ignoring cable stretch: Always re-check after a few rides.
- Adjusting while chain is dirty: Clean first for best results.
- Mixing parts from different brands: Shimano and SRAM are not always compatible.
A non-obvious insight: Many bikes come from the factory with cables that are slightly loose. After the first few rides, always check and adjust cable tension.
Maintenance Schedule For Gear Shifters
Keeping your shifter working isn’t just about fixing it once—it’s about regular care.
- Every ride: Shift through all gears, check for issues.
- Monthly: Clean and lubricate cables.
- Every 6 months: Inspect cable and housing for wear.
- Yearly: Replace cables and housing, check shifter function.
If you ride in extreme conditions, do maintenance more often.
Frequently Asked Questions
How Often Should I Adjust My Mountain Bike Gear Shifter?
You should check and adjust your gear shifter every month or after any rough ride. If you notice skipping, noisy, or slow shifting, adjust immediately. Cables stretch and parts wear, so regular checks keep your bike running well.
What’s The Best Lubricant For Gear Cables?
Use a bike-specific lubricant. Avoid heavy oils or WD-40. Thin lubricants designed for cables keep movement smooth and prevent dirt buildup. Don’t use household oils—they can attract grime and cause problems.
Can I Use Shimano Shifters With Sram Derailleurs?
Usually, Shimano and SRAM parts are not compatible. The cable pull and indexing are different. Always use matching brands or check compatibility charts before mixing components.
Why Does My Chain Skip Even After Adjustment?
If your chain skips after proper adjustment, the cause is likely worn parts—especially the chain or cassette. Check for wear using a chain checker. Replace any worn parts for best performance.
Is It Hard To Replace A Gear Shifter?
Replacing a shifter is moderately difficult. If you have basic tools and patience, you can do it yourself. Follow manufacturer instructions and make sure to match the shifter to your derailleur and cassette for correct indexing.
Making your mountain bike gear shifter work perfectly isn’t just about one adjustment—it’s a process of understanding, regular care, and smart troubleshooting. With these steps and tips, you’ll enjoy smoother rides, fewer problems, and more confidence on every trail. If you ever feel stuck, don’t hesitate to consult a bike shop or expert resources.
Your mountain bike will thank you with every effortless shift.

Hello Guys! I am John Reese, a professional biker and my hobby is biking! I have been biking for last 12 years and I love using bikes while outing as well. Based on my experiences with the different type of bikes (mountain bikes, road bikes and hybrid bikes); I am sharing my opinion about various bikes so that a beginner can get started right away. Happy reading!